How to use FL Studio Explanation of New Time
I'm yosi, the administrator of Chillout with Beats.
NewTime is a feature added in FL Studio 20.6.
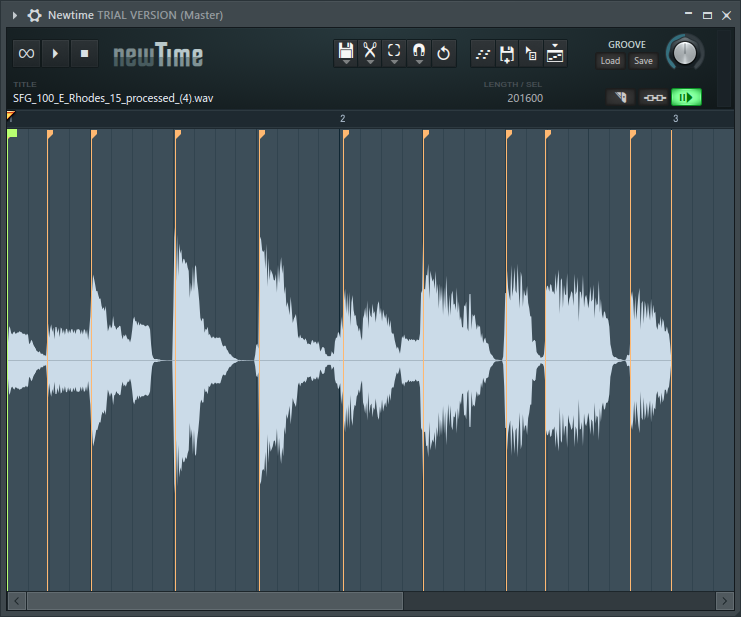
What is New Time is a function that allows you to adjust the timing while keeping the audio.
Unfortunately, this is a function that is normally installed in other DAWs.
Moreover, since it can be edited on the PlayList, which is usually called in FL Studio, it seems that FL Studio is still behind other DAWs when it comes to audio.
If you are good at English, please watch the video below.
(I will not do anything more than the content of the video this time)
How to use NewTime

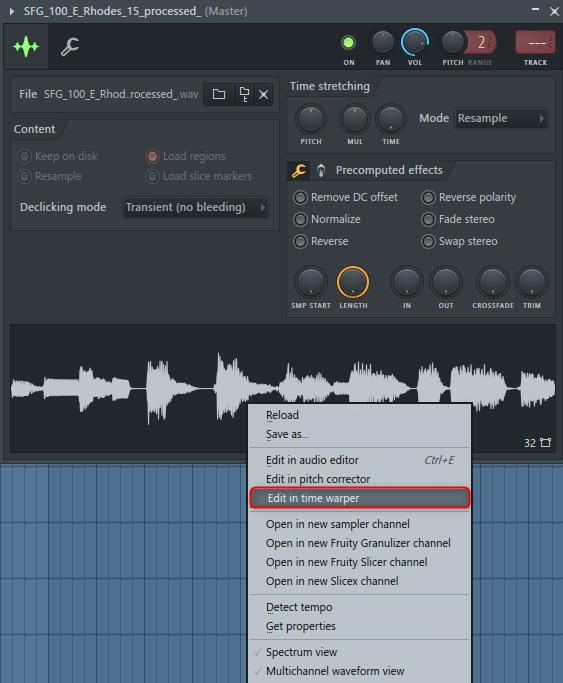
First of all, load the audio file and double-click AudioClip to open the properties.
Right-click on the audio waveform and click Edit in time warper.

And if you want to quantize Ctrl + q You can do it with.
Quantize is quantized with the grid set in Snap.

When dragging, it also snaps to the grid set by this Snap.
To add a marker, double-click or set it to cut mode. (( c Can be switched on and off with
When you have finished editing, delete the original audio clip from the Play List and click "Send to Playlist".
![]()
New Time manual Japanese translation
Time Warp Editing
- Downbeat markers - To set: To set: Right-click on an existing warp marker.Use the downbeat marker to determine the starting point of the bar and automatically place the warp marker at the beat boundaries found in the sample.Downbeat markers also automatically align to the starting point of the nearest bar when the sample is dragged or sent to FL Studio.
- Warp markers - To set: To set: Hold down (Shift) and click to add a warp marker or double-click where you want to add / remove markers.Warp markers are similar to Edison and Slice region markers, but dragging them time-stretches the sample data.
NOTE: To add a downbeat or warp marker where the marker does not currently exist, first add the warp marker and then change its type. - Grooves, Markers & Knob – Add or edit an existing warp marker (Ctrl + Alt + click) and then set the warp marker to set it to type Groove.Groove markers are similar to warp markers, but move in position according to the groove knob.You can set multiple markers and enter Groove. Learn more about Groove markers and Groove templates.For example, load a groove to quantize or shuffle an existing beat.
- Load (groove pattern) – Once the Groove Pattern is loaded, you can move the active Groove Markers with the Groove knob.A groove pattern is a set of (user-defined) positions on the beatgrid where slices (if any) are snapped to that position and slice markers move according to the groove knob.
- Save (groove pattern) – Saves the current Groove pattern to a file. Use Groove Patterns (Ctrl + Alt + Click) to create slice markers and set them for Groove.It's usually best to create a Groove pattern with a 1/16 beat audio loop, so you can work relative to the beat grid.Groove markers can be moved according to the groove knobs, for example to "shuffle" audio.
- Select multiple Markers / Regions Use – (Ctrl + click and drag) to select a marker or area. You can hold down (Ctrl) while clicking and dragging to select a non-contiguous area / marker while releasing the left mouse button.
- Delete multiple markers – Besides double-clicking and deleting a marker, you can also tap (delete) the entire marker (Ctrl + click and drag).
- Move markers - With time stretching: Place the mouse cursor anywhere in the center of the marker's top flag or vertical line, click and drag when the left and right arrows appear.
Without tine stretching: Double-click to remove the marker (Shift + click) and add a warp marker (change the type as needed). - Move regions – Click between the markers and drag.Hold down the Alt key to disable snapping.This will move the area and warp the sample data from side to side.
- Set BPM (F2) – Click the disk icon and select Edit Properties.Enter the desired BPM.
- Preview Scrubs – Click and drag the time ruler above the slice.
How to use FL Studio Summary of explanation of New Time
It's a feature that I finally got, but I don't think it's necessary to open another window.
To tell the truth, I hope it can be done on the PlayList.
I'm feeling patient now, hoping that this area will be integrated in the next major update.


![[Free] Explanation of arpeggiator VST tool “RandARP” 15 2020 02 05 20x40 31](https://chilloutwithbeats.com/wp-content/uploads/2020/02/2020-02-05_20h40_31.png)
Comment