How to create crisp sounds with Fruity Peak Controlle in FL Studio
The point is to use the Fruity Peak Controlle to increase or decrease the effect when the sound is loud.
I've been using it in a sound demo recently, and it's easy but effective, so if you don't know it, please try it.
Various applications are possible.
It's faster to listen to the sound than the words, so please listen to the video below.
Sound demo
I tried to apply it strongly so that the effect is easy to understand.
You can apply a saturation plug-in to your drums so that it only applies to the attack part instead of applying it all the time.
Gain match.
Saturation isFront DAWI tried using ".
The delta (difference only) is played at the end, so please listen to it.
The next method is for Lo-Fi applications where the pitch fluctuates greatly when the sound is loud.
The effect is a free "Pitch drift".
As for the piano, which I introduced yesterday,Thawney Practice Room Piano".
Setting method
This time"Front DAWI'll show you how to use the .
"Front DAW's 'Mojo' parameter with the 'Fruity peak controller'.
First, "Fruity peak controller" and "Front DAW” into the mixer.
The order should be "Fruity peak controller" first.

Change "Fruity peak controller" to "Front DAW" will be assigned to the parameters.
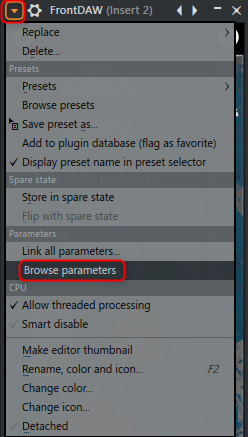
"Front DAW” and click “Browse parameters” from the upper left ▼
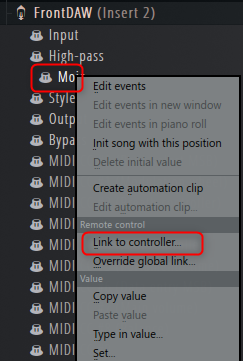
A list of parameters will be displayed in the browser, so right-click "Mojo" and click "Link to controller"
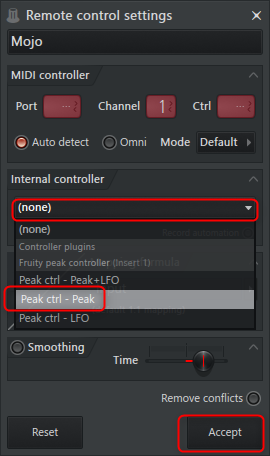
In "Remote control setteings", select "Peak ctrl – Peak" from the "Internal controller" pull-down and click "Accept"
Now you are ready.
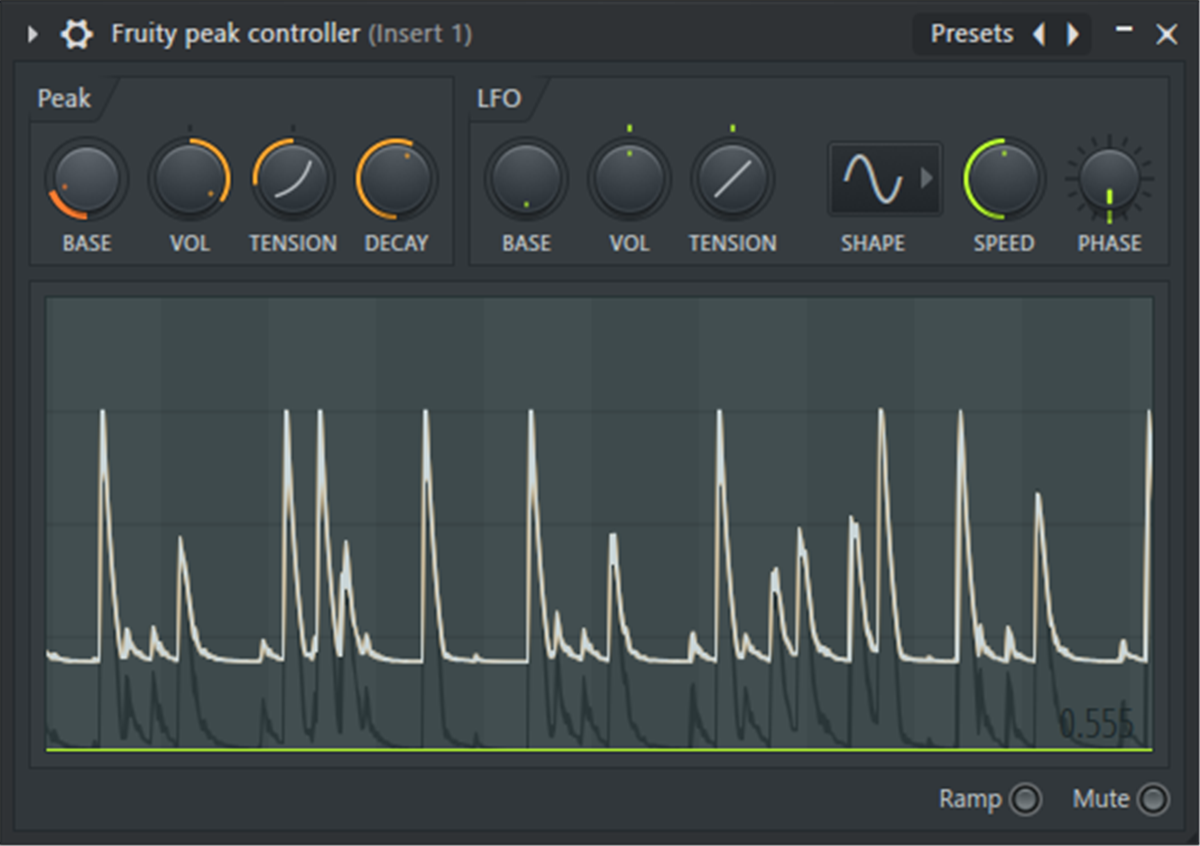
Open the "Fruity peak controller" and adjust the degree of effect.
It is the “Peak” part that is set.
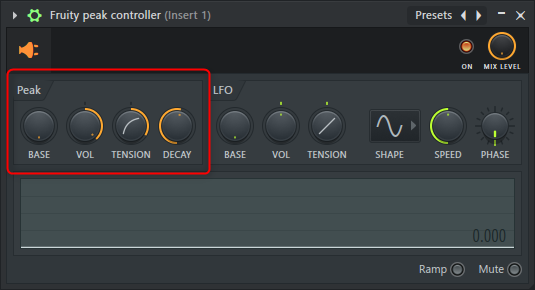
I will also put the Japanese about the manual.
- Base - the base or minimum value (offset) of the control output.
- Volume (VOL) - maximum value of the control output.Controls are bipolar with values from -200% (maximum left) to 200% (maximum right).If positive values are used, increasing the volume will increase the peak control output value.Negative volume makes the peak control output negative, creating a "ducking" effect that dips with each input peak.Must be set in conjunction with the Base level to create a "sidechain pumping" effect. Raise the Base and make the Volume negative.
- Tension – The shape of the attack and release curves (control graphics show the effect).Note: Most sounds have very short attacks, so you won't be able to see or hear the effect of this parameter.Most useful on the decay side of the envelope.
- DECAY – Time it takes to decay to the 'base' level.
First, adjust "VOL" and then "BASE" to adjust the general degree of application.
After that, use “DECAY” to adjust whether the movement is large or small, and “TENSION” to adjust the attack and release.
I made a video of the editing process.
Summary
With this method, you can aim for various effects by changing the plug-in or modulating parameter.
I tried it with a delay and it was pretty good.
(If you invert it, you can make the wet sound louder when the sound is small.)
You can really use "Fruity peak controller".
However, it has not been updated for a long time, so it would be great if you could expand the functions a little more.
![[Free] Introduction to Thawney Practice Room Piano, a room piano sound source that can be used with Decent Sampler 15 2023 02 02 02x29 06](https://chilloutwithbeats.com/wp-content/uploads/2023/02/2023-02-02_02h29_06.png)
![[Free] Introduction to RJS LoFi Nylon, a Lo-Fi nylon guitar sound source that can be used with Decent Sampler 16 2023 02 04 03x05 52](https://chilloutwithbeats.com/wp-content/uploads/2023/02/2023-02-04_03h05_52.png)
Comment
The videos were clear and very helpful!thank you!
Shorarou
Hello.
Thank you for visiting us again.