How to use FL Studio How to easily increase the tone of DirectWave for free XNUMX
I'm yosi, the maintainer of Chillout with Beats.
Continuing from the last time, this is a method to increase the tone of DirectWave.
This time, it's a little different from the purpose of increasing the tone.
(From VST that can be used with no limit for 〇 minutes or 〇 days without limit ... Self-restraint)
Click here for the previous article.
This time I will make it myself.
Even if you say that you made it yourself, you do not set up the Zone, but convert it from the existing VST.
By using this method, it is possible to play quite a lot of tones even on a low-spec PC by playing VST with a high CPU load from DirectWave.
However, since DirectWave is a Sampler, I am not good at reproducing sounds with movements such as LFOs.
Decide the sound source to convert
First of all, decide what sound source to use, but the one that meets the following conditions is good.
-High CPU load
-No modulation or delay effects are applied.
I think the most applicable synth is a Unison synth.
For example, such a sound is perfect.
Since Unison is forcibly maximized, the CPU load will increase to about 70% by itself.
If you have modulation, delay, or reverb, turn it off.
Before converting, check the folder where the DirectWave sounds are saved.
Find out where the sample is stored
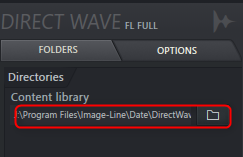
After launching "DirectWave", click "OPTION" on the right side.

"Content library" is the default content Path.
Check here and make a note or copy.
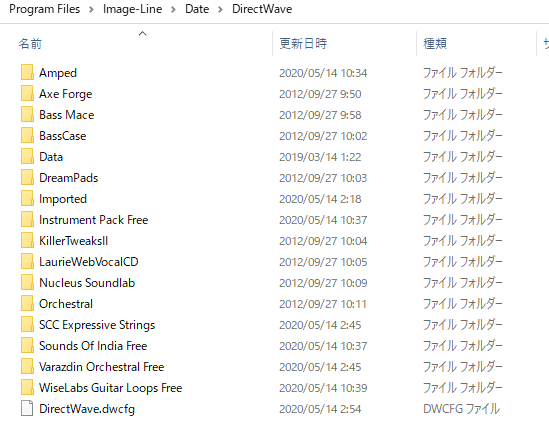
Delete the DirectWave opened to check the Path.
Convert VST to DirectWave
It's easy to do.
In this case, right-click on "UNION" in "Channel rack" and click "Create Direct Wave instrument".
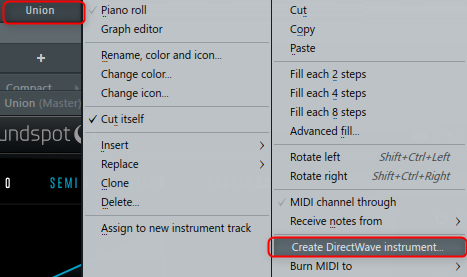
A dialog will appear, so save it in a suitable location.
Select the folder where the DirectWave sounds you checked earlier are saved.
If you used a preset name, it will be convenient to enter the synth name and preset later.
(To follow what you used if you want to change a little later)
Next, the following screen will be displayed.
Here you can decide how accurate the sampling should be.
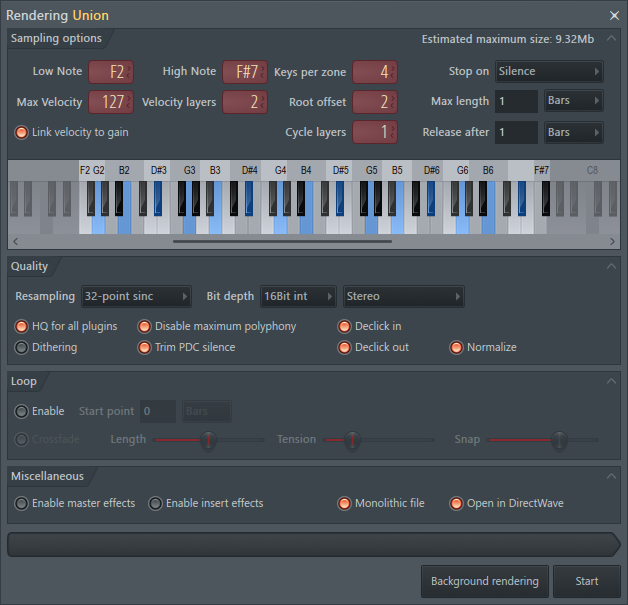
Function translation + some original commentary added
Low Note, High Note: The lowest (highest) sampling note.For example, when using treble, there is no point in setting the "Low Note" value low.Conversely, when using it as a Bass, "Low Note" should be set high and "High Note" should be set low.
Keys per zone: Width of the sample zone. You can create a "sample zone" by playing a sample across multiple keys.The width of the zone alternates between the gray and white parts of the preview keyboard. If set to 1, sampling will be performed with all keys. (Highest reproducibility, but requires capacity)
Stop On: Conditions to end sampling
- Max length – Sampling stops at the length sent.
- Silence – Sampling stops when the sound fades out to silence (-96dB).In this case, you can stop sampling before reaching Max length, but not after reaching Max length. Max length always takes precedence over maximum length.
Max Velocity: Set the velocity value to be sampled. (When Velocity Layers is XNUMX)
Velocity Layers: Set how many stages the velocity is divided into.If there is a change in timbre due to velocity, it should be set high. (Example: Live musical instrument system)
Root offset:Root offset – The number of notes above the first note in the range of each key zone from which the sample is taken.The root note is displayed in blue on the preview keyboard.
Link velocity to gain – Set DirectWave to change velocity to gain (volume).This does not affect the source sample data.
Cycle layers – Create a repeating sample layer with the same settings as the Round Robin style sample effect.In other words, when the tone or sound of the source changes with repeated notes, you can capture the change. NOTE: Before using this feature, let's experiment to see if the sound changes dramatically from repeat note to note. Each Cycle layers represents the perfect multiplication of patch sizes.Tap to test using the preview keyboard.
Max length – Total sample time.Set in seconds, bars, or beats.
Release after Release after – The amount of time the key is held during sampling.Set in seconds, bars, or time signature.
Resampling – Select resampling quality.This avoids aliasing on the channel sampler.
Bit depth – Select a 16-bit or 32-bit float. (As a result of trying, 32-bit is a little louder. Unless there is a special reason, 32-bit seems to be better)
Stereo mode – Select Stereo, Monaural Left Channel, Monaural Right Channel, or Monaural Merge.
HQ for all plugins -Set the high quality mode of the native FL Studio plug-ins (effects, instruments, sampler channels) used for rendering. The VST plug-in can also be rendered in HQ mode if the Wrapper setting "Notify Render Mode" is selected.
Disable maximum polyphony – Ignores the maximum polyphony setting in Miscellaneous Channel Settings, but not if the Monophonic option is selected.
Dithering – Apply 16- to 32-bit dithering to 16-bit .wav files. FL Studio uses a "shaped" dither algorithm that shifts most of the "his" of dithering above 10kHz.
Trim PDC delay – Removes sample start delay due to plugin latency. The PDC can add a delay to the mixer track, so this option determines whether to render his PDC's delay.If selected, PDCs added to the master mixer track will be removed from the beginning of the rendered .wav file.When deselected, the PDC remains as a short period of silence equal to the PDC setting of the source mixer track.
Declick in / Declick out – Use 20ms fades to prevent clicks to prevent sudden changes in sample levels if the start or end of the sample is not captured correctly.
normalize -Increase the amplitude of the waveform so that the largest sample is at 100% level.This is useful if you have'Link velocity to gain' turned on to create a single velocity layer.
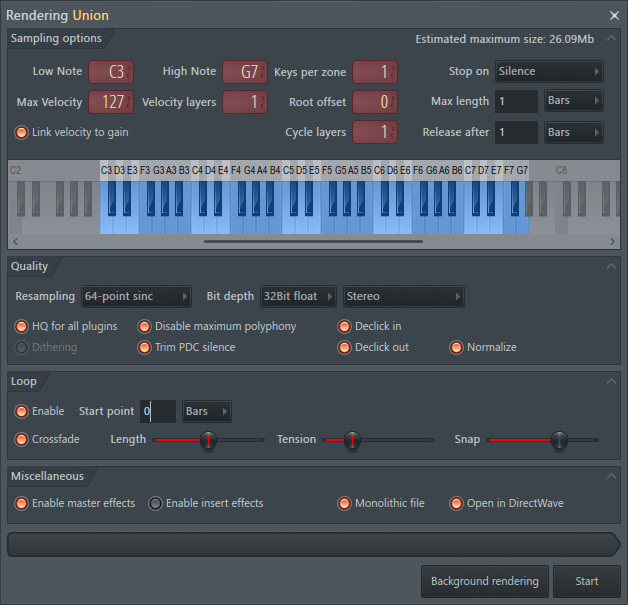
Recommended settings
I think it will change depending on the source material to be sampled, so please use it as a reference.
If one tone is about 26M, I think that even a low-spec PC will not be a load to that extent.
Warnings
-Please change "Low Note" and "High Note" according to the tone you use.
(This setting can be used for both base and lead to some extent)
-"Resamping" has nothing to do with the capacity, so it is set higher, but if it is better to have a shorter processing time, try changing it to 32-point etc.
-For live musical instruments, increase "Velocity Layers", "disable" "Loop", and increase "Max length".
How to use FL Studio How to easily increase the tone of DirectWave for free XNUMX Summary
To be honest, I like the VST conversion function of DirectWave.
This should be used well with a guy with a high CPU load.
Bounce is often used as a countermeasure against CPU load, but it is quite troublesome when making small changes.
With DirectWave, you can change it freely as it is still MIDId.
I came up with a few things, so I will verify it and write an article if it goes well.
![[Free] Decentsamples releases Box Violin Sustains & Swells 20 2020 05 17 02x05 47](https://chilloutwithbeats.com/wp-content/uploads/2020/05/2020-05-17_02h05_47.png)
Comment
Perhaps using the Create DirectWave instrument for MIDI Out could result in hard synth sampling like the Mac's Auto Sampler ...?
Sino
thank you for your comment.
Unfortunately, it seems that hardware cannot be done because it is sampling by rendering.
(I checked it for the time being)
It would be great if you could do it.
Thank you for checking!
disappointing…
No, maybe when you really comment!I thought ...
It seems that Logic supports sampling of synths, so I hope FL Studio will support it.
From now on, this is my expectation.