It is not an exaggeration to say that it is a professional laser specification, and you can finely adjust the timing of applying the side chain.
As far as I know, the side chain that can be set so finely is WavesfactoryTrackspacerAnd thisLaserI think it's just. (Please let me know if there is anything else)
And interestingly, these two plugins sidechain with different approaches.
TrackspacerFor the approach to frequencyLaserIs a timing approach.
Both are great and I think it's a good idea to separate the plugins used from time to time.
This is the introductionLaserI will explain how to use.
This article will be sent with the following contents.
・ How to use Sweetsonics Laser
・ Japanese translation of the manual
Overview of Sweetsonics Laser
Laser is a unique sidechain tool with accurate time domain control, designed to make sidechains more powerful and completely transparent. Laser will change the way you mix your music.
Unique Laser algorithm
The Laser draws a reduction envelope for transient signals, but it also recognizes continuous signals.You can easily create presets with one click and make subsequent adjustments.This algorithm is specifically designed to recognize transient signals.
How to use Sweetsonics Laser
It is a commentary in FL Studio that you are familiar with every time.
Prerequisites
As a prerequisite, start with Kick's paraout and Bass tracks assigned to different mixers.
It is assumed that Bass is assigned to mixer XNUMX and Kick is assigned to mixer XNUMX.
Set the side chain
Route the Mixer XNUMX Kick to the Mixer XNUMX Bass sidechain input.
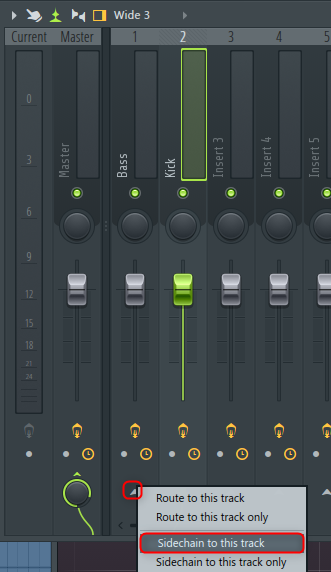
To do this, with Mixer XNUMX selected, right-click on Mixer XNUMX's ▼ and click "Sidechain to this track".
Then open "Laser".
From the gear icon, set "2. Sidechain" of "Processing" to "1".
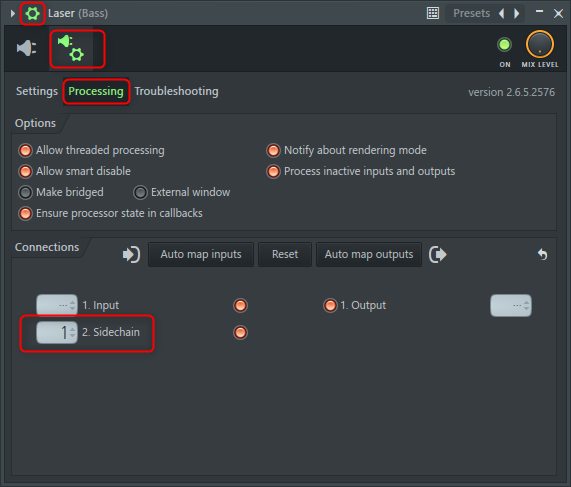
Now you are ready to go.
Sweetsonics Laser settings
It's pretty easy to set up.
After playing first, click the triangle icon in the red frame in the figure below.
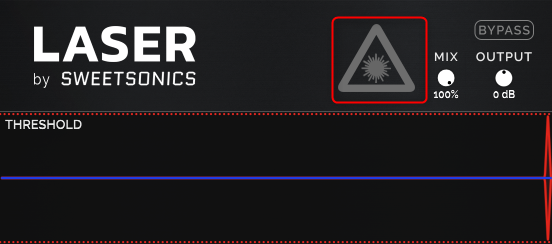
This will give you a value that matches your input, so it feels like you're making fine adjustments from here.
I prepared a video.
Be careful of the volume as it sounds painful to your ears.
This fits pretty well.
After that, we will adjust how much the side chain effect is applied.
Use "OFFSET" to adjust the front and back.
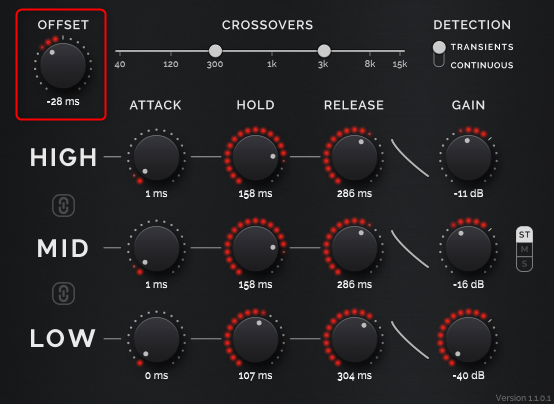
After that, adjust "ATTACK", "HOLD", "RELASE", and "GAIN" while listening to the sound and looking at the oscilloscope.
I'm using FX23'sPSYSCOPE PRO (Win only).
Free versionThere is also, so please try the free version first.
I also write articles on how to use both the free version and the paid version.
If you disable the band link, you can set each band separately.
Japanese translation of the manual
Although it is a machine translation, I think it is easier to read than PDF, so I will post it.
I mean, the characters in the manual are images, so they can't be translated normally.
I tried my best to get the characters and made them into Japanese.
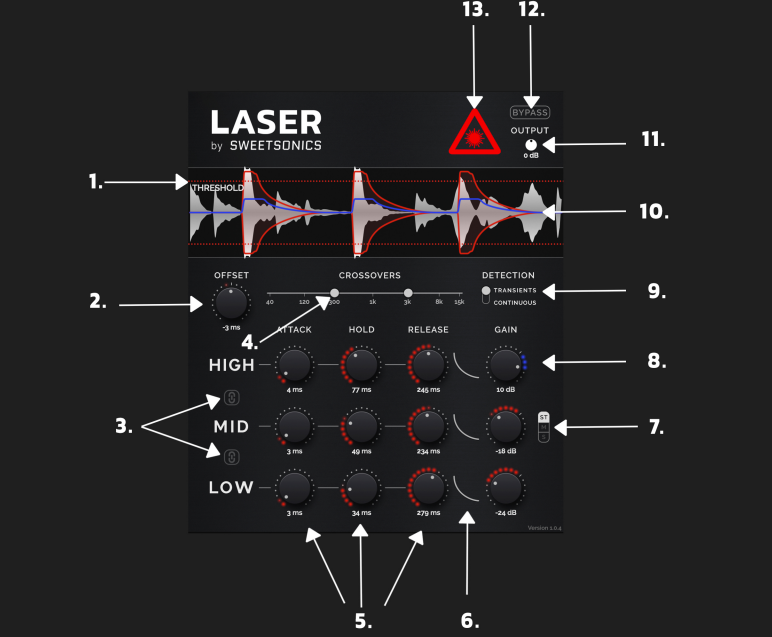
1.Threshold
Detects signals that have reached the threshold level
(In both transient and continuous modes)
2.Offset
Offset moves the reduction and boost envelopes along the time axis.For example, an offset of -10 ms means that the sidechain signal is detected 10 ms before it actually hits.
3.Band links
With bandlink enabled, the Laser can be used in 3-band, 2-band, and 1-band modes. You can enable / disable only one link with Alt / Shift + click.When all bands are linked, the parameter will be reset to the value you first touched.
4. Crossovers
Set the crossover frequency. Laser is a 3-band tool with a unique and musical cut and boost curve.Adjust the low mid crossover at the point on the left and the mid high crossover at the point on the right.
5.Time domain controls
Time domain control: attack, hold, release
6.Release curve
You can adjust the release curve by changing the shape of the line.
7.Stereo/Mid/Side-modes
This button is available on stereo channels.Processing in stereo mode, mid mode, and side mode is possible.
8. Band gain
Band gain.The maximum reduction is -40db.The maximum boost is + 20db.
9. Detection mode
Detection mode.In transient mode, only the transients of the input signal are picked up.When the signal falls below the threshold, the next transient is detected.Transient mode allows for very fast reduction and boost curves.Continuous mode works like a regular compressor.
10. Sidechain input & Reduction / Boost curves
Graphical display of sidechain signals and reduction & boost curves.The reduction curve is displayed in red and the boost curve is displayed in blue.If the sidechain input is not configured, the Laser will capture the signal from its channel. The Laser can also be used as a multiband transient shaper without sidechain routing.
11.Output trim
Output trim
12.Internal bypass
Internal bypass
13.Laser button
The laser button activates the laser algorithm for a few seconds.This button is listening to the sidechain signal being input and can be disabled by pressing the button again while listening.
The Laser algorithm is enabled only when the signal is detected (played) and the Laser button is red.
Laser algo listens to the input signal and draws the reverse reduction curve for the input signal. Laser algo is specifically designed to detect transient envelopes, but it can also detect continuous signals by giving it a start preset.
![[Free] How to use multiscope plug-in FX23 Psyscope free 2 2020 09 22 17x46 14](https://chilloutwithbeats.com/wp-content/uploads/2020/09/2020-09-22_17h46_14-320x180.png)
Comment
I bought this after seeing this article
Automatic adjustment of gain reduction curve, multi-band, offset support.
Most of what I wanted is packed and it's the best w
This system has always been supported by using Volume Shaper with MIDI Trigger.
The offset can be pushed with the DAW function using a ghost kick, but I didn't know the comp that can clean the multi-band and reduction curve, so I thought the Volume Shaper was the best.
You can solve all this.Good to know!
I couldn't say that I could adjust the multi-band while looking at the waveform if I forced it. Because VolumeShaper can be done.
It was introduced as a transient plug-in on other sites, so I was able to go through it. Thank you very much! \ (^ O ^) /
As an aside, my joint pain has recovered a lot by using a stronger painkiller.
However, I haven't been able to type for a long time or at high speed yet, so I'm thinking of spending some time rehabilitating with DTM.
Thanks to that, the side chain progresses b
Thank you for your purchase!
It was good!
Perhaps many people are unaware of the value of this plugin.
Offset is quite annoying, isn't it?
It's really nice to be able to easily adjust the offset.
I was finally surprised at the demo recently.
I was relieved that my joint pain had recovered.
Please enjoy the steady DTM rehabilitation without overdoing it.