How to use Venomode Phrasebox ② (Parameter explanation)
ContinuedVenomode PhraseboxThis is an article on how to use.
Click here for the previous article.
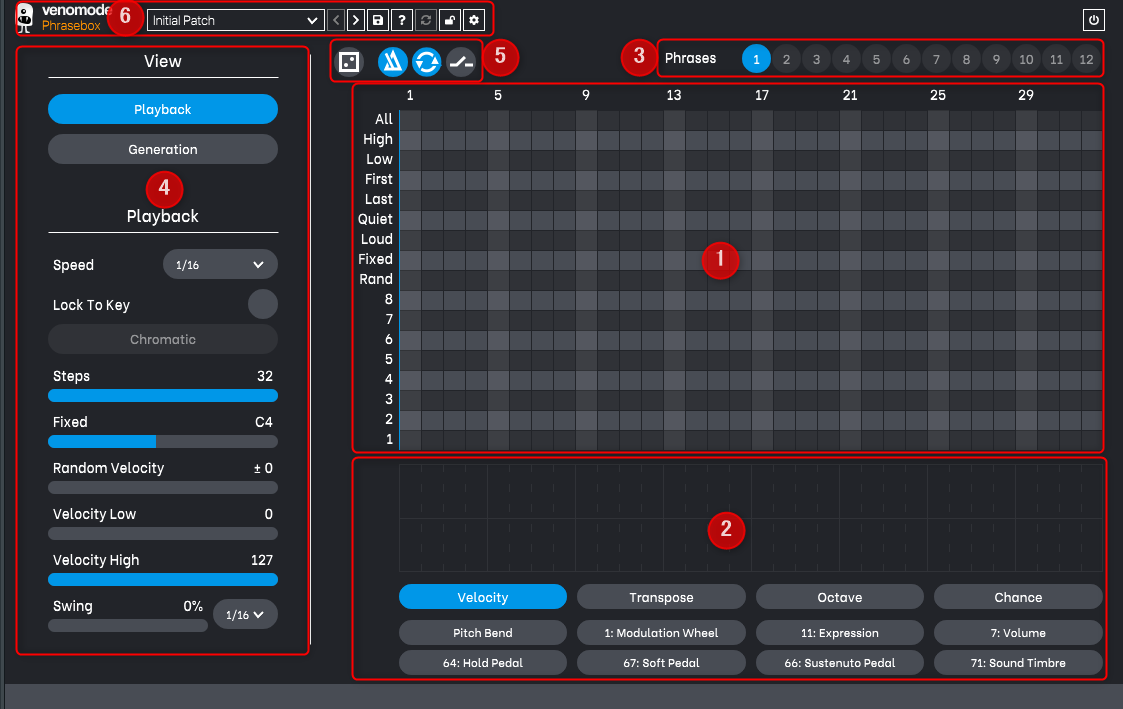
Parameter explanation of Venomode Phrasebox
① Piano roll
② Note modify and controller envelope
③ Fraise
④ Main control
⑤ Option
⑥ Top bar
This time, I will explain ① in detail.
① Piano roll
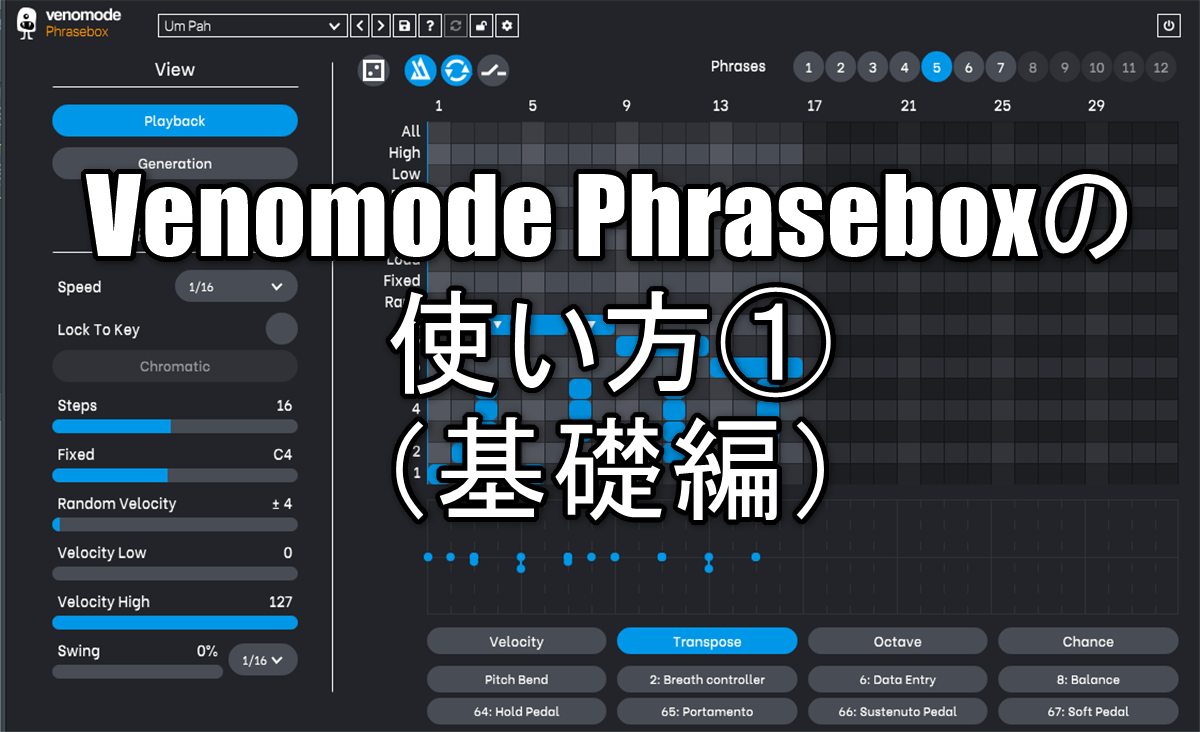
The piano roll is where you control the patterns that the arpeggiator is playing.You can add notes by clicking and dragging them to the desired length.You can move the note by dragging the note, or resize it by dragging the left and right edges of the note.You can disable snapping by holding down the shift key while dragging.Right click to delete the note.You can add a note to your selection by holding down Shift and clicking on the note.You can drag the box selection over multiple notes by holding down shift and dragging an empty area.
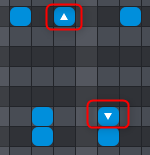
The darker the color of the note, the lower the velocity, and the lower the chance, the higher the transparency.Up or down arrows indicate the transposition applied to the note and its relative direction to the base note.In such cases, you can change the scale in this way.
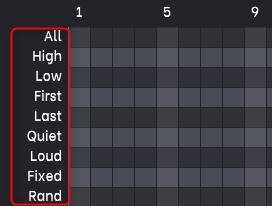
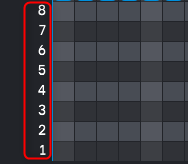
Each line specifies which of the entered notes to play. The numbers from 1 to 8 represent the lowest eight notes, with 8 being the lowest note.The special note sequence above it is selected from MIDI input based on specific rules.
This is an explanation of each parameter on the left side (top) of the piano roll.
ALL: ALL:Note = Play all notes as chords
The "ALL" note means all the code.
High, Low:"High" and "Low" play the highest and lowest notes in the chord
"High" means the top of the code, and "Low" means the top of the code.
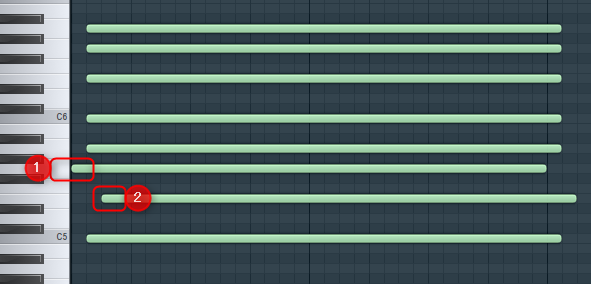
First, Last:"First" and "Last" Play the latest note first and the oldest note last.
"First" and "Last" are chord positions, "First" plays the front MIDI note, and "Last" plays the last MIDI note.
The following has changed the order in which MIDI sounds for easy understanding.
① is "First" and ② is "Last".
Quiet, Loud: "Quiet" and "Loud" are played by velocity with
"Quiet" plays notes with the lowest velocity and "Loud" plays the notes with the highest velocity.
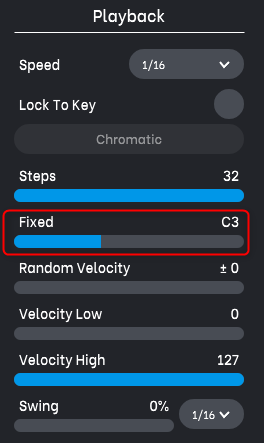
Fixed play: Fixed play:Play the sound set by the slider in the playback section
Regardless of the chord, the note set in "Fixed" of "Playback" on the left side will sound.
Random:Random plays random notes from the input MIDI
One note from the chord will play at random.
This is an explanation of each parameter on the left side (bottom) of the piano roll.
This number can specify which note from the 1st to the 8th of the chord to play.
Of course, there aren't enough chords in the chord.
② Note modify and controller envelope
Below the piano roll is the note modifier and controller envelope.Select the button here to display the corresponding window.The Velocity, Transpose, Octave, and Chance windows show vertical markers for each note.You can drag these points to adjust the corresponding values.The velocity can be set in the range of 1 to 127, the transpose can be set up and down by 24 semitones (2 octaves), and the octave can be set in the range of -4 to 4.The chance value determines the probability that the note will be played.When set to full (100%), all notes play as expected, and when set to minimum (1%), the notes play an average of once in 100 times.The chance value is calculated during playback, so if you set a value other than 1%, the playback will be different each time.
Top XNUMX buttons
First of all, the upper four explanations.
There is no detailed description in this area, so the main explanation is as if you used it.
Velocity: Velocity can be adjusted.The sound source must be compatible or the Velosity setting must be reflected.
The effect is as follows.
I tried to lower the velocity only for the "All" note.
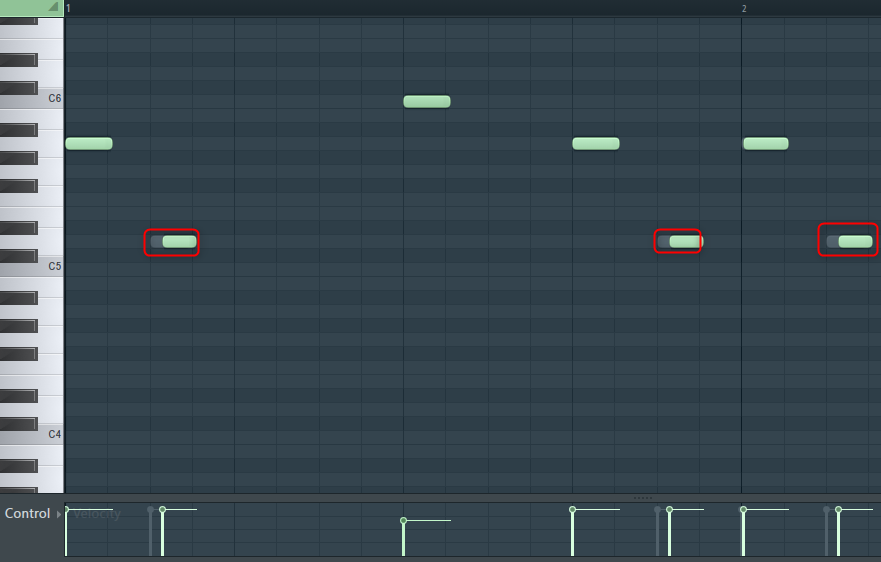
Transpose: You can even raise or lower the pitch in increments of + -24 semitones.
▼ ▲ marks will be attached to the notes where you have set them.
This is quite difficult to use.
+ -5 degrees is easy to use, but it can still be dissonant in some cases.
I think it's possible to use it in "Rand" and repeat "Burn to MIDI" until a good result is obtained. (Or edit after exporting)
In the video, "Rand" is multiplied by "-5" "T transpose" in three places.
(As you can see, there are some dissonant sounds, but sometimes there is a sound like this!)
Octave: Can be moved up or down an octave within the range of + -4.
It is easier to use than "T transpose".
In the video, "Rand" in the latter half sounds one octave higher.
Luck: You can set the probability of ringing the note.The default is 100%.
If you set it to 50%, you will hear an average of once every two times.
You can use this function to make the rhythm random.
You can get a good effect by applying Delay with a low probability.
"Chance" is set low in the first half of the video, and the default is 100% in the second half.
(If you apply Delay, the first half will be sharper and easier to hear.)
XNUMX buttons in the middle and bottom
The eight buttons at the bottom of the suspend and lower rows can set the envelope for MIDI CC.
Only "Pitch" is fixed, and the other XNUMX can be assigned by right-clicking freely on MIDI CC.
Pitch is pretty good and you can easily do the following things.
(Pitch is not set in the first half, Pitch is changed using the envelope in the second half)
Other CCs can be easily set with a soft synth equipped with a MIDI Learn function, and any parameter can be easily moved with an envelope.
For example, in the case of Vital, you can assign MIDI CC by right-clicking on the parameter and clicking "Learn MIDI Assignment".
I also prepared a video.
③ Fraise
The 12 phrase buttons are variations of the saved sequence.You can switch phrases with the click of a button, or you can automate it in your DAW.To automate phrase changes, Phrasebox exposes a parameter called “Phrase” that can be manipulated directly from your DAW.When you select a phrase, a new note and controller envelope will be used.Other values such as controller number, number of steps, and playback speed remain constant. You can duplicate a phrase by dragging and dropping one phrase onto another.
I don't think it's necessary to explain in particular, but I will explain some functions that are not mentioned in the manual.
Copy of phrase
There are two ways.
One is drag and drop, as explained above.
The second is "Copy" from the right click, select another "Phrase", and then "Paste Phrase".
Delete phrase
To delete a phrase, right-click on the "Phrase" number and select "Delete".
I also prepared a video.
④ Main control-Playback
It's quite heavy, so I'll divide it into two parts.
(I will put it together at a later date)
The sidebar has various controls for changing playback and generation.The two buttons labeled “Playback” and “Generation” at the top toggle between playback and generation controls.
4a. Playback section
The playback section sets how Phrasebox plays the phrase.
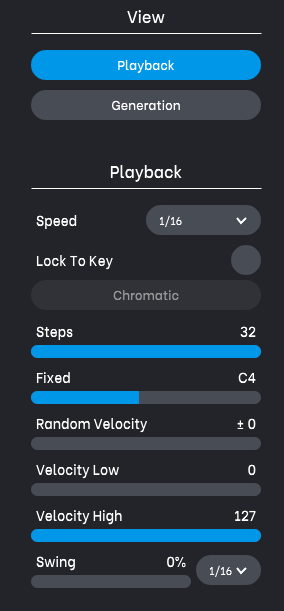
The playback speed value selects how fast the playback speed of the sequence should be relative to the host tempo.For example, if the playback speed is 1/16, each step of the piano roll will be 1/16 length (semi-quaver).
The Lock To Key option ensures that all notes are playing with the correct key.When this option is enabled, clicking the keybox will transpose the output to the key selected from the menu.Not only can you mash your keyboard for great results, but transposed note patterns will always work.
For example, if you use the transpose option on a note, you may find that the MIDI input is off the key.For example, suppose your phrase is playing a trill with consecutive notes, and all other notes are transposed up one note.If your song plays the E note in C major, the trill will work (one semitone above E is F), but if you play it on the C note, the trill will be off the key (C). The next semitone above is C #, not the C key).So the Lock to key option rounds C # to D to fit the scale.
By design, the lock-to-key feature attempts to scale up before it goes down, so you're sure how this feature works.In the trill example above, if you want to transpose down instead of up, you want to transpose two semitones down instead of one. When playing an E note, transposing it at 1 results in a D #, which tries to round to E. Moving down with a 2 guarantees moving down one note in the scale.
If you have the lock-to-key enabled when you load the preset, the new phrase will always match your song, as it will remain enabled with the selected key.If you have disabled locking when you load the preset, load the keys and enablements stored in the preset.If you want to create your own presets, it's a good idea to turn off the lock-to-key feature before saving.All factory presets have lock disabled, so you can set keys and browse presets freely without changing the keys.
Steps – The number of steps in the piano roll to play.For example, if you set 1 steps at a playback speed of 16/16, 4/4 will play one measure. Fixed – A fixed MIDI note used for the “Fixed” line of the Piano Roll.Random Velocity – A random velocity value that is added or subtracted from each note during playback.For example, if ± 1, notes with an original velocity of 10 will play in the 100-90 range.This is great for adding dynamic variations to playback. Velocity Low and Velocity High – Used to remap the velocity range from 110 to any Low and High.The value is scaled within this range.
May be higher in the bass than in the treble.This has the effect of reversing velocities. Swing – Adds a swing to the playback.
Playback
From "Playback".
Speed: The speed value selects how fast the sequence will play relative to the host tempo.For example, if the playback speed is 1/16, each step of the piano roll will be 1/16 length (semi-quaver).
Basically it is 1/16, but 1/8 is also quite good.
Lock To KeyYou can use the: Lock To Key option to ensure that all notes play with the correct key.When this option is enabled, clicking the keybox will transpose the output to the key selected from the menu.Not only does this mean you can mash your keyboard for great results, but it also means that transposed note patterns will always work.
It takes some trial and error, but you can make it sound natural by matching it with the loop key.
In the video below, I tried to match the loop of the key Dmin.
Steps: Number of steps – The number of steps of the piano roll to play.For example, if you set 1 steps at a playback speed of 16/16, 4/4 will be one measure.
The atmosphere changes quite a bit just by adjusting the number of steps.
Fixed – A fixed MIDI note used for the “Fixed” line of the piano roll.
This is a MIDI note that sounds with Fixed.
Random velocity: A random velocity value that is added or subtracted from each note during playback.For example, if ± 10, notes with an original velocity of 100 will play in the 90-110 range.This is great for adding a little dynamic variation to your playback.
You can randomly set the velocity value with +-.
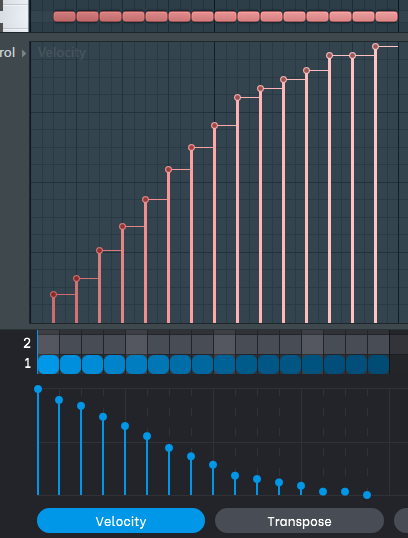
Velocity Low, Velocity High: Velocity Low and Velocity High are used to remap the velocity range from 1 to 127, with Low and High set.The value is scaled within this range, and the bass can be higher than the treble.This has the effect of reversing the velocity, making quieter sounds louder.
I made the following settings.
The result of Burn to MIDI is as follows.
(Scaled to the original velocity value)
Swing: Add a swing to playback
This is a common swing function.
The result of multiplying by 30% is as follows.
When you ring it, it looks like this.
④ Main control-Generation
This is an explanation of "Generation".
"Generation" is a randomizer option.
It's like you can make various phrases just by pressing a random button.
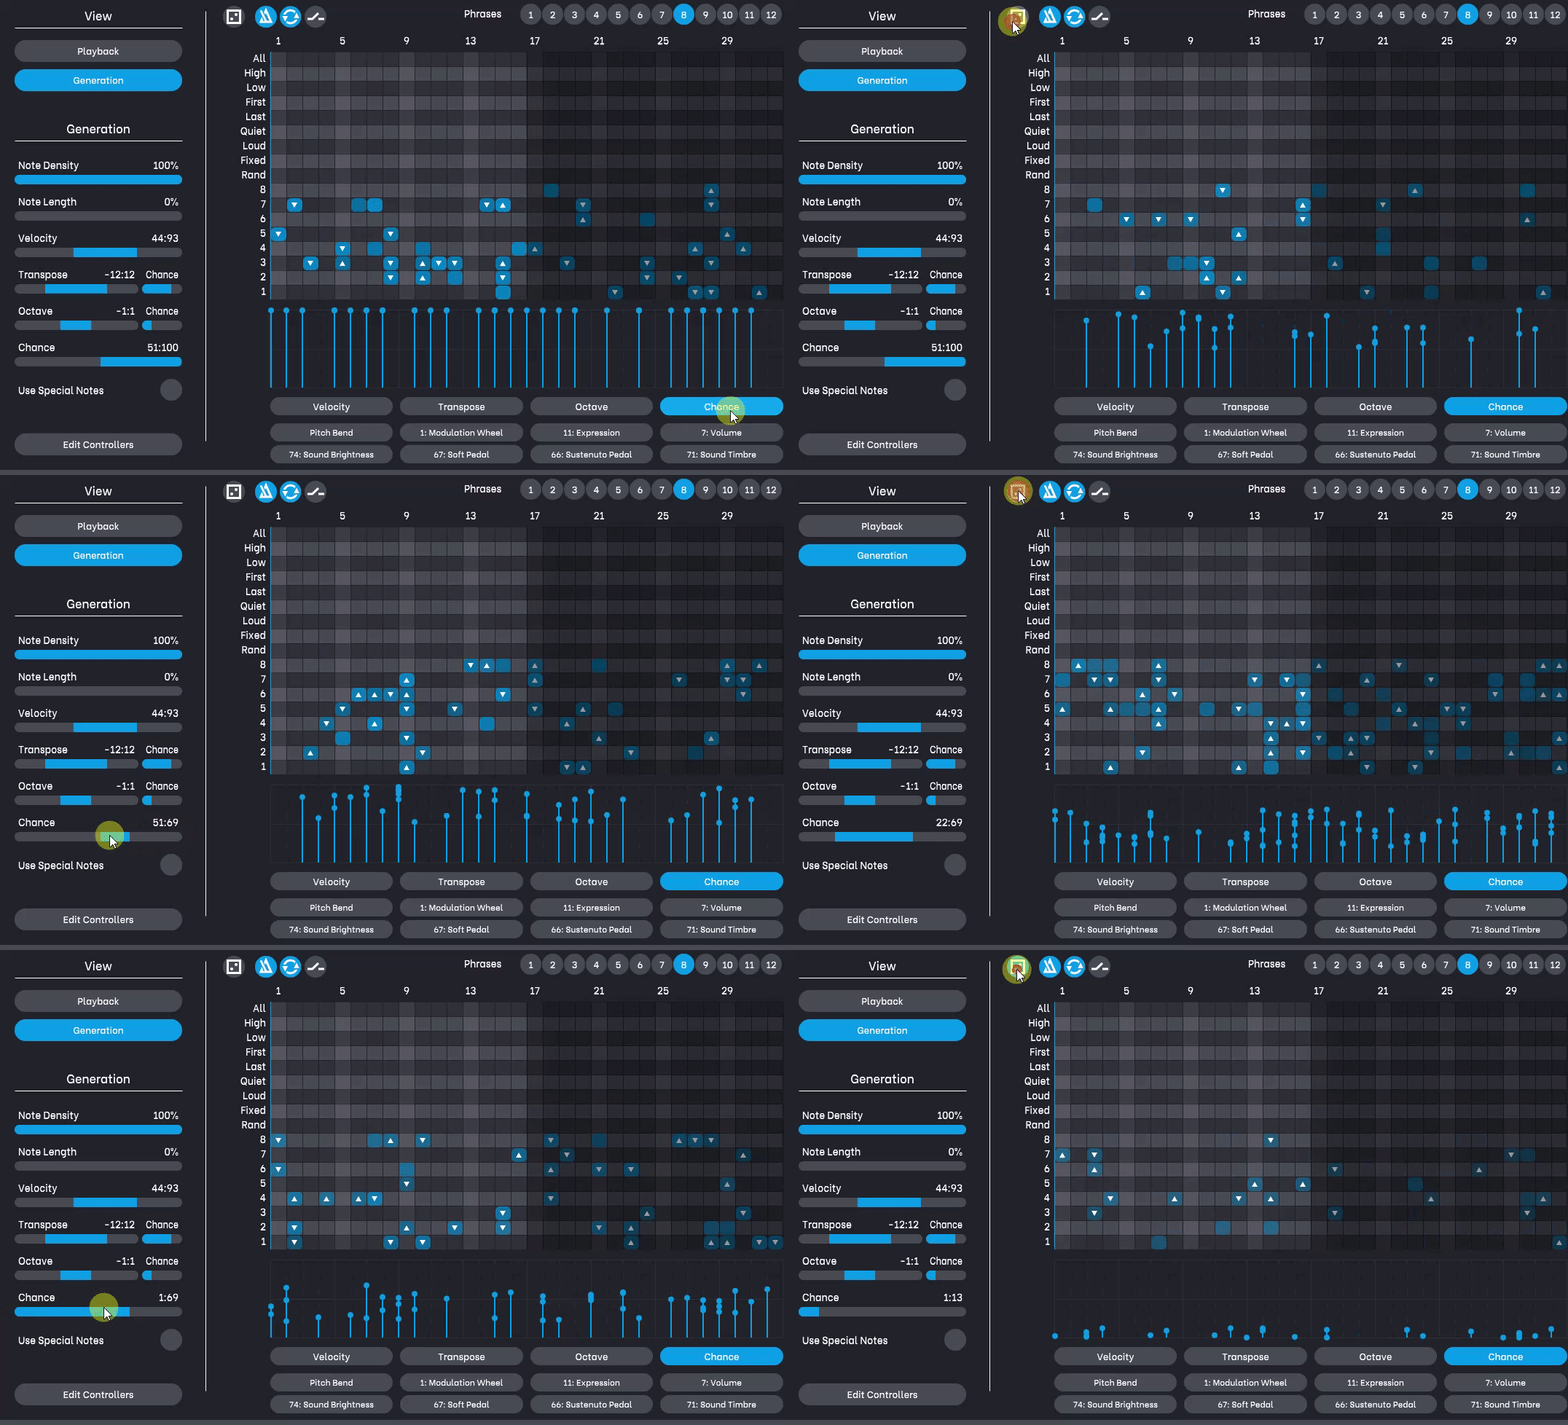
The generation window gives you options on how the randomizer works.
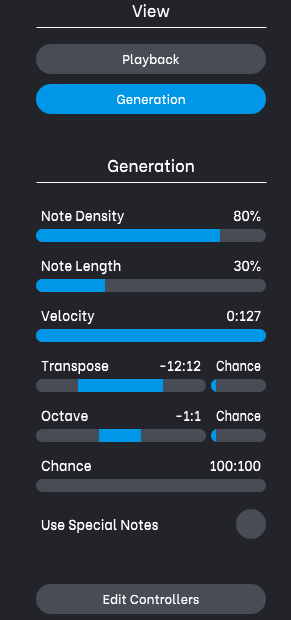
Note Density – The amount of notes generated.The higher the value, the more notes will be generated.Note length – Specifies the note length.Velocity – A range of velocity values.You can adjust the start and end range by dragging from both ends of the blue bar.Transpose – A range of transpose values.You can adjust the start and end range by dragging from both ends of the blue bar.The chance slider adjusts the probability that the note will be transposed.At full, all notes are transposed, with a minimum 1/100 chance of being transposed. Octave – A range of octave values.You can adjust the start and end range by dragging from both ends of the blue bar.The chance slider adjusts the probability that a note will be transposed an octave.At full, all notes are transposed by one octave, and at a minimum, the probability of being transposed is about 1/1.Chance – The range of chance values.You can adjust the start and end range by dragging from both ends of the blue bar.Use Special Notes – When selected, the Piano Roll notes will use all notes, including special notes (loud, quiet, etc.).When disabled, only notes 1-100 will be created.
Click the Edit Controller button to see the controller generation options.
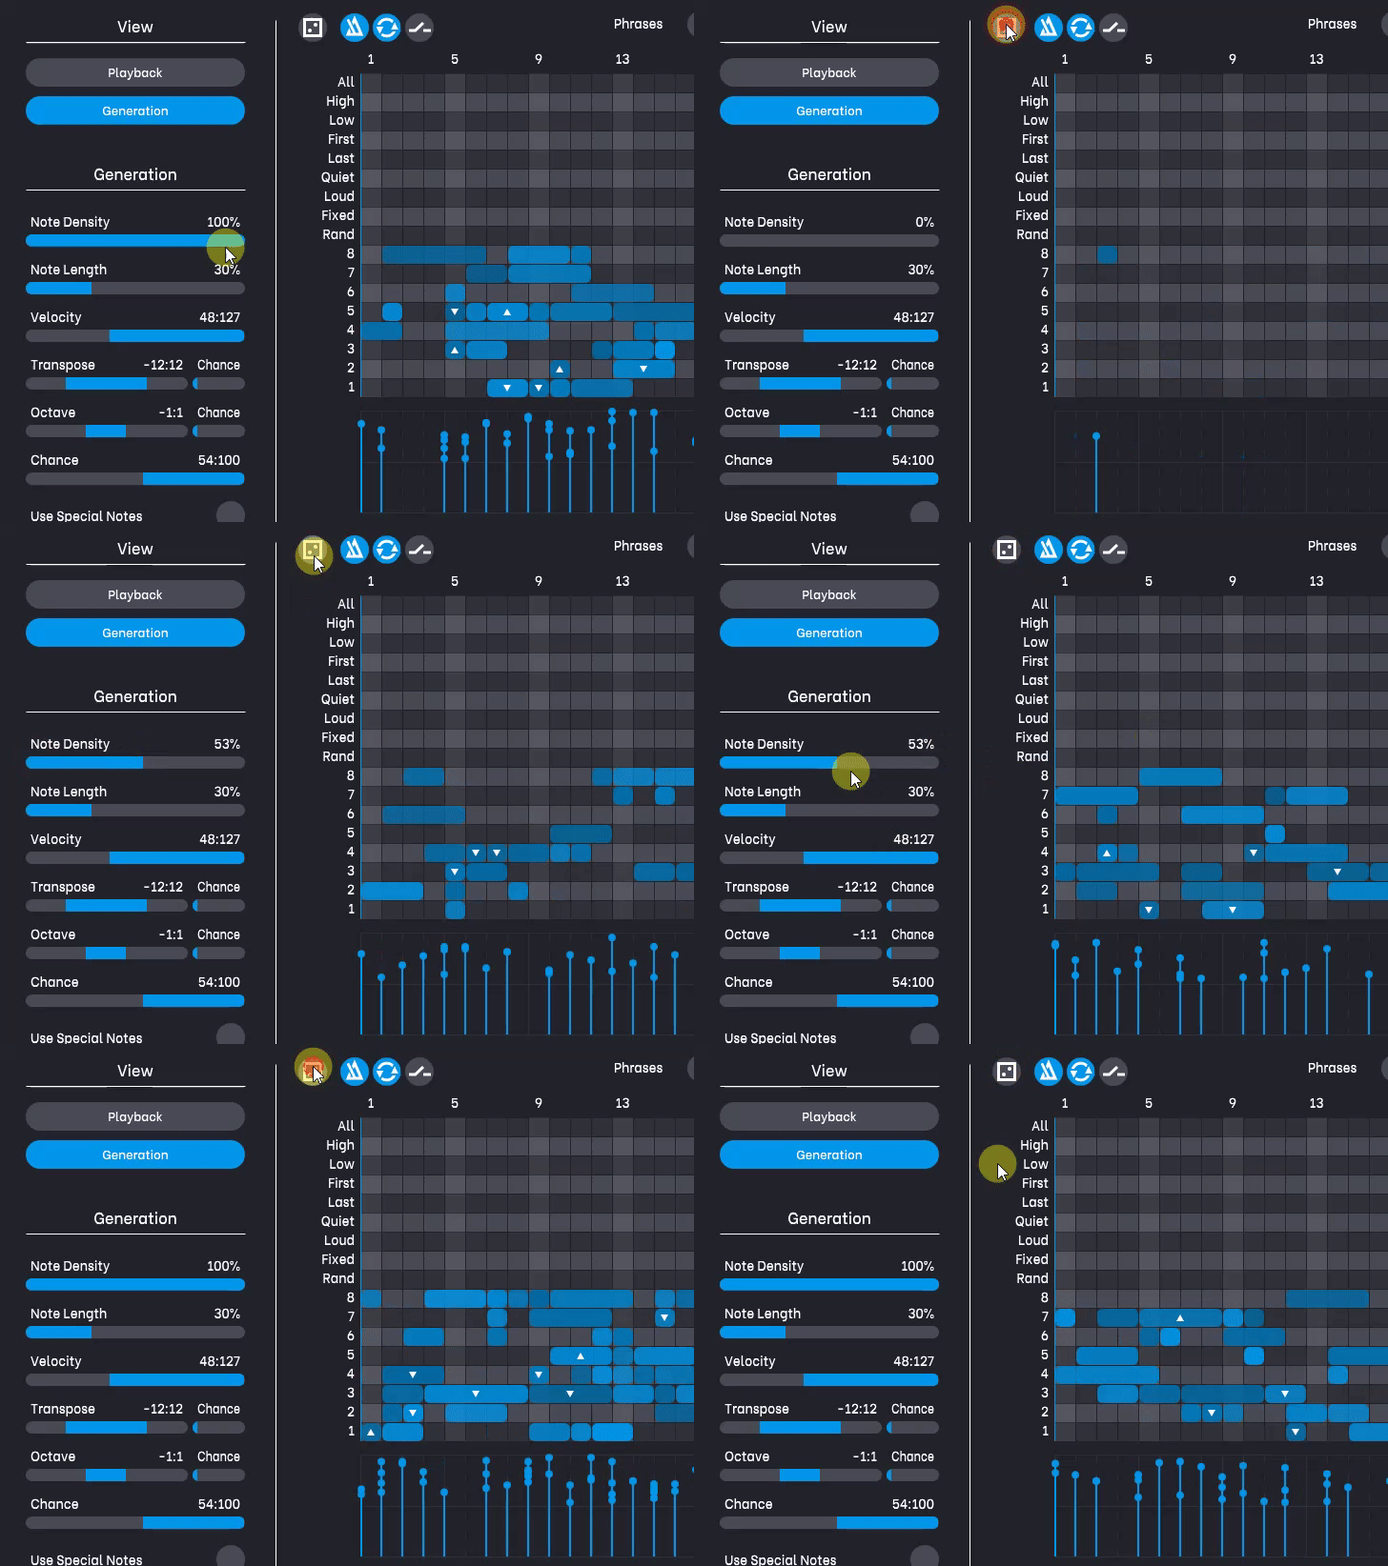
Note Density: Note Density:The amount of notes generated.The higher the value, the more notes will be generated.
Random elements are quite strong, and even 100% may not generate many notes.
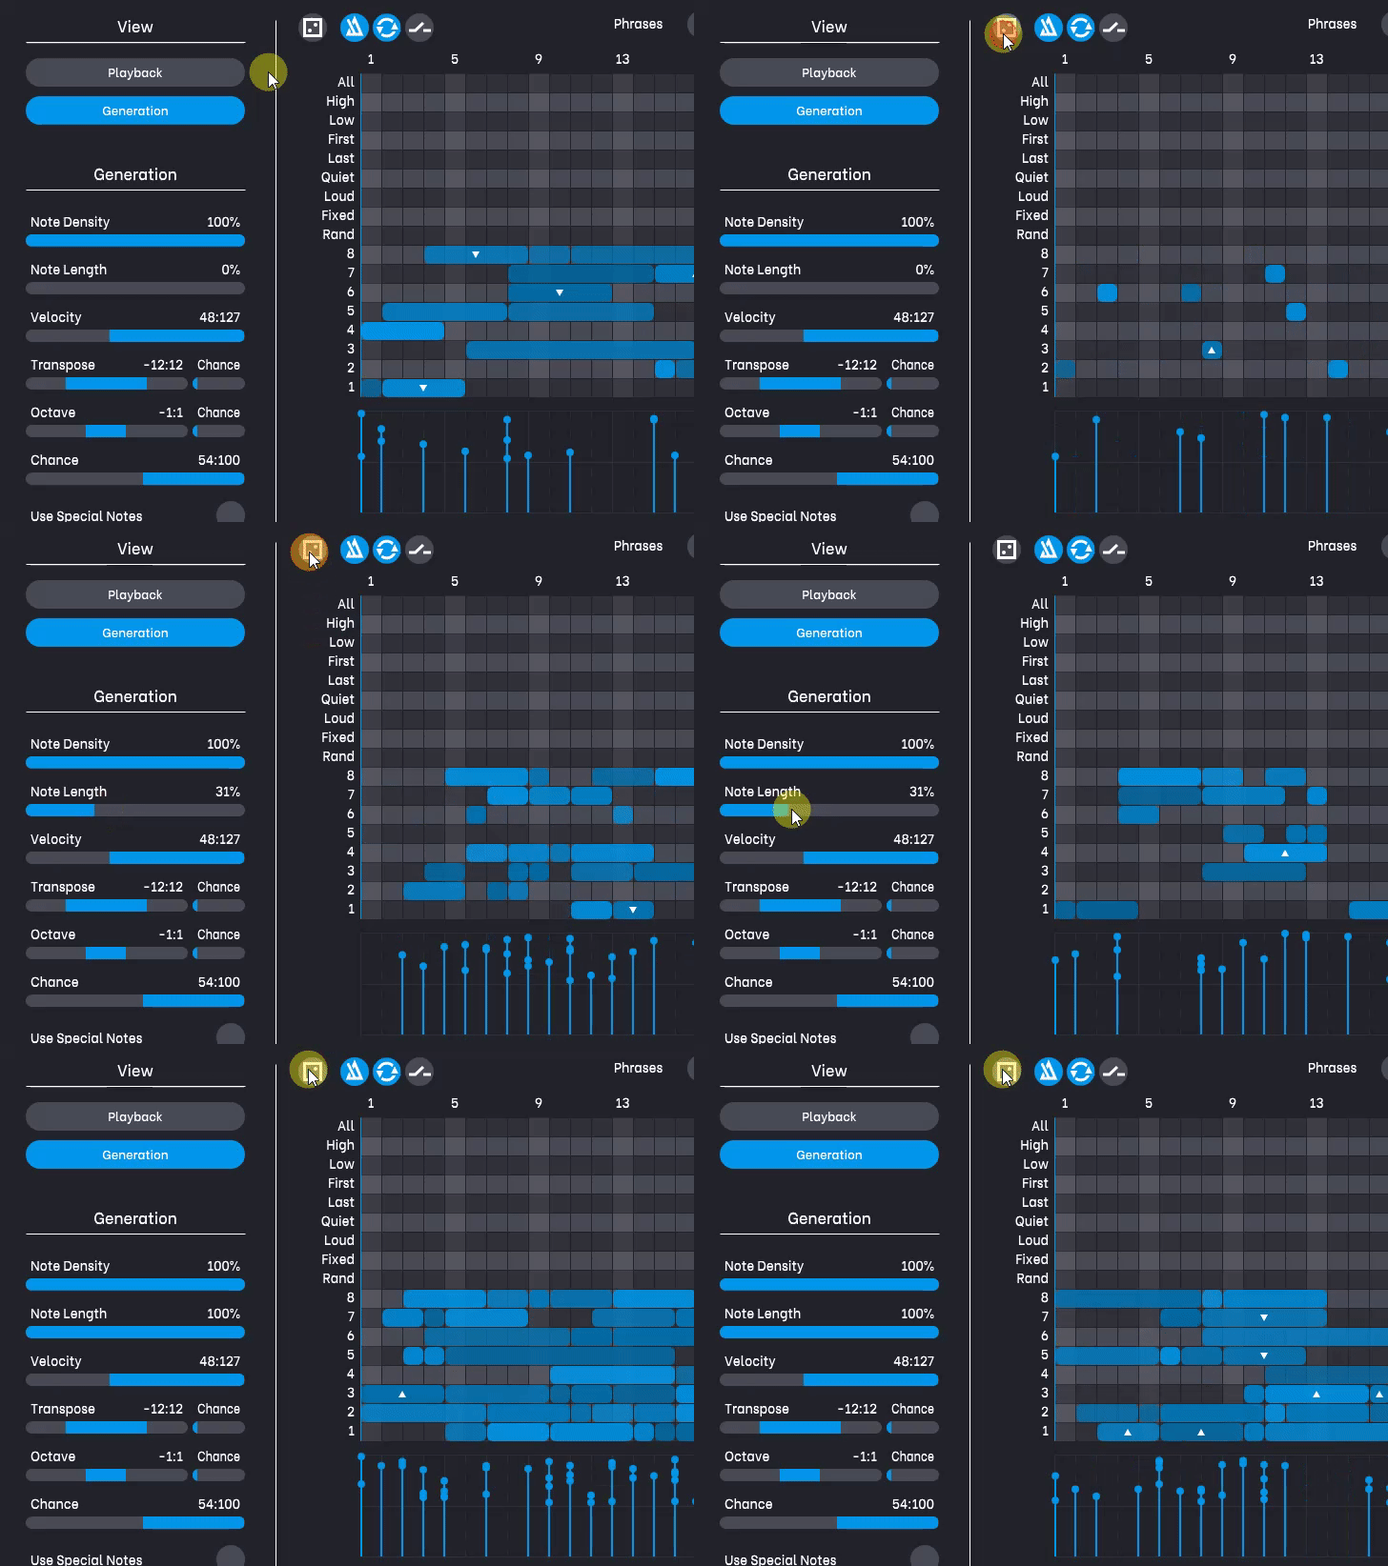
Note Length: Note Length: As for the note length, the higher the value, the longer the note.
If it is set to 0%, it will be the minimum unit.
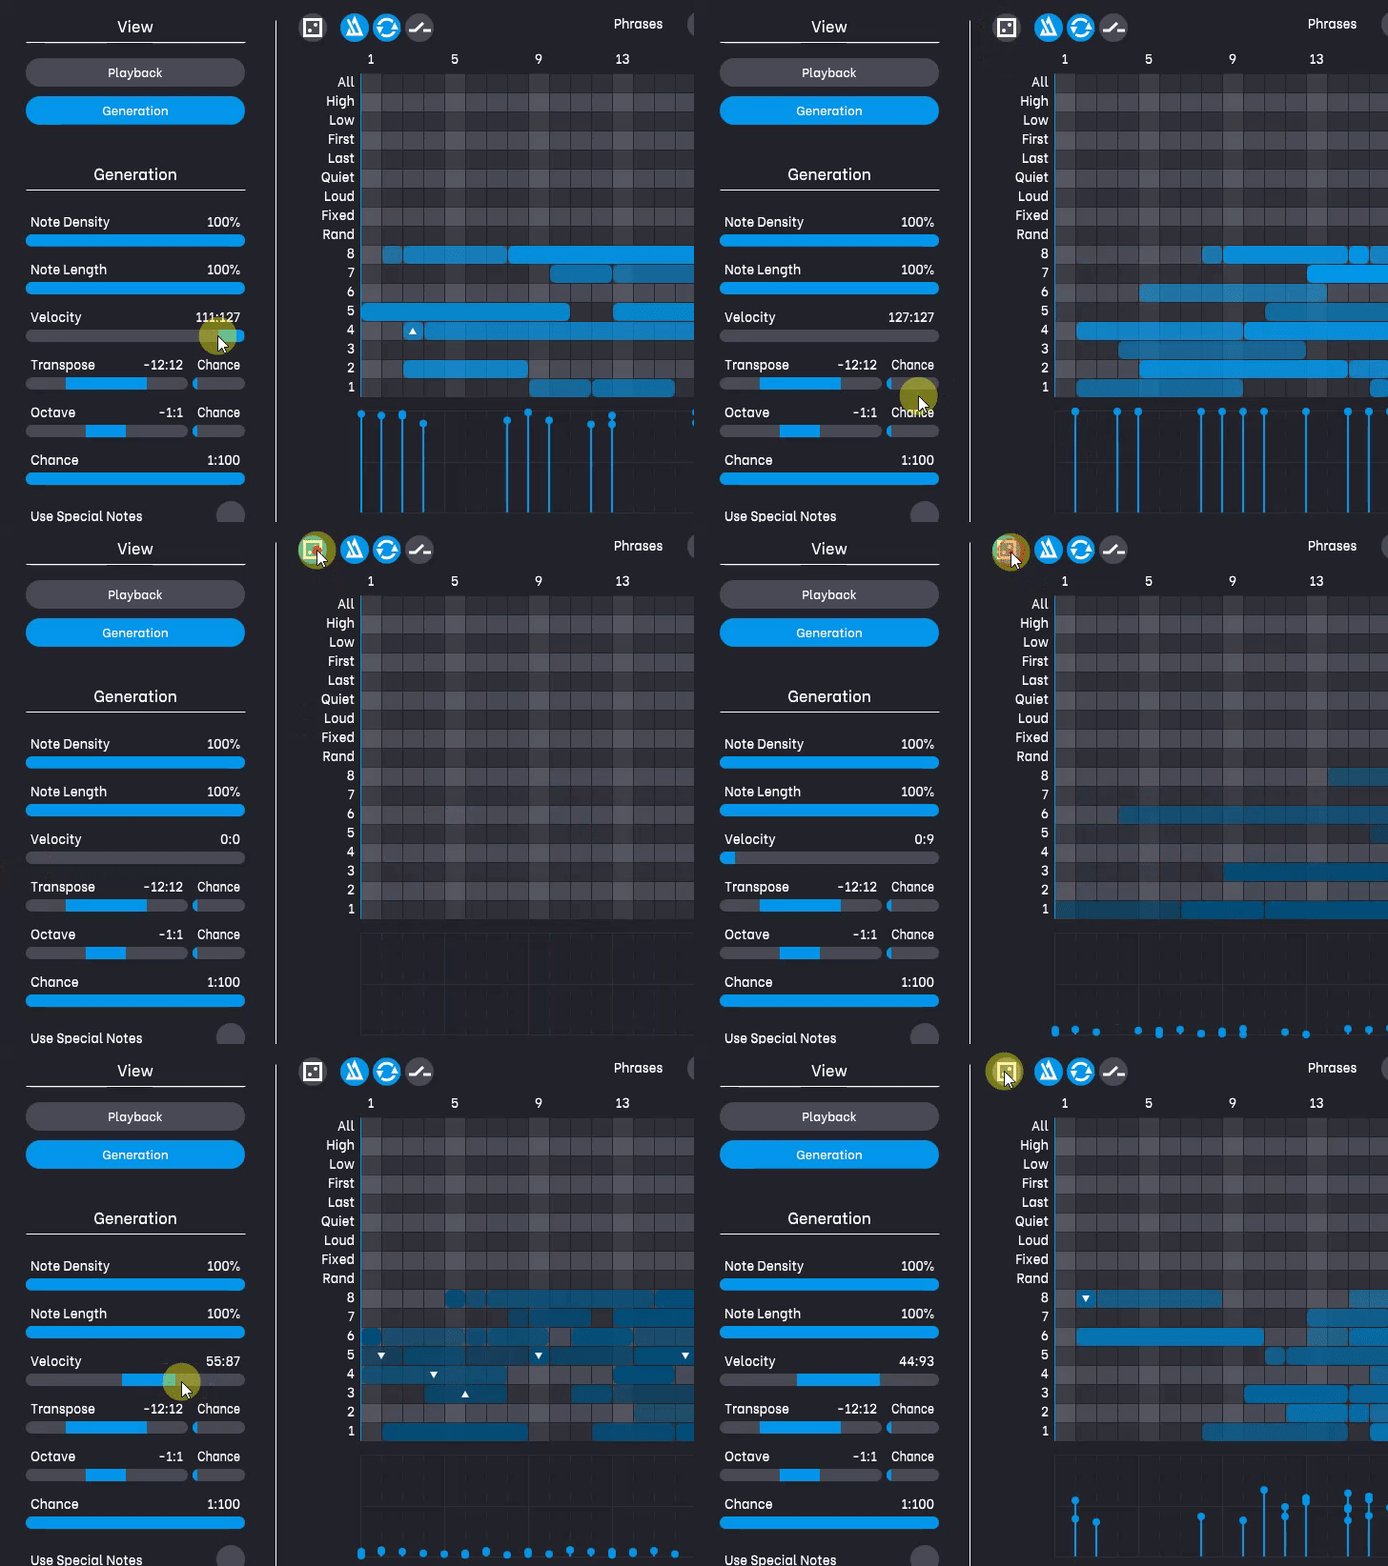
Velocity:A Velocity range.You can adjust the start and end range by dragging from both ends of the blue bar.
You can specify the range.
transpose: Range of transpose values.You can adjust the start and end range by dragging from both ends of the blue bar.The chance slider adjusts the probability that a note will be transposed.When full, all notes are transposed, with a minimum 1/100 chance of being transposed.
You can also specify the range of transpose.
You can adjust the random occurrence rate with "Chance".
Even if you set this wonderfully, if you enable "Lock To Key", the sound will match the Key.
If "Lock To Key" is enabled, there will be no dissonance.
Octave: Octave value range.You can adjust the start and end range by dragging from both ends of the blue bar.The chance slider adjusts the probability that a note will be transposed an octave.At full, all notes are transposed by one octave, with a probability of at least 1/1.
Octave can be ranged in the same way as transpose, and the random occurrence rate can be adjusted with "Chance".
Chance:The range of chance values.You can adjust the start and end range by dragging from both ends of the blue bar.
You can adjust the playback rate of the note.
Use Special Notes:When selected, the Piano Roll notes will use all notes, including special notes (Loud, Quiet, etc.).When disabled, only notes 1-8 will be created.
Click the Edit Controller button to see the controller generation options.
When it is OFF, only codes 1 to 8 are used, but when it is On, "All" and "Rand" are also used.
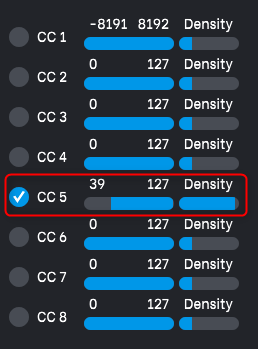
Edit Controllers:The controller generation window gives you options on how the controller randomizer works. There are eight rows, each corresponding to which controller to control.
It can play MIDI CC envelopes randomly.
Line 8 is linked to the red frame in the figure below.
If checked, it will be subject to randomization.
You can adjust the density by specifying the range and "Density".
I also prepared a video.
⑤ Option
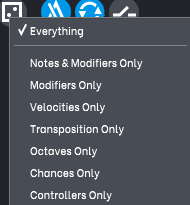
Randomise: Click the Randomize button to generate a new phrase based on your settings.You can right-click and select what will be generated.
For example, if you like the note pattern in randomization but want to change other parameters, you can randomize only the target parameters.
Everything: Everything:Everything generates notes, speeds, transpositions, chances, controllers.
Notes and Modifiers Only:A new set of notes is generated with new velocities, transpositions, and chances.
Modifiers Only:Only velocity, transpose, and chance are generated for existing notes.
Velocities Only:Velocity is generated only for existing notes.
Octaves Only:For existing notes, only octaves are generated.
Chances Only:Velocity is generated only for existing notes.
Controllers Only:Only the controller is generated.
Sync To DAW: When enabled, the phrase will play in sync with your DAW, which is the default behavior.If disabled, the phrase will start playing only when there is input.When you release all notes, the phrase will stop playing and return to the first note.
If disabled, it will be played triggered by MIDI input.
Loop Freeform:Applies only if you are not syncing to your DAW (see above).When enabled, the phrase will repeat indefinitely.If disabled, it will play in one-shot mode.
Latch: Latch:If you enable this feature, you can continue playing even after you release a note.When you play a new chord, the old note is note-off and the new note is held.
I don't know if this function is only for FL Studio, but it doesn't output Note Off, or it keeps ringing even if I turn off the DAW. (And runaway)
I don't know how to use it by turning "Latch" on and off in automation.
How to use Venomode Phrasebox ② (Parameter explanation) Summary
There may not be many uses around "First", "Last", "Quiet", and "Loud", but I think you can do what you want with other parameters.
It's easy to make a sound that is aimed to some extent while making it random.
You can do something like this with one code.
The feeling of aiming and the degree of randomness are just right.
The amount of parameters that appear on the entire surface is moderate, and I think it is exquisite, not too much and not too little.
If you dig deeper, you can do more edits, so you can do a lot with this one, and with FL Studio, if you export to MIDI with "Burn to MIDI", you can edit freely and it's really wonderful.
The next article is here.









![[Free] Cymatics drum enhancer plugin DIABLO Lite released 44 2021 01 01 20x13 05](https://chilloutwithbeats.com/wp-content/uploads/2021/01/2021-01-01_20h13_05.png)
Comment