- Overview
- massive x
- How to install
- Japanese translation of the official tutorial
- Quick start guide
- Summary
Overview
This is yosi from Chillout with Beats.
It was finally released.
It's been postponed twice, so I hope you don't disappoint, but here's how to install it and a quick review.
The following articles introduce free presets.
The Japanese translation (Google Translate) of the manual is updated from time to time.



massive x
The price of a single unit is ¥ 24,800.Cross grade It's ¥ 18,800.
Crossgrades are for Massve users only, as shown below.

Komplete12The user is originally included and can be downloaded from Native Access.
Unfortunately Komplete Select is not covered.
Half price update from Komplete Select to Komplete this monthTherefore, Select users are recommended to update! (It's about 2 yen considering the points, so upgrading is recommended rather than buying it alone)

Overview
This is the official explanation.
MASSIVE X is a rethought, redesigned and reborn synthesizer that is the successor to the iconic synthesizer that has influenced all musical genres.Quickly patch complex routing to get the sound you want.No matter how eccentric the flash, you can create sounds beyond your imagination with modulation that allows you to play with excellent expressiveness.Develop ideas, turn knobs, and shape the sounds of the future.
MASSIVE X will be updated regularly for free and will grow, adapt and evolve with an exciting music culture.
You can also try the demo version, so if you are interested, please check the sound yourself.
How to install
The installation method is easy.
Launch NativeAccess and click "Not installed"
Click "INSTALL" on Massive X to install it.
If not, click the refresh icon in the upper right corner.

Click "INSTALL"
![]()
All I have to do is wait.
Japanese translation of the official tutorial
Since there was only an English tutorial officially, I will explain the same thing while translating (basically Google). (If you have no resistance to English, I think the official one is better)
Header
In the MASSIVE X drop-down menu, search, save, load presets, adjust output volume, and set display size.You can also use headers to assign pitch bends, modulation wheels, aftertouch, and macros to control your sound.

Audio module
The audio module produces and processes sound.You can freely connect them on the routing page of the editor to implement different compositing techniques.

Navigation bar
Select the page you want to display in the editor below.The available pages include all modulation sources, not just voice and routing.From the navigation bar, you can use drag and drop to assign modulation sources to parameters.
![]()
Editor
Access the modulation parameters, voice page, and routing page as you select in the navigation bar. The Voice page allows you to set polyphony, unison, and harmonization.The routing page allows you to connect audio modules.

Quick start guide
Loading presets
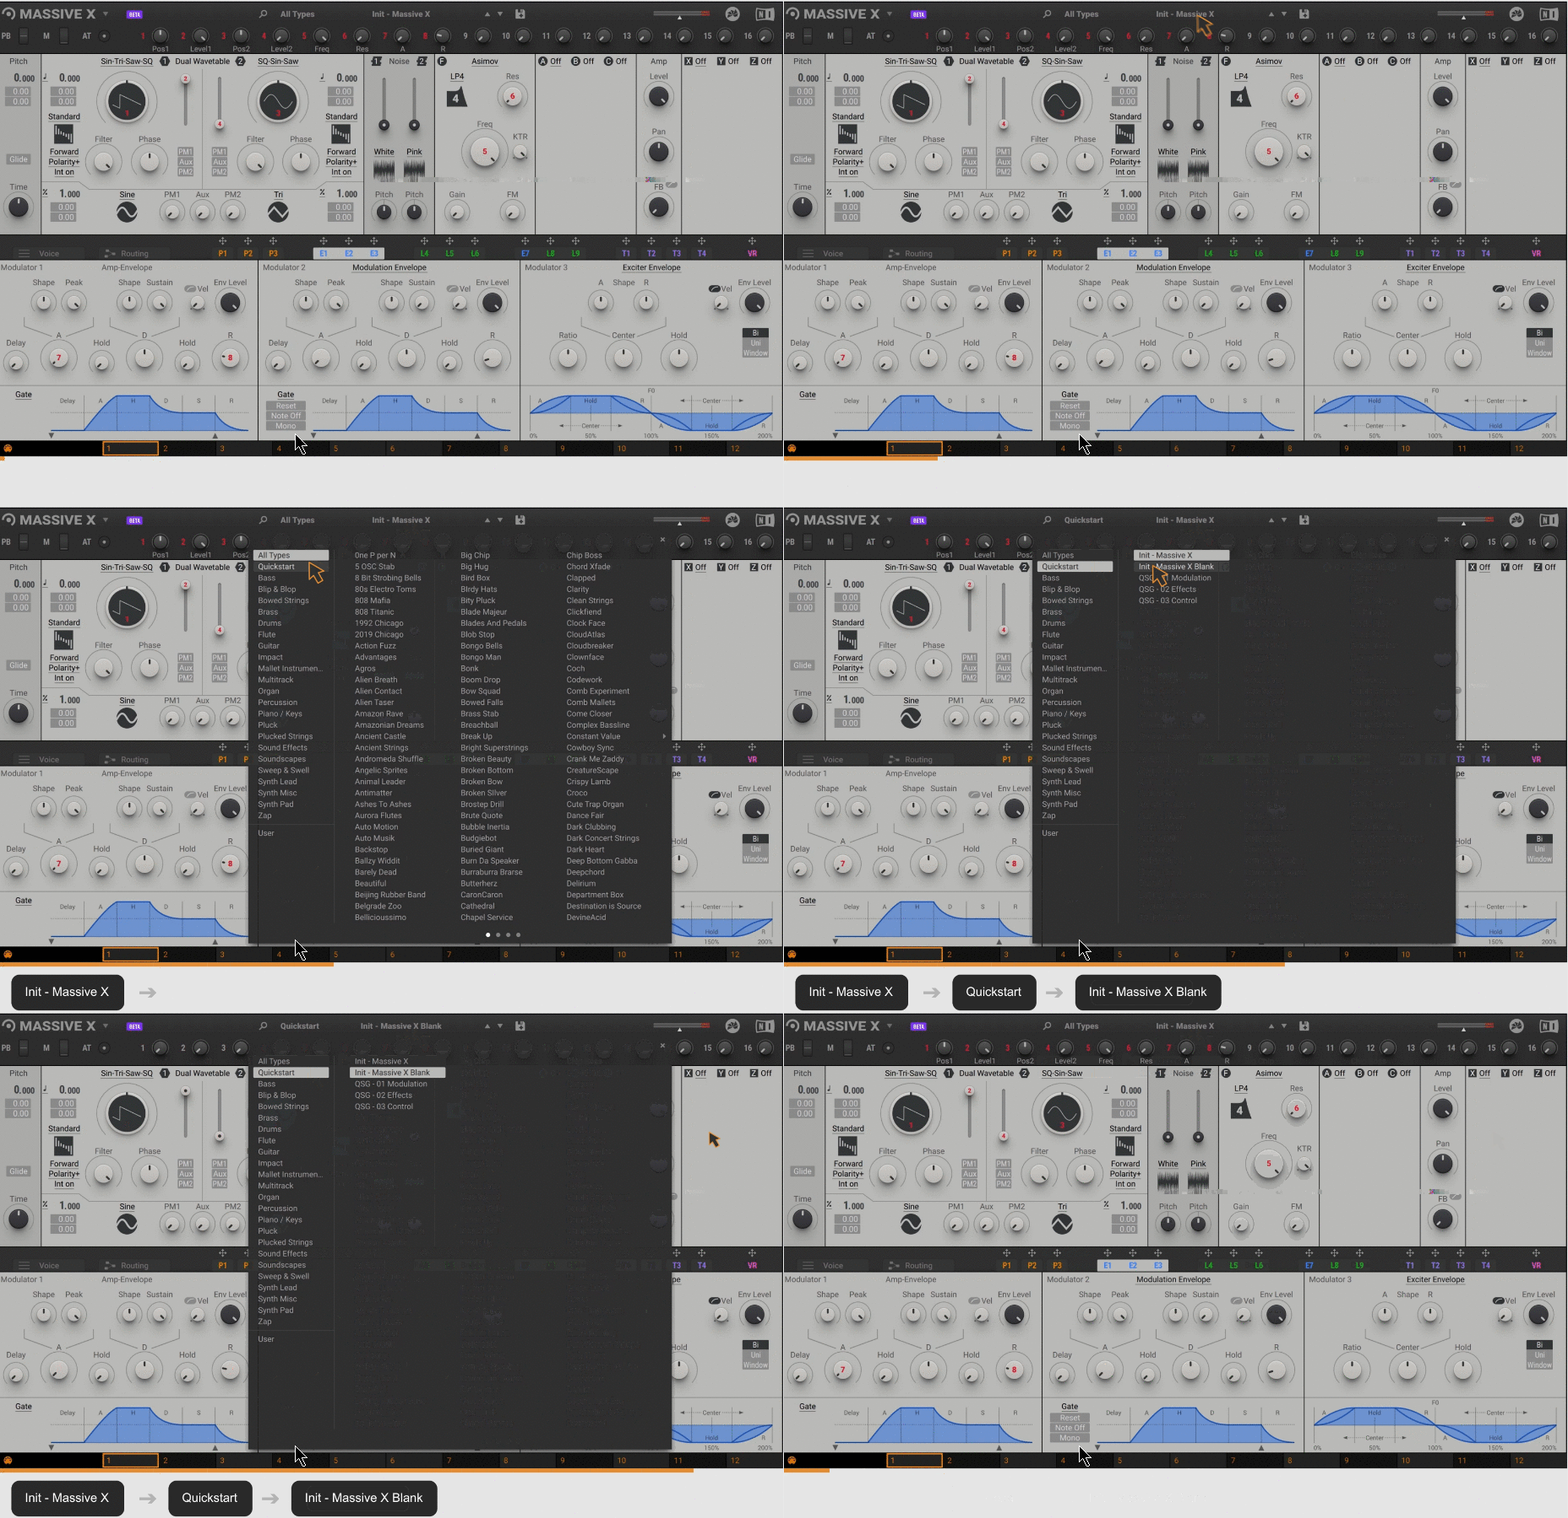
Read "Init – Massive X Blank" and experience the process of making sounds in order.
Load the preset as follows.
Routing page overview
The Routing page defines the signal flow for MASSIVE X.By freely arranging and connecting the available modules, various synthesis methods can be facilitated.
Click the Routing button in the navigation bar to open the Routing page in the editor.
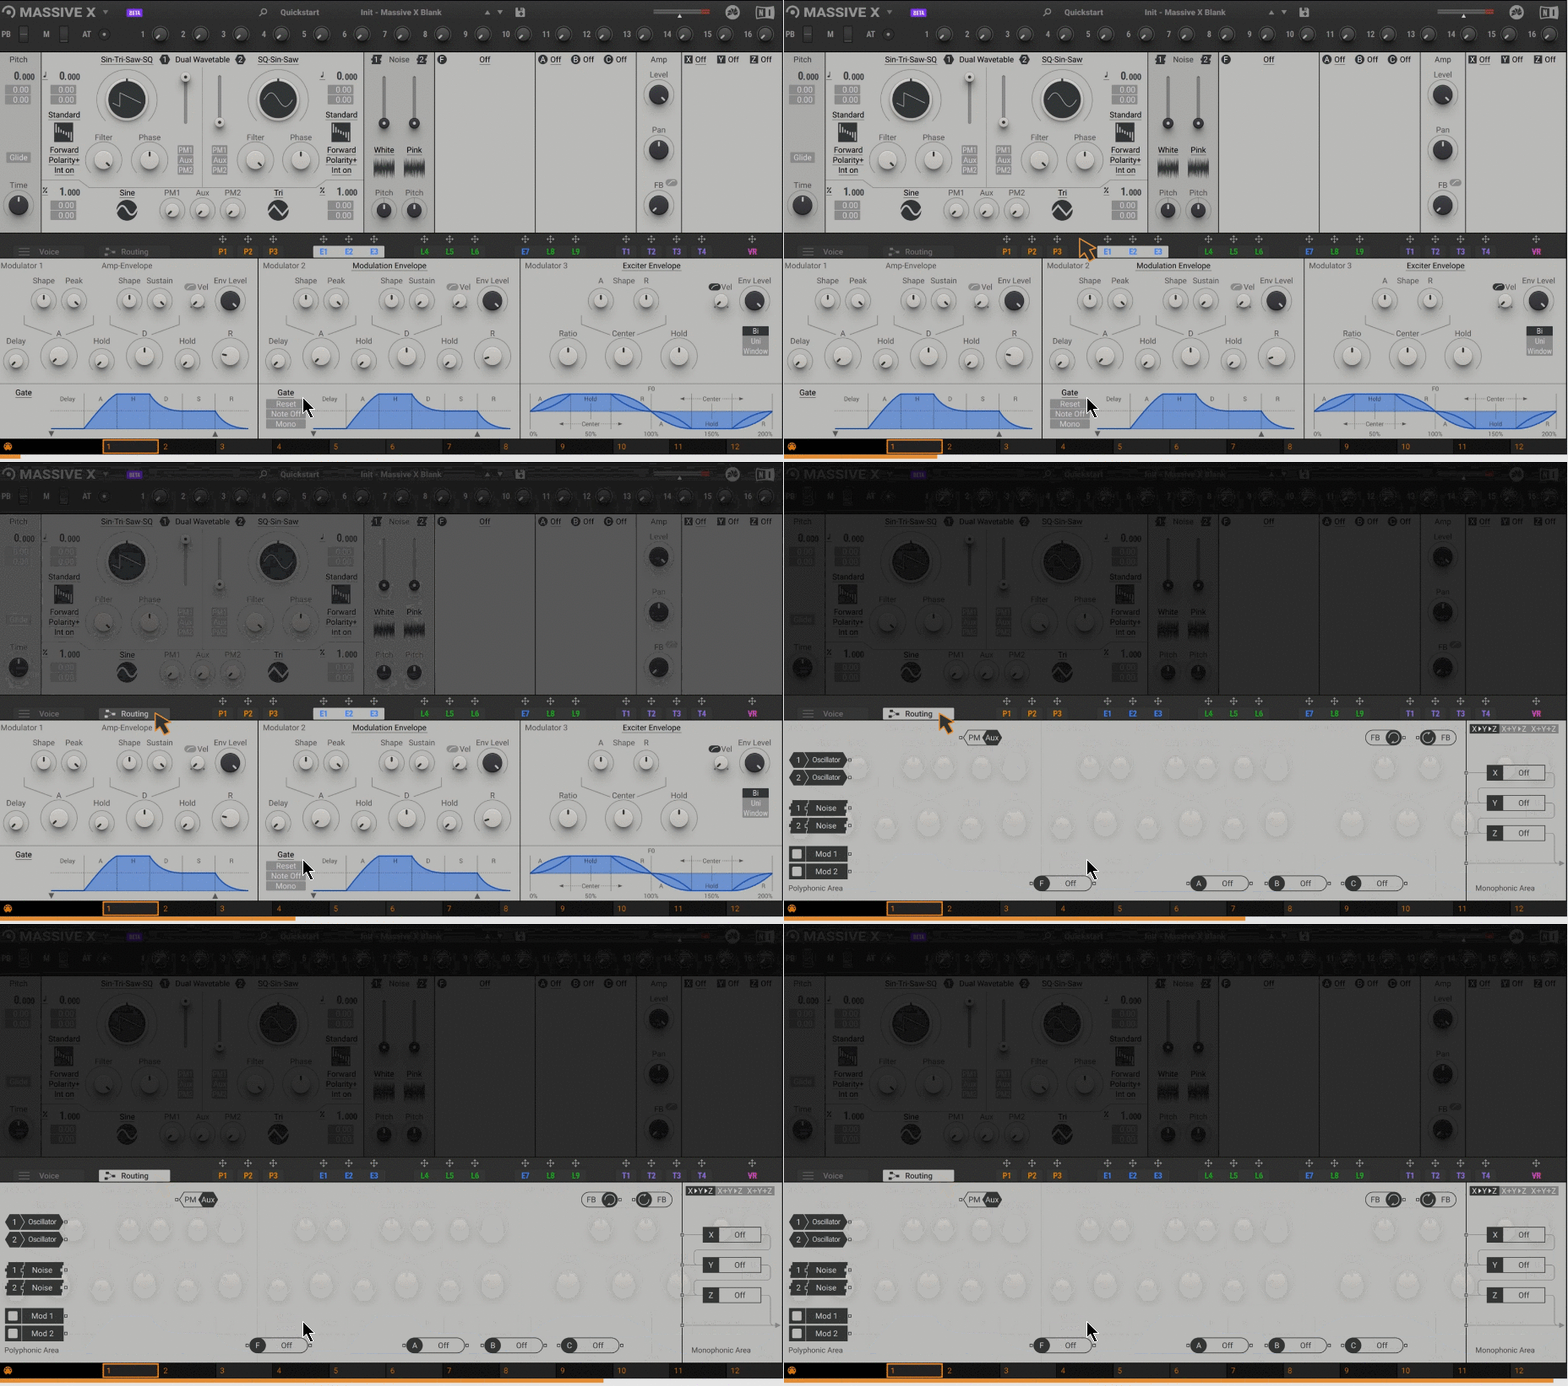
The following overview describes the elements that you plan to use in this guide.
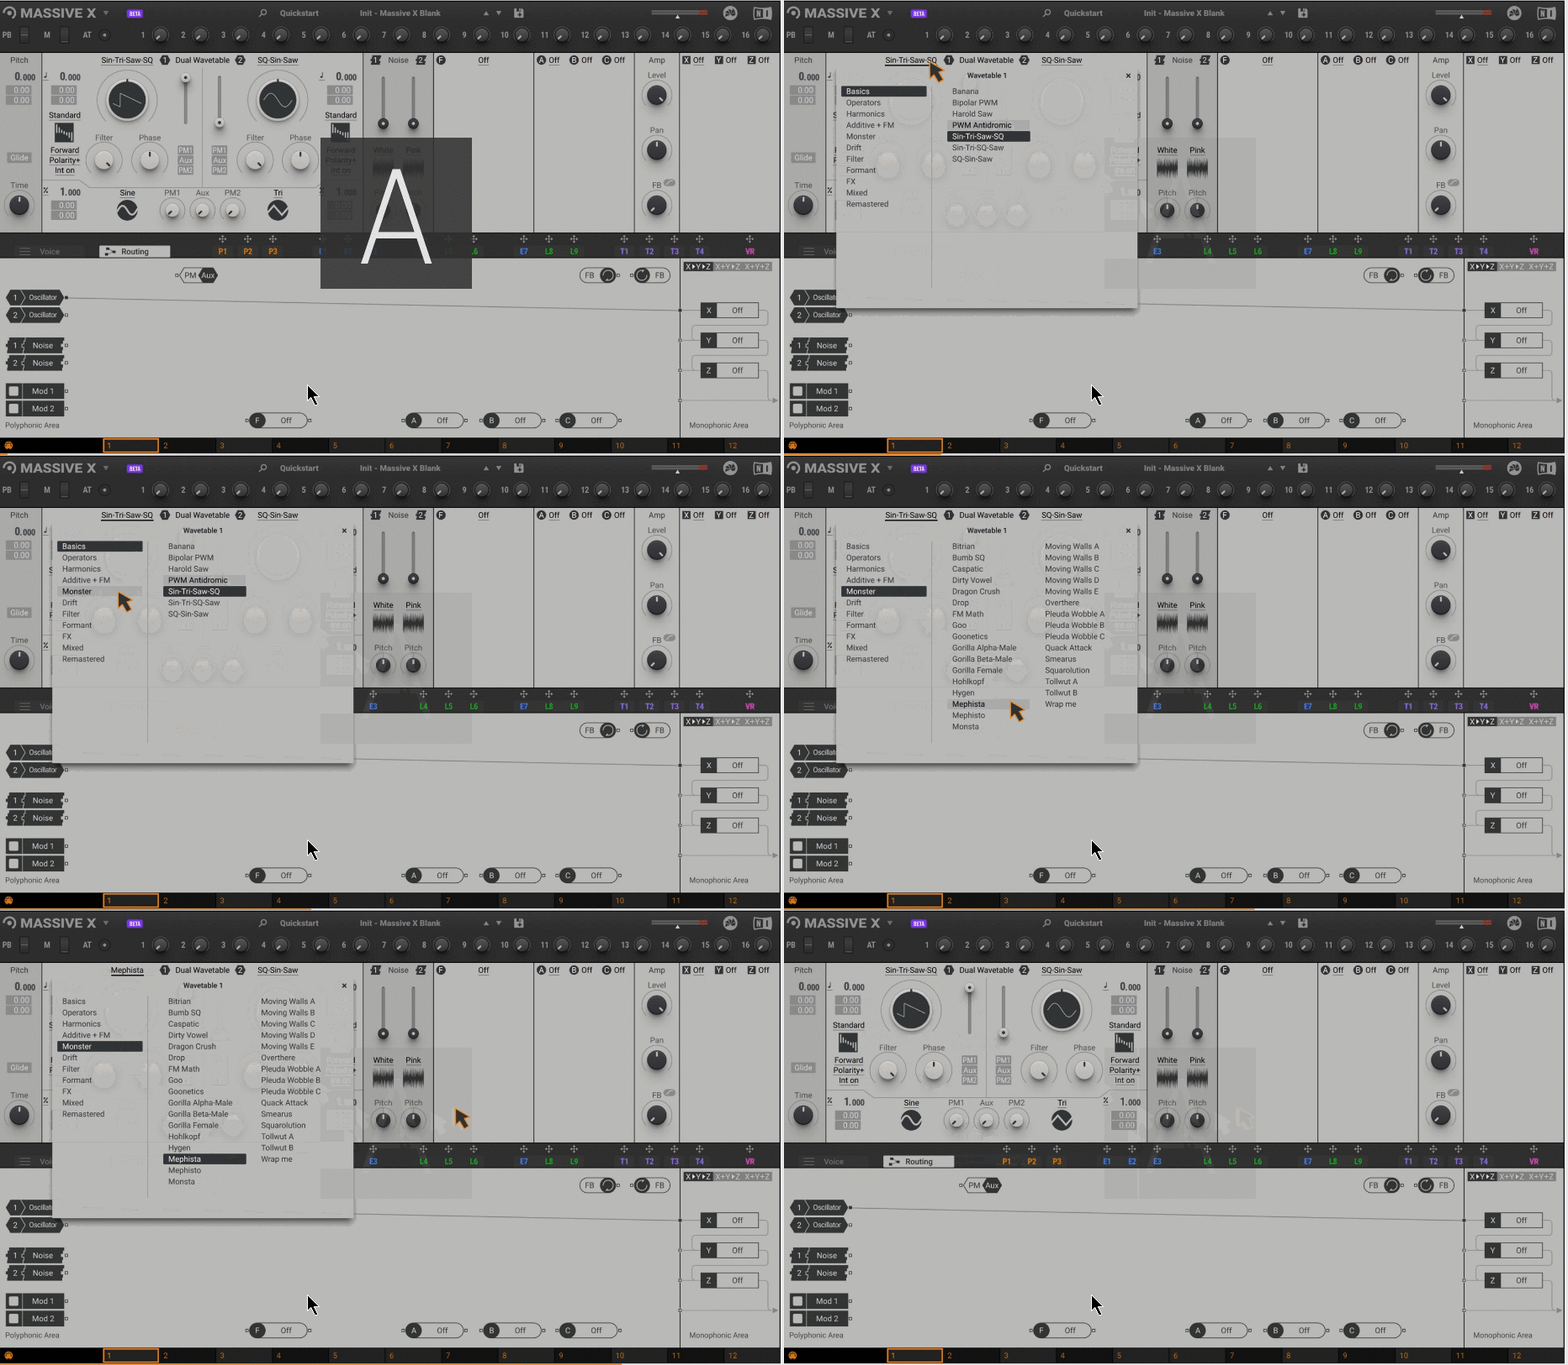
Wave oscillator connection
Drag the wire from Wavetable Oscillator 1 (1 oscillator) to the first output.

As you play the notes, you will hear the direct sound of the Wavetable oscillator.
Wave oscillator performance
Go to Wavetable Oscillator 1 on the left side of the top audio module.So open the Wavetable drop-down menu and load wavetable Mephista from the Monster category.
Note: After selecting the wavetable, click the background user interface or the X icon in the upper right corner to close the menu.
Turn the Wavetable Position to play some notes to explore the sounds of the Mephista wavetable.Before reading this guide, turn Wavetable Position all the way to the left.
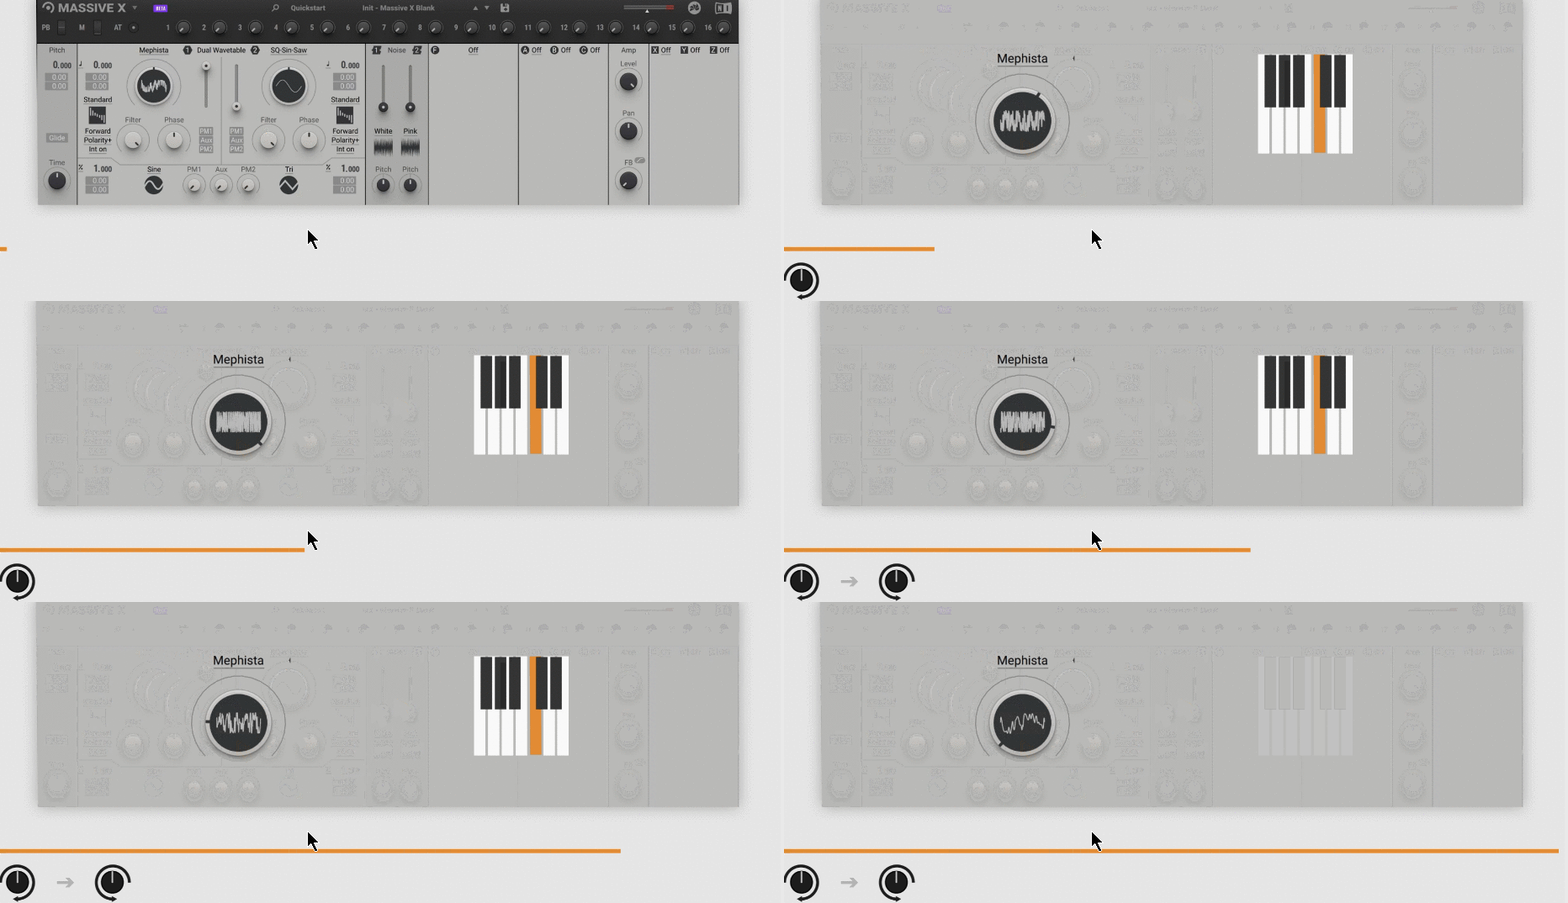
Tip: Try a non-standard wavetable mode and use the two wavetable mode parameters to shape the sound.

Coordination of assignments and adjustments
Modulation adds movement to the sound by changing parameters over time.The available modulation sources include not only modulators such as envelopes and LFOs, but also more advanced concepts such as performers.In this section you will learn how to assign and use them.
Note: If you jump directly to this section or need to reset the sound, load a preset called QSG-01 Modulation from the Quick Start category of the preset menu.
AMPLITUDE Envelope Adjustment
Modulator 1 is an envelope, wired to control the level of the output amplifier (Amp).This allows you to form volume contours for your sound without having to manually assign an envelope first.
Click E1 in the navigation bar to open Modulator 1 in the editor.
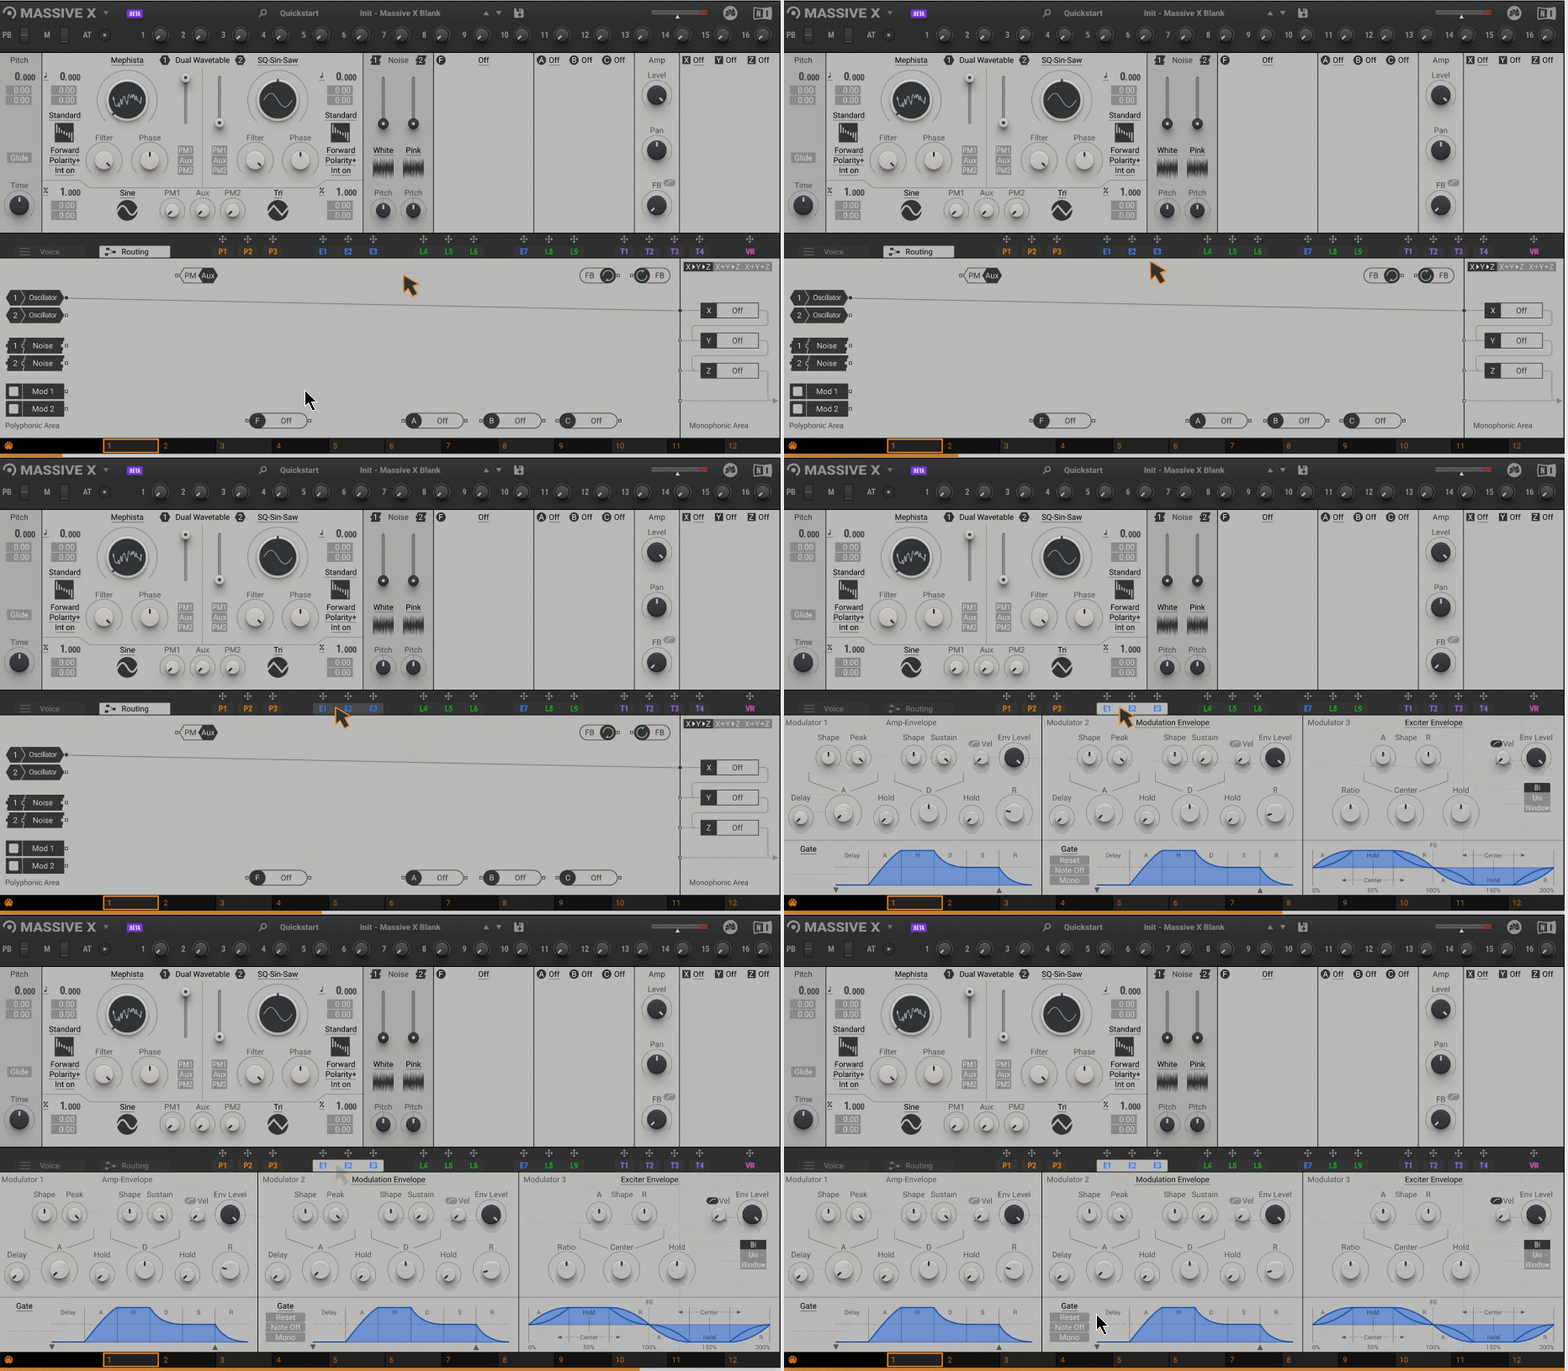
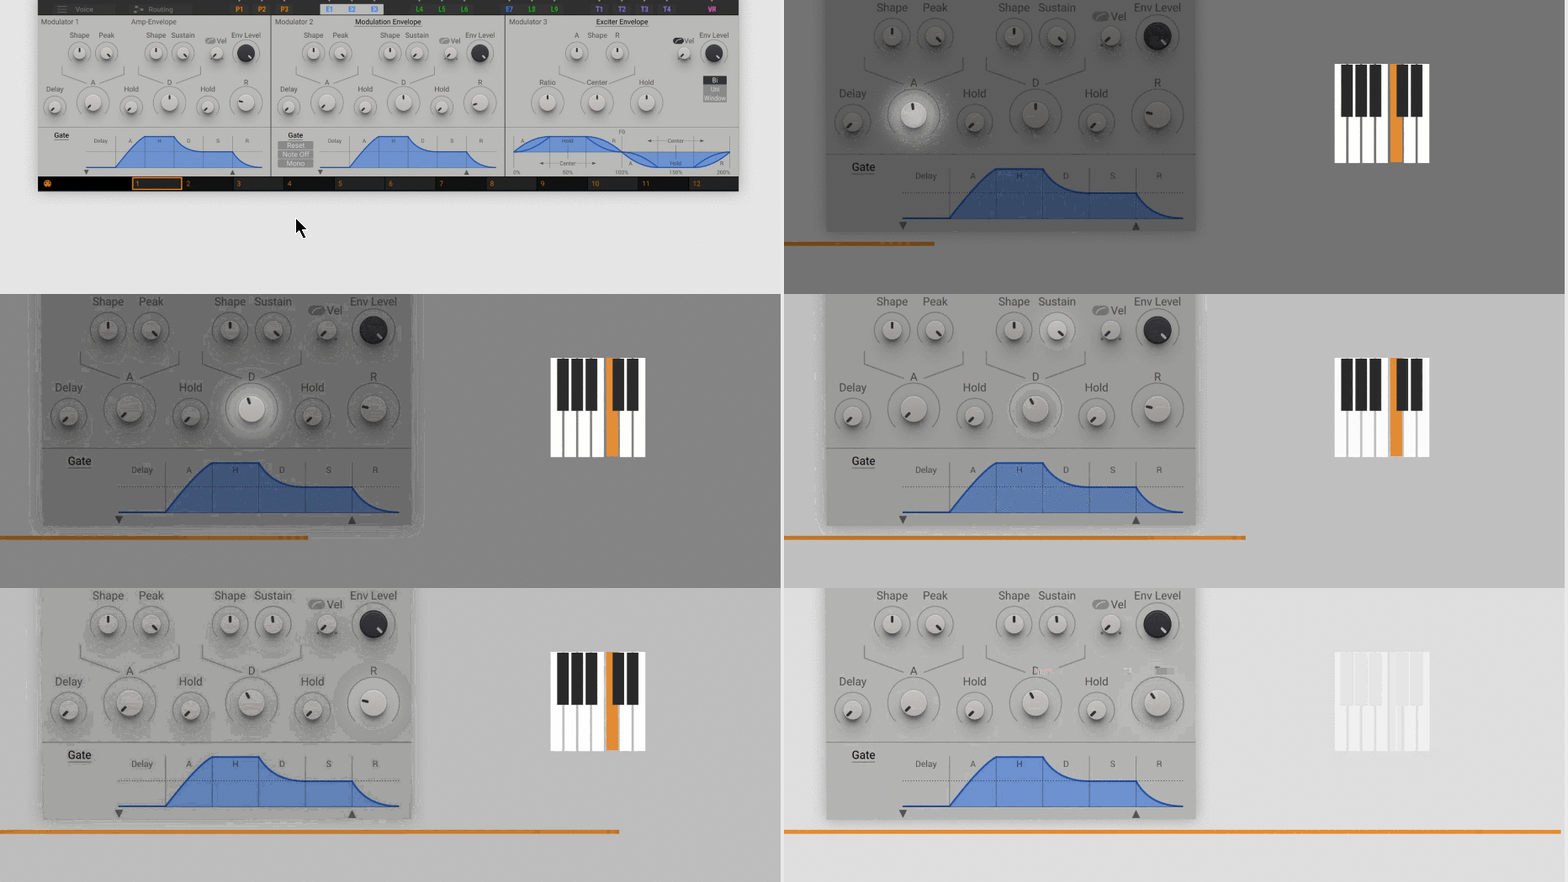
Play a few notes and turn the envelope parameters to give an impression of how they affect the sound.
Attack (A): Adjusts the beginning of the sound from sharp to soft.
Decay (D): Adjusts the decay after the first peak of the sound
Sustain (S): Adjusts the sound level while holding down the sound.
Release (R): Adjusts the attenuation of the sound after the note is released.
Allocation of other modulation sources
If you want to use other modulation sources for your sound, you need to assign them first.This guide uses one of Performer, a special sequencer for modulation.
To assign a performer, drag the performer 1 (P1) arrow icon to the first modulation slot in the wavetable position.
Note: Alternatively, you can click the arrow icon first and then the modulation slot to make the assignment.
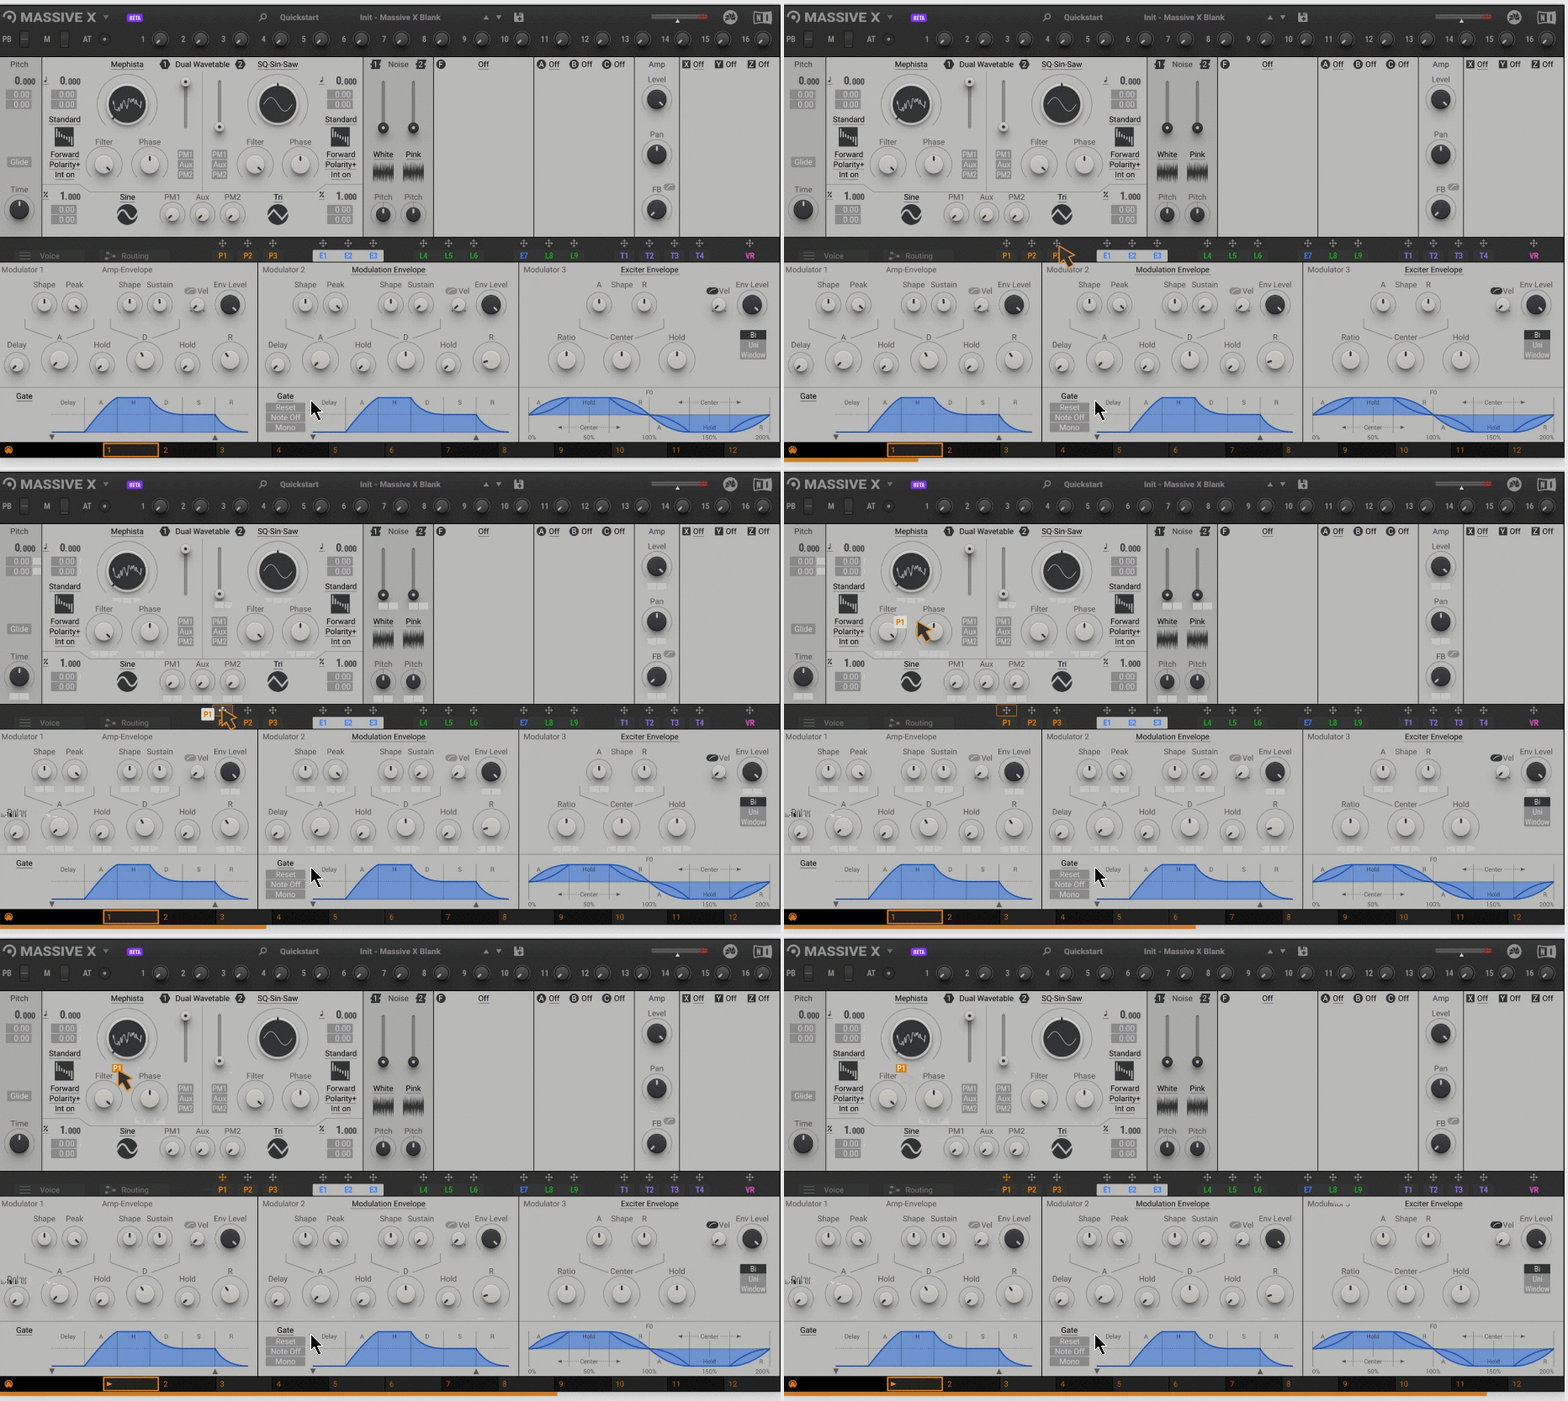
Clicking on a modulation slot and dragging it upward will increase the amount of modulation applied by the performer to the wavetable position.
Note: You can set the maximum amount of modulation by double-clicking on the modulation slot.
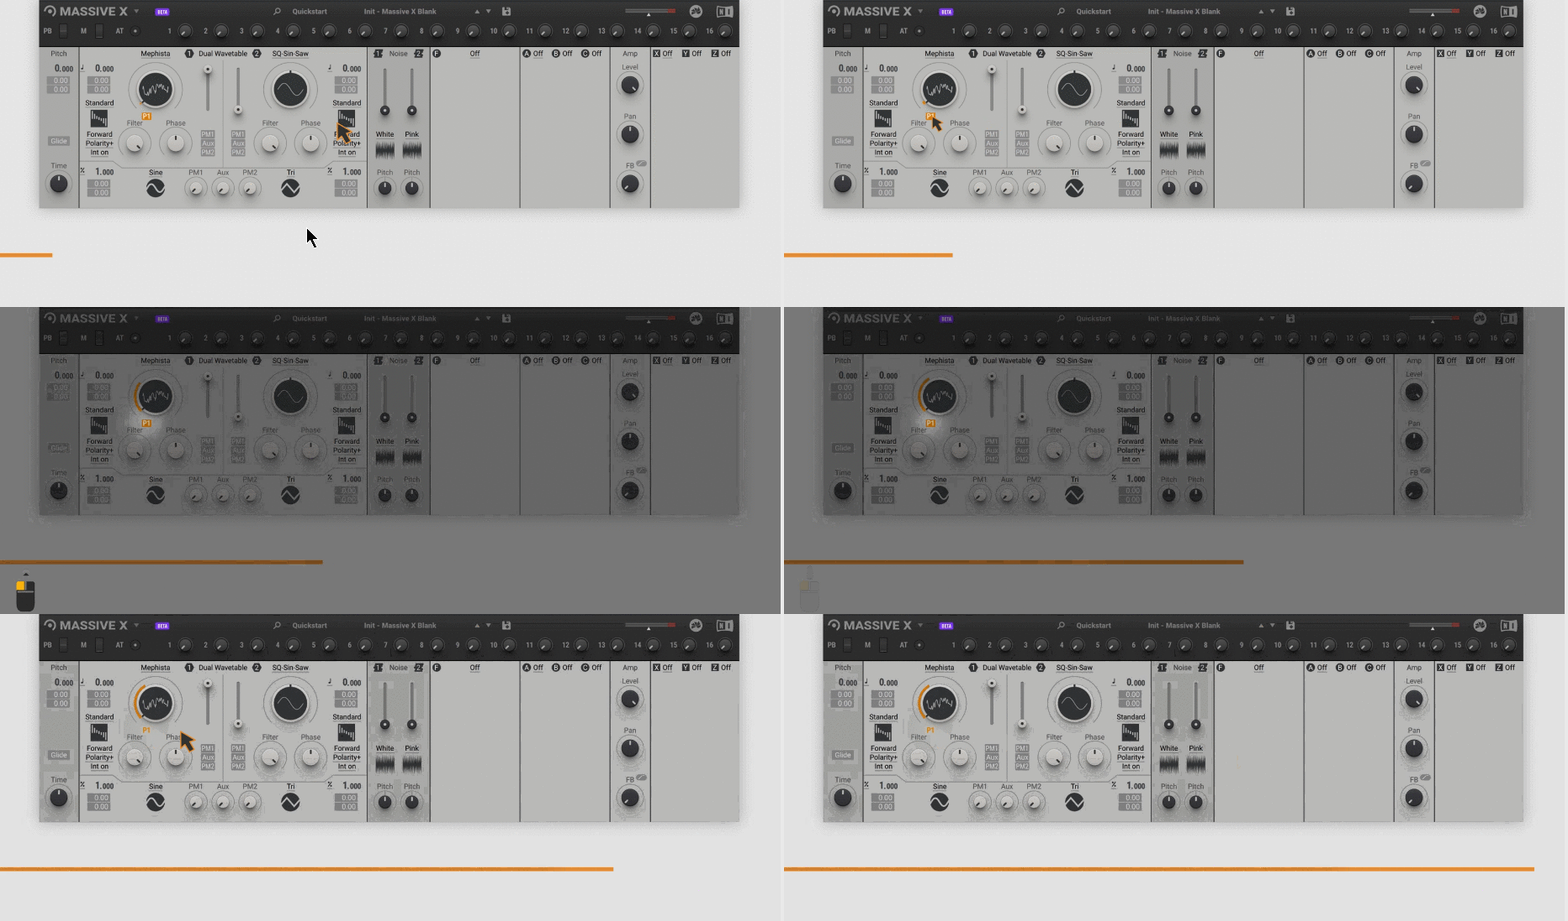
Modulation is only effective after contouring the performer.You will learn how to do this in the sections below.
Performer adjustment
The performer can create complex contours, which are essentially sequences of modulated shapes.You can adjust the contours on the editor's cast page.
The performer's manual has been released.I translated it into Japanese and made it more detailed than some manuals, so please refer to this as well.
Click P1 in the navigation bar to open Performer 1 in the editor.

Adjust the length of the sequence by dragging the range bar to measure 2 on the grid.

In the Edit area, select a drawing tool to create a drop saw.
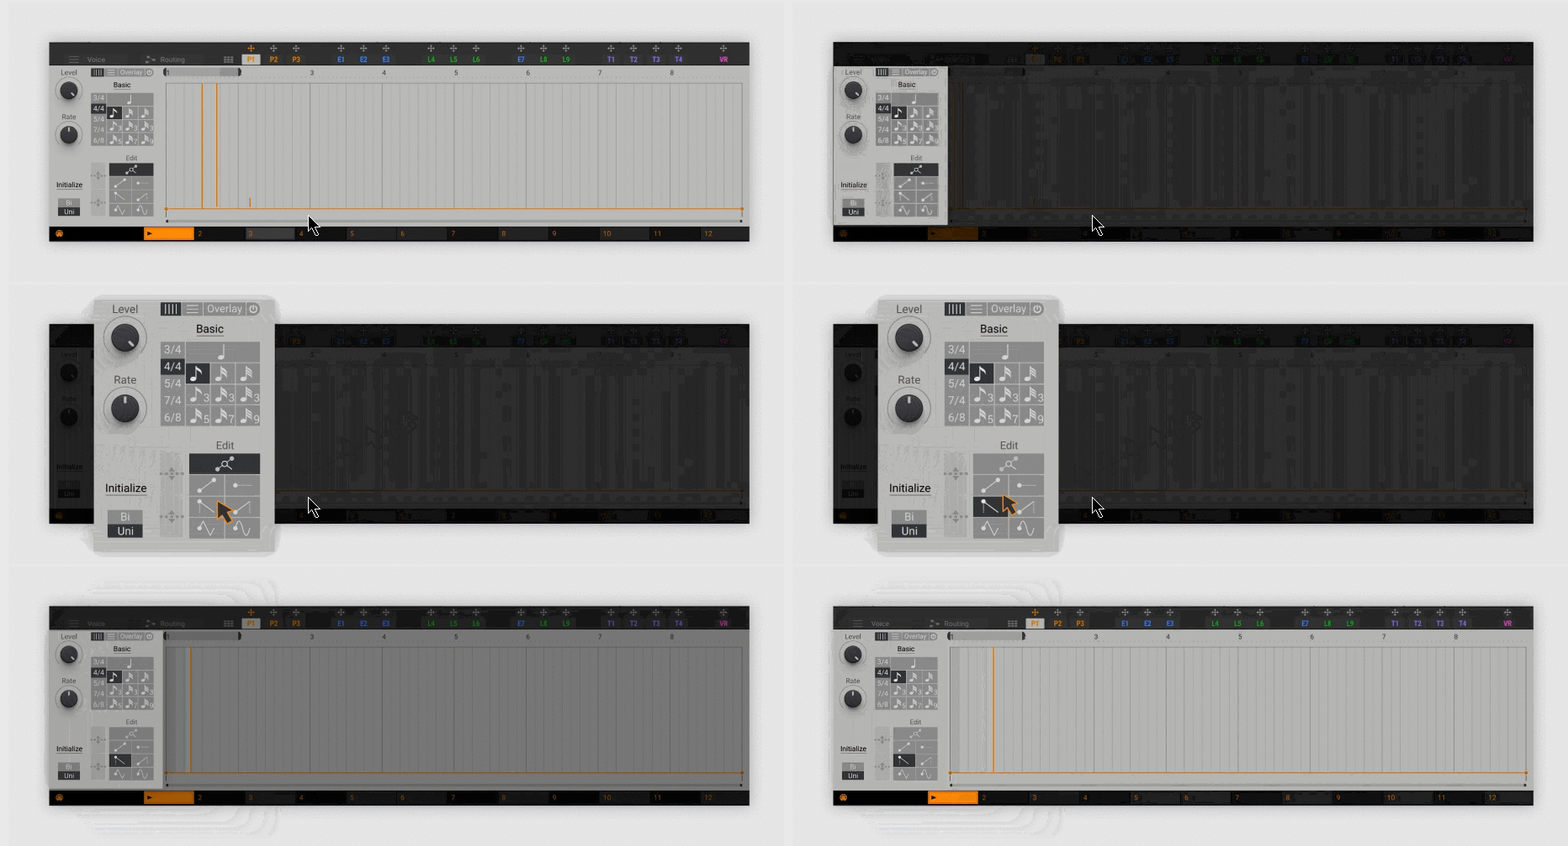
For example, click and drag the performer to outline it.For example, draw 2 diagonally from the beginning of the grid to create the following contour.

Play some notes and listen to the performer morphing through the wavetable.
Change boot mode
You can also restart the performer's contour from the beginning of each note you play.
Open the cast grid display and set the launch mode to the key.
Note: As long as you have a note, the performer will loop its contours.If you want to stop at the end of the contour, set the mode to one shot in the grid view.
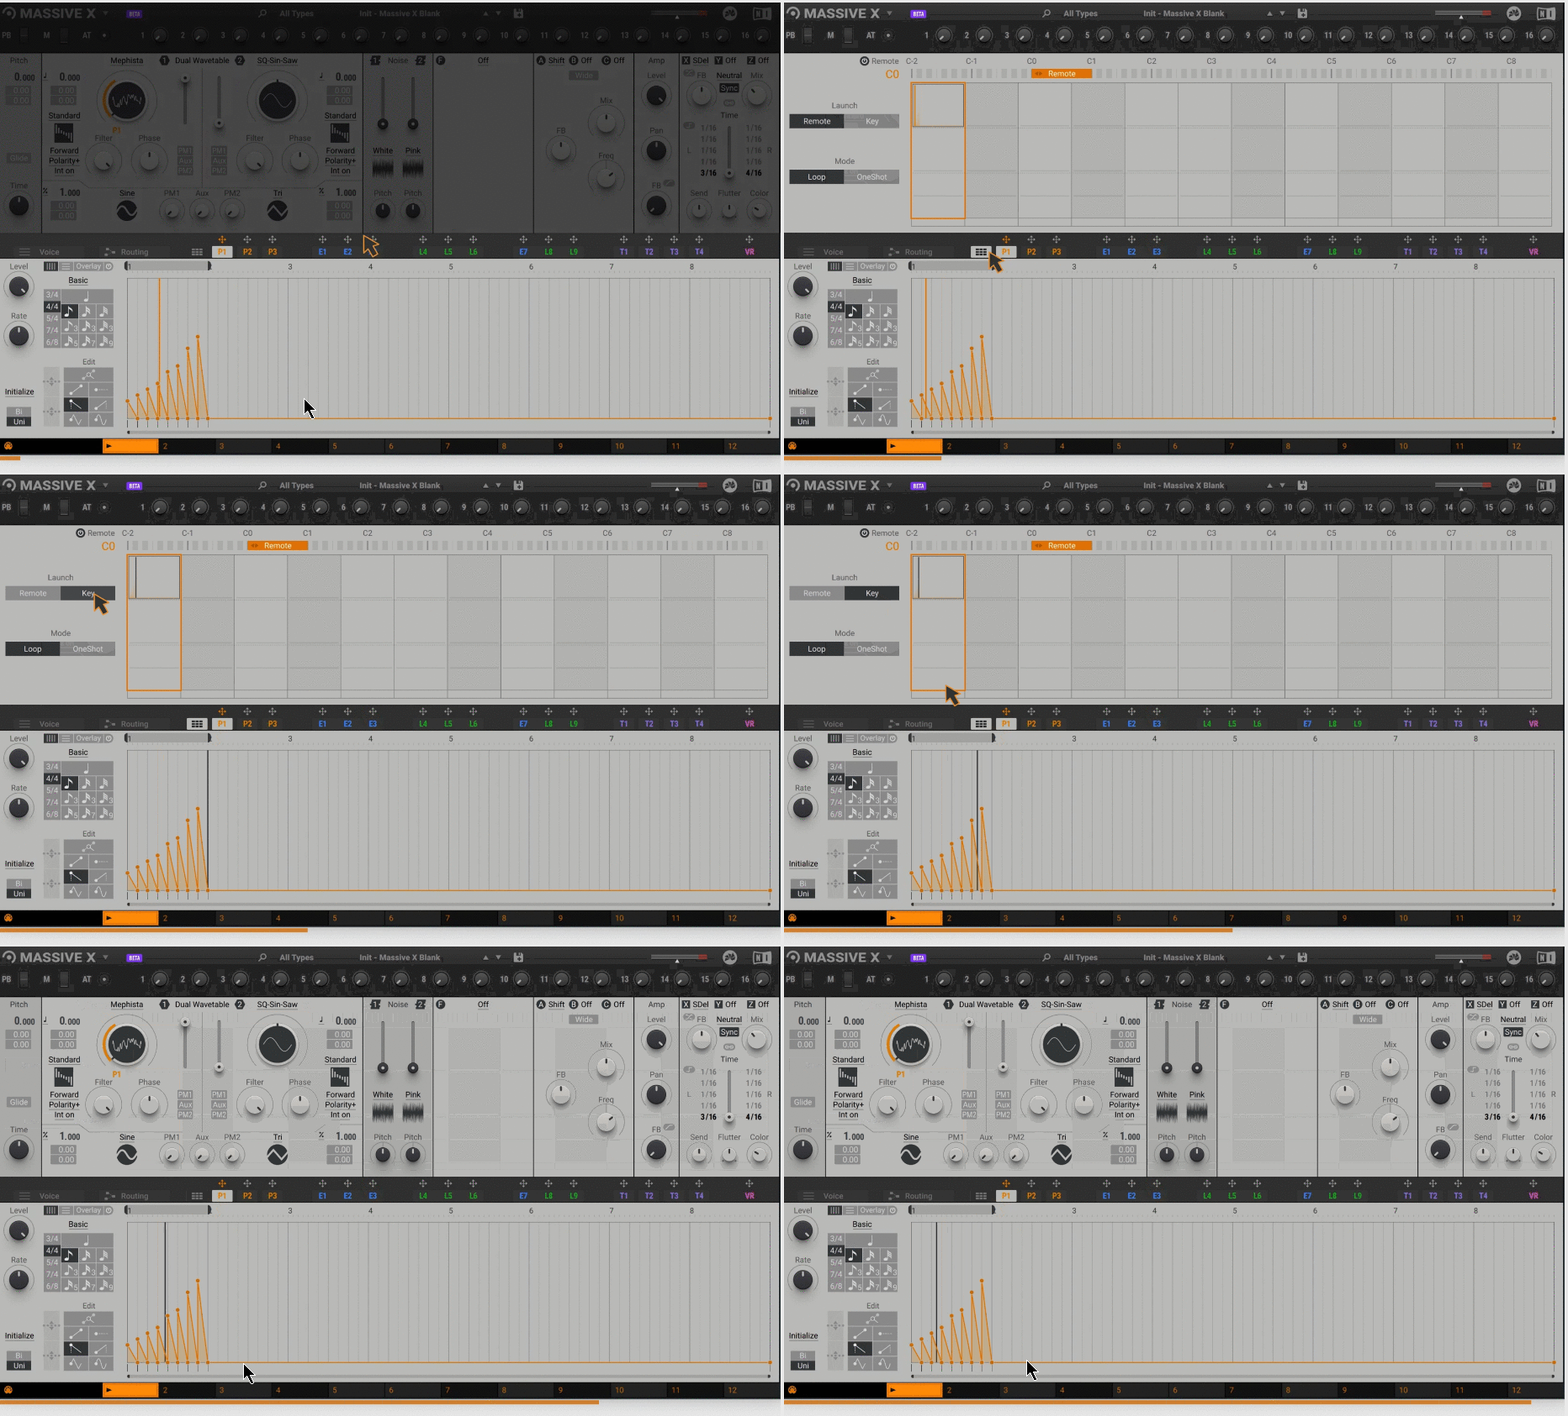
Tip: Try other drawing tools in the editing area to create different shapes or change the grid to a different time signature.

Use effects to refine your sound
MASSIVE X effects can be part of sound generation or used for traditional output processing.In this section, you'll learn how to enrich your sound with insert and stereo effects.
Note: If you jump directly to this section or need to reset the sound, load a preset called QSG-02 Effects from the Quick Start category of the Presets menu.
Add insertion effect
The insert effect is polyphonic.That is, the sound of each note you play is processed independently.In this way, they can be used as part of sound generation.
This guide uses a frequency shifter.It can also be used to break down the harmonic structure of the sound and create a lively fading effect.
Use the Insert Effect A drop-down menu to load Freq Shifter.
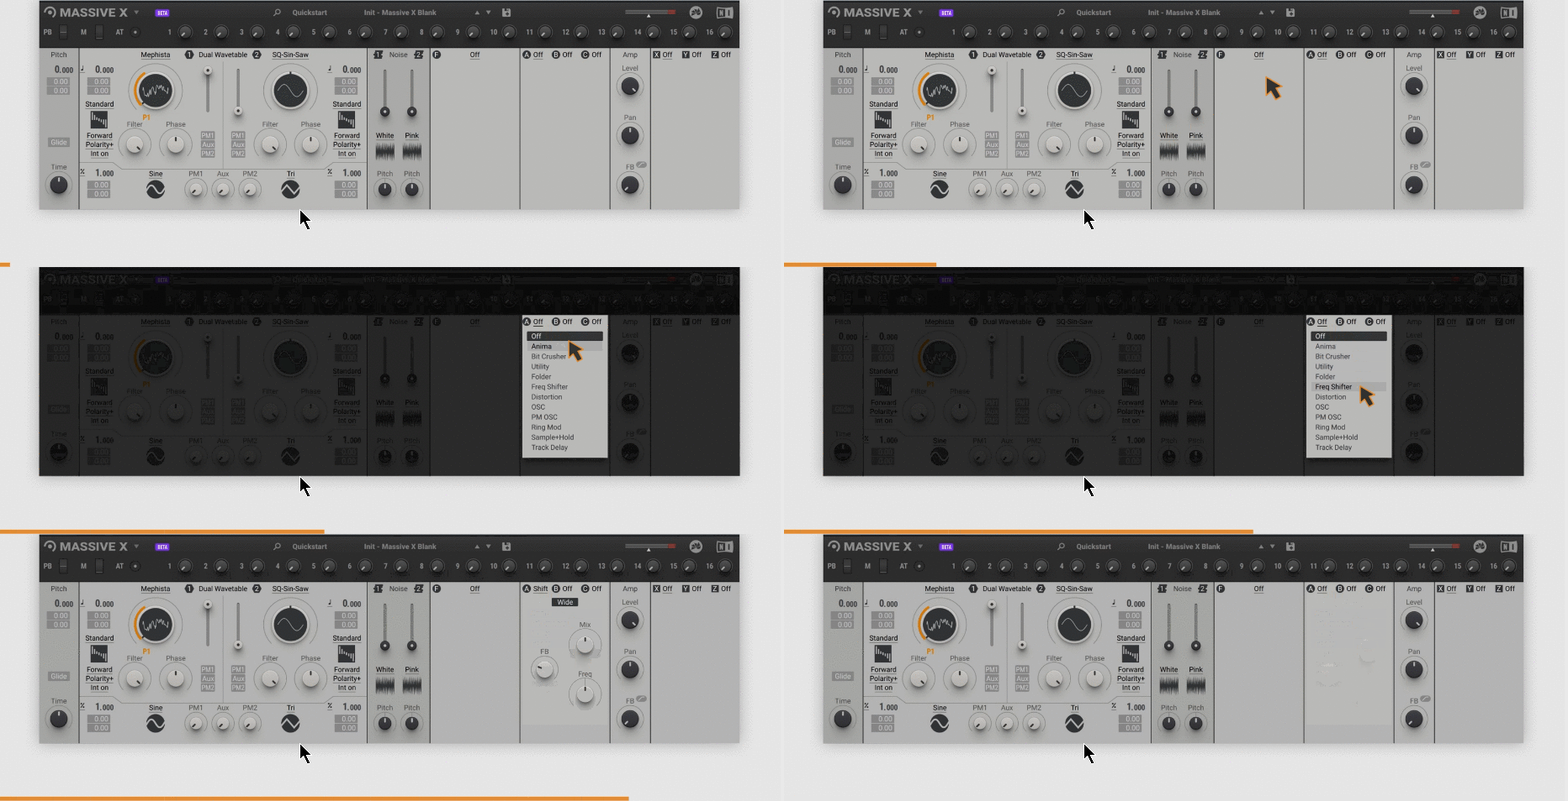
Insert frequency shifter
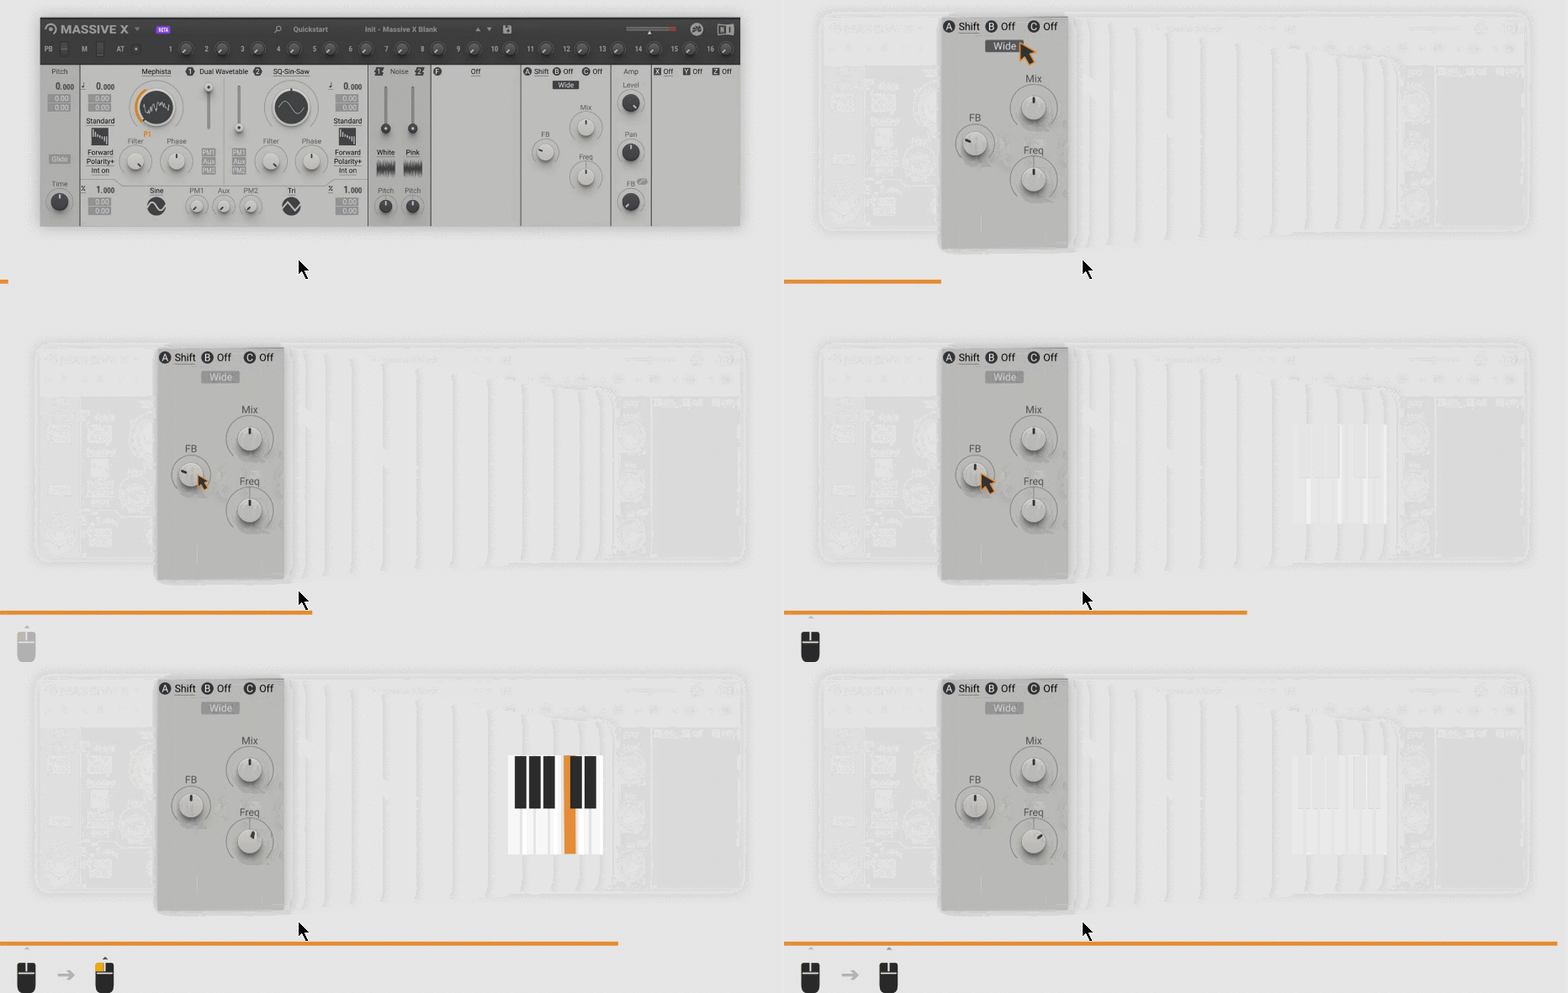
Go to the Routing page and double-click the wire to remove the existing connection from Wavetable Oscillator 1 (1 oscillator) to the first output.Then connect Wavetable Oscillator 1 to the frequency shifter (AF Shift) and connect the frequency shifter to the first output.
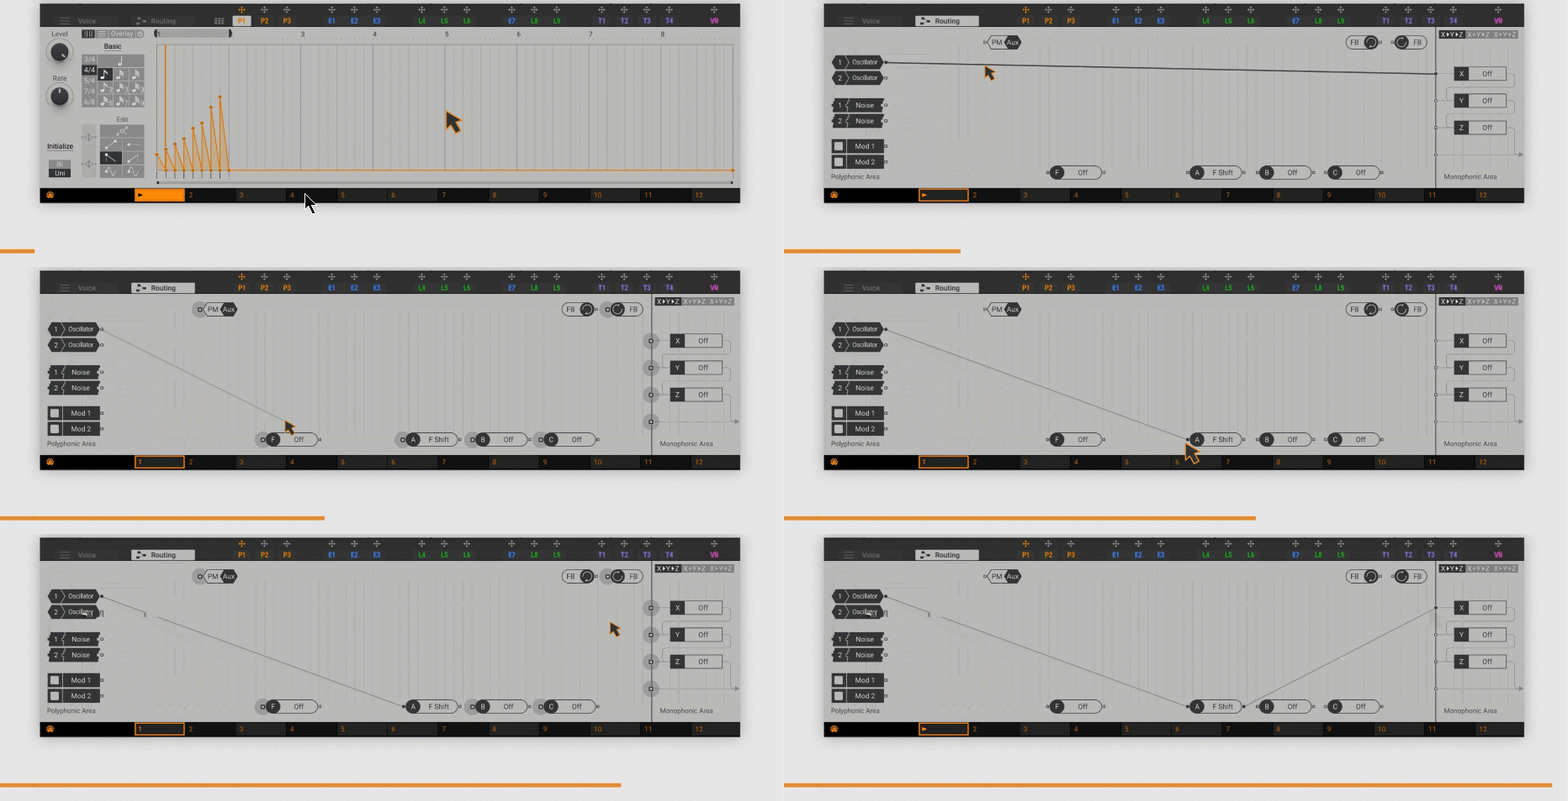
In the frequency shifter, disable wide mode, increase feedback, and lower Freq a little to introduce a fading effect.Play some notes to hear the effect.
Add a stereo effect
Stereo effects can be used to process the final audio output and improve the sound.This guide uses stereo delay.It's a flexible but easy-to-control echo effect that can add space and depth to the sound, or create interesting rhythmic effects.
Load the Stereo Delay using the Stereo Delay X drop-down menu.
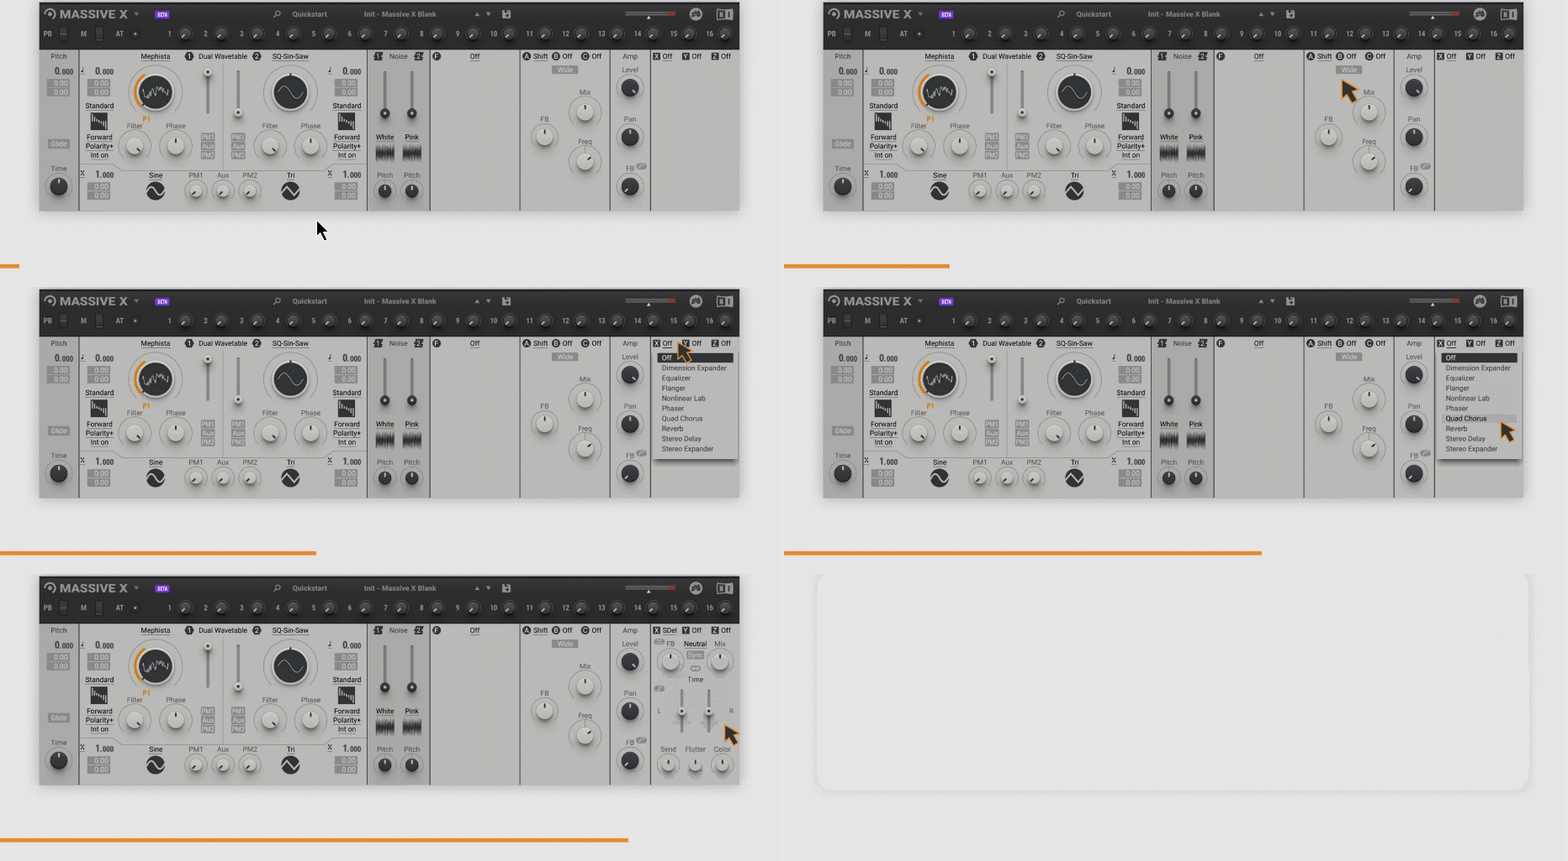
Stereo effect X processes the audio received on the first output, so the correct routing of this effect has already been done.
With Stereo Delay, switch from Neutral to Warm mode, enable Sync, and adjust the delay time to your rhythm.Reduces color and mix to separate echoes from direct sound, creating deeper depth.
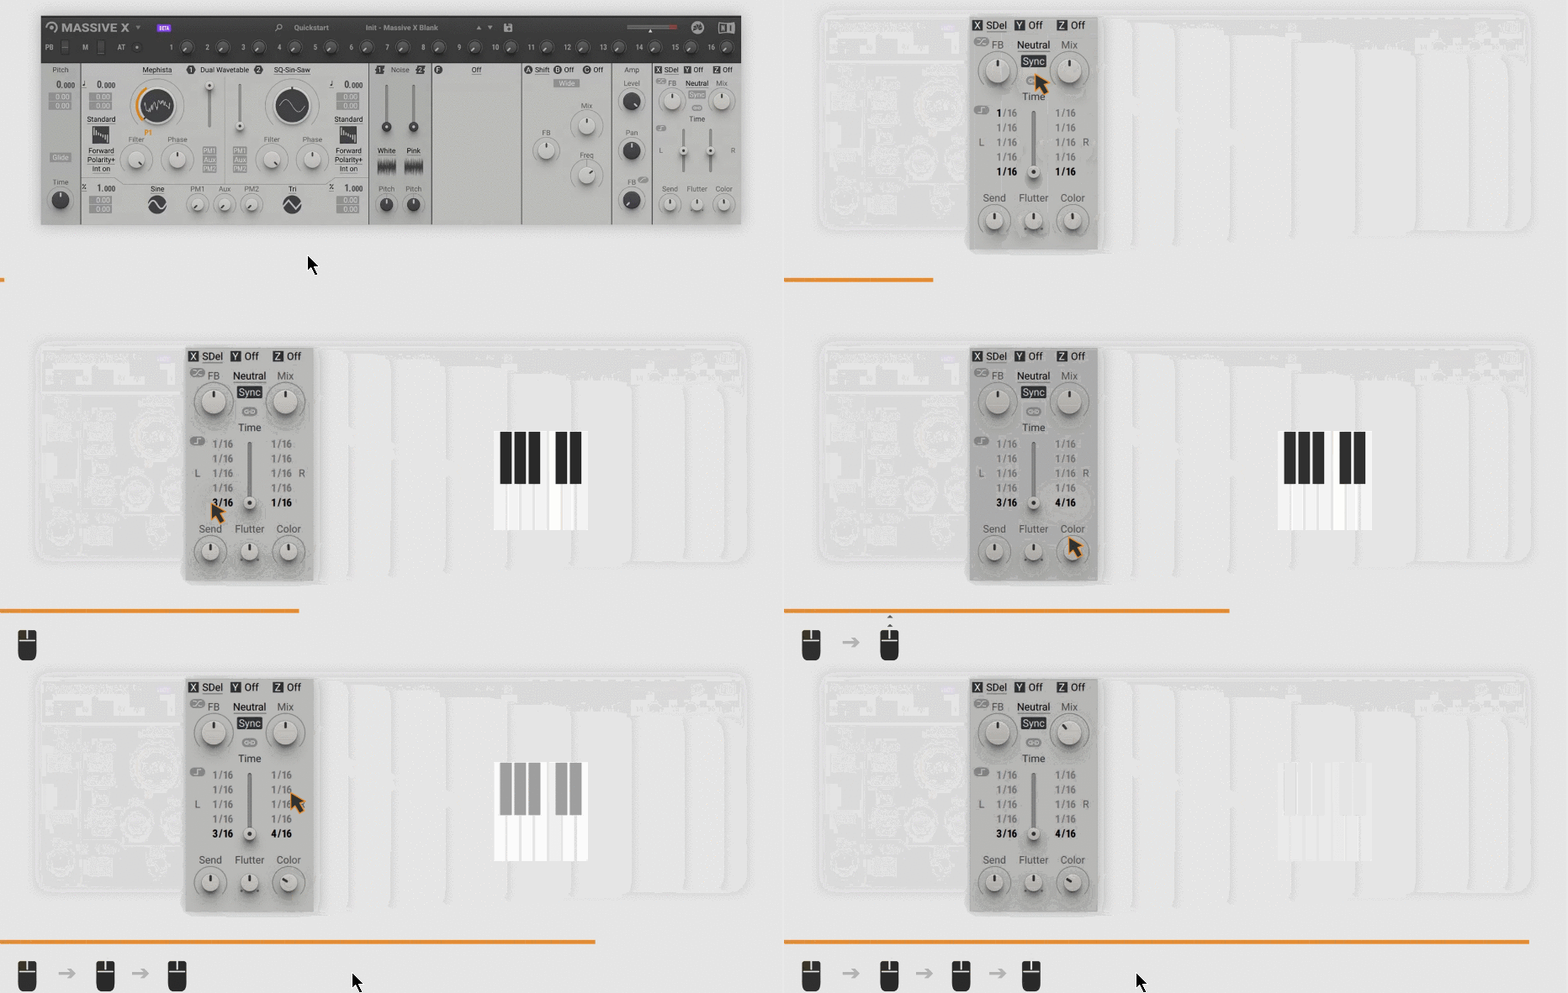
Hint: Hint:VerbAnd its modeWanderlustTry other types of stereo effects, such as.Tweak its controls for a surreal and rich reverb effect.

Playback and control of MASSIVE X
The Header contains controls that you can use to play the sound, such as pitch bend, modulation wheel, aftertouch, and 16 macros.All of these can be used for host automation and MIDI control. MASSIVE X provides two ways to assign these controls to parameters.
Note: If you jump directly to this section or need to reset the sound, load a preset called QSG-03 Control from the Quick Start category of the Preset menu.
Single parameter assignment
The controls in the header can inherit the full range of a single parameter.For example, you can use the modulation wheel to control the position of the wavetable.
Drag and drop the modulation wheel icon (M) from the header to the Wavetable Position.
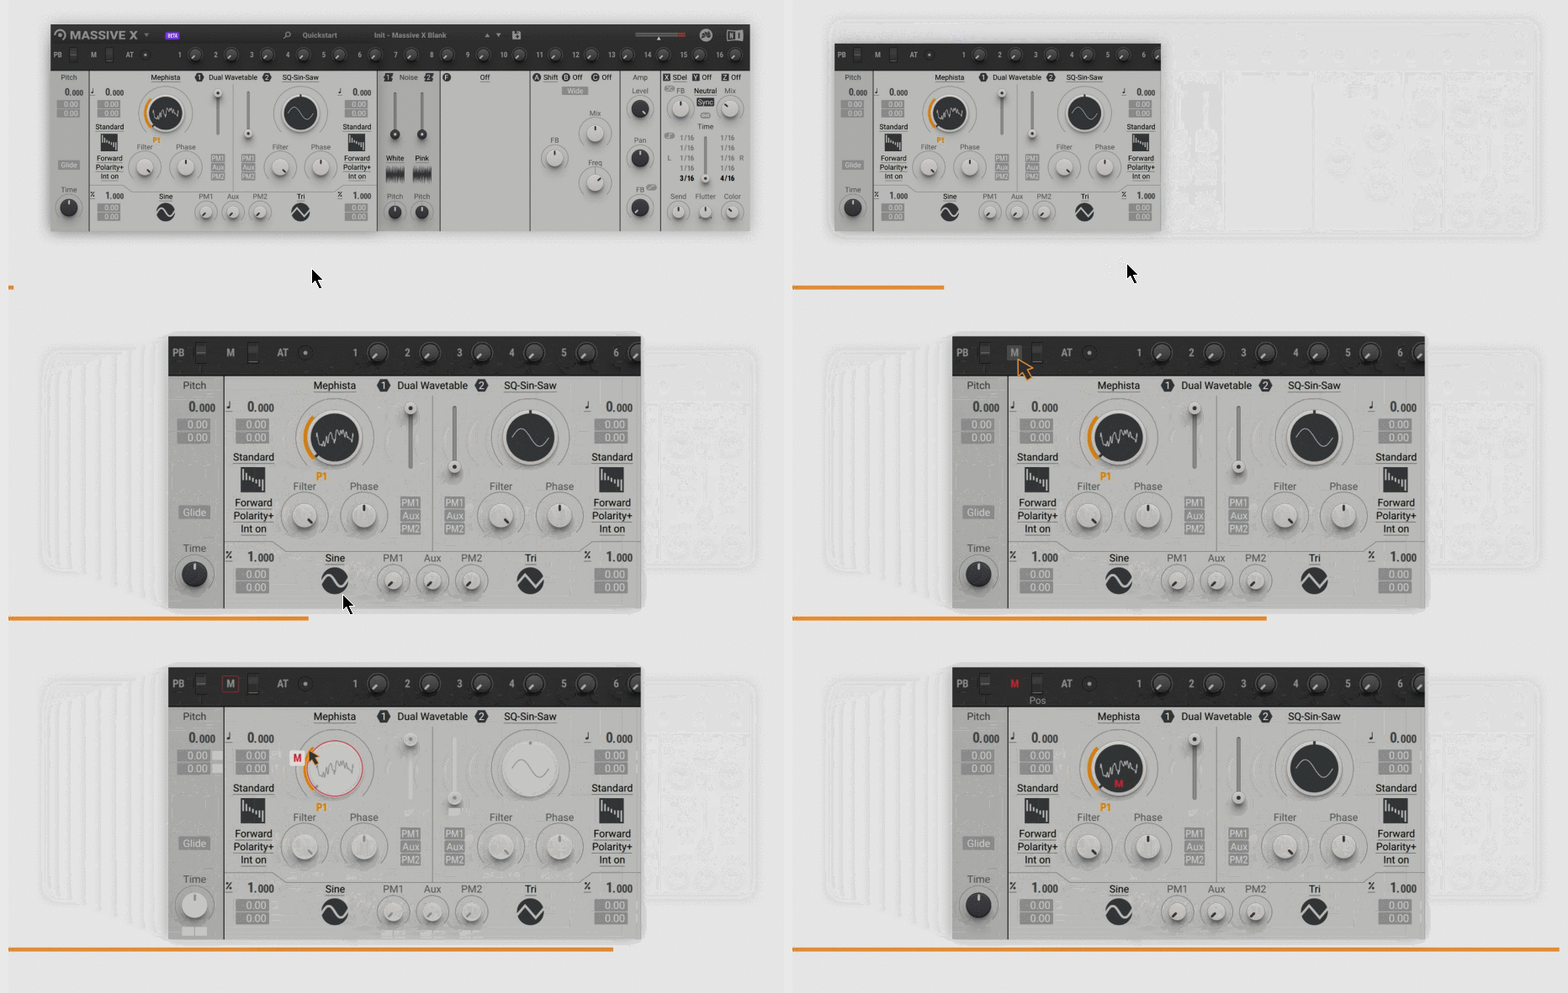
You can control the position of the wavetable from the keyboard by playing notes and turning the modulation wheel.
Assignment of multiple parameters
The controls in the header can also adjust multiple parameters at the same time.This works the same as assigning a modulation source.For example, you can use Macro 1 to control both Feedback and Freq in the Frequency Shifter.
Drag and drop the Macro icon (1) from the Header into both the Feedback and Freq modulation slots.Then click on the modulation slot and drag it up to increase the amount of modulation.
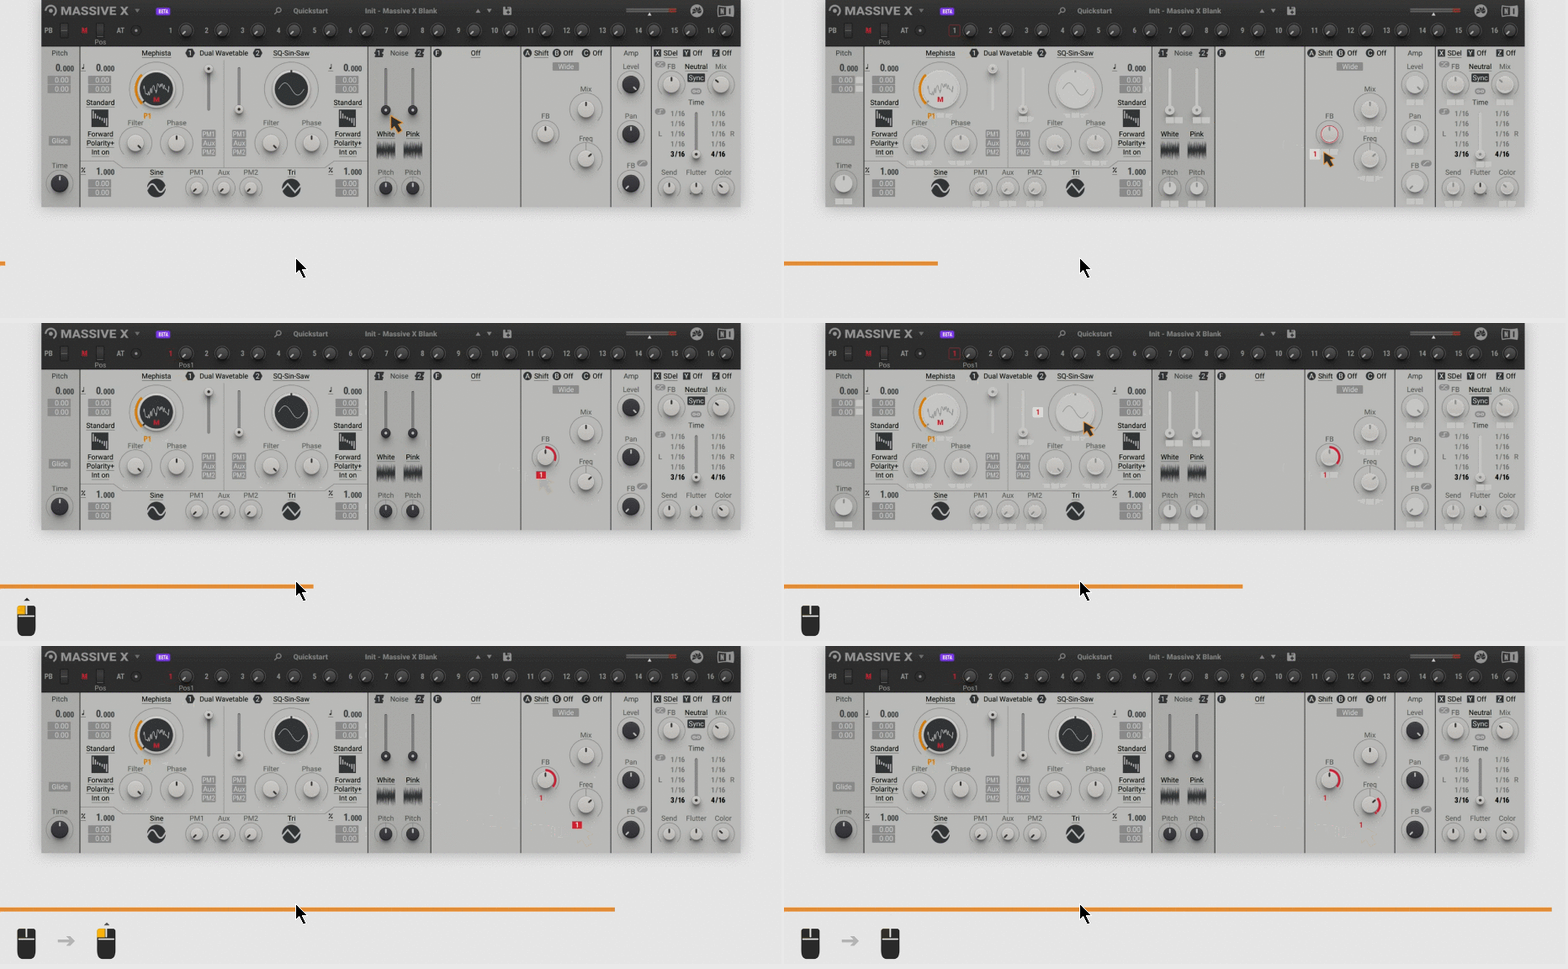
You can control two parameters of the frequency shifter at the same time by playing a note and turning Macro 1.
After reading this guide, you should be familiar with the basic workflow for creating simple sounds with MASSIVE X.However, MASSIVE X has more than can be covered here.If you need tips or more information about a particular feature, check back for upcoming tutorials on a regular basis.
This is a compilation of Massive X related videos posted on YouTube.
I also wrote an introductory article about Massive X's free and paid presets.Free presets are good, so if you have Massive X, please do!
Summary
I've been waiting this long, but I think it's a synth that doesn't disappoint.
Massive has been around for a whileSERUMWas deprived of the title of champion, but Massive XSERUMI'm looking forward to the future trends as it may become a synth that shakes the position of.
(Komplete users are automatically Massive X users, so you'll find usage information and free presets all at once.)

Comment