Native Instruments Massive X Manual Japanese Performer Edition
This is yosi from Chillout with Beats.
Since some manuals have been released, I will tell you in Japanese and some videos.
Only the "Performers & Remote Octave" part has been released.
I always think that Native Instruments' English is beautiful, Google Translate is very accurate. (There are few corrections of mistranslations. Others take time to correct soberly)
Performers & Remote Octave
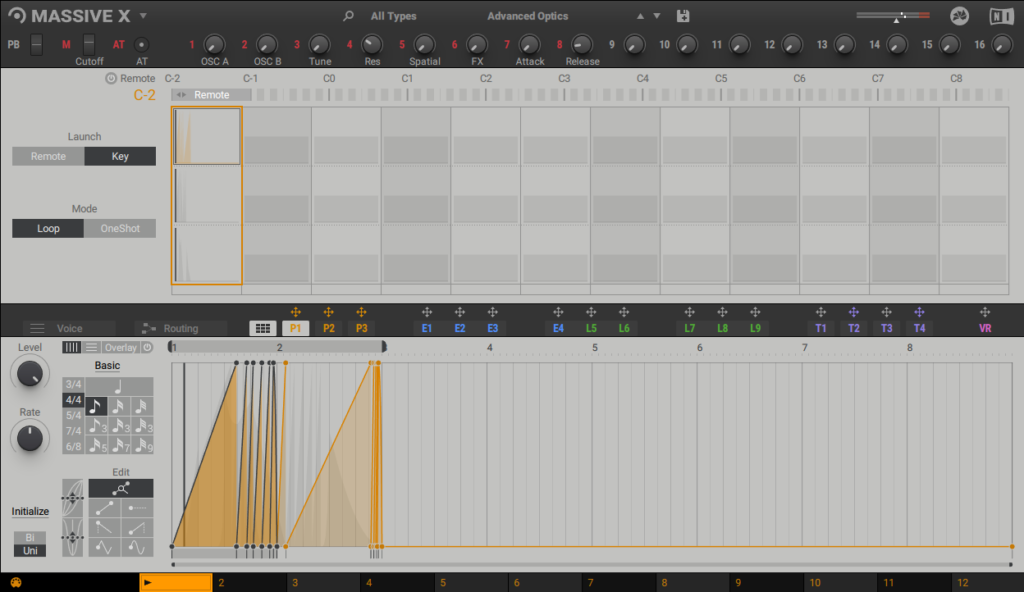
"Performers & Remote Octave" is exactly the part of this screen.
Then I will explain it immediately.
1. PERFORMERS
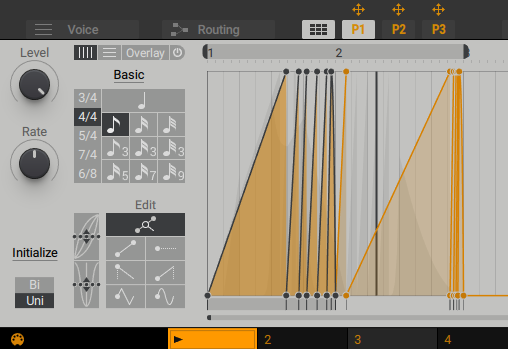
Performer provides a flexible way to add complex modulations to multiple parameters at once.
Access it from the navigation bar using the tabs labeled P1, P2, and P3 and place it in the Editor section of MASSIVE X.
Each Performer contains up to 12 different modulation patterns that you can switch between with a keyswitch.
It is being played or programmed into the host sequencer using Remote Octave.
Performer has a basic editor and a custom editor that allow you to quickly "paint" modulation curves into Performer lanes to form patterns.The default basic editor is flexible.
The custom editor allows you to set constraints on how to add and adjust curves.
And accurate results.
The grid view makes it easy because you can see a summary of all three performers at the same time.
How to copy, swap, delete patterns, trigger patterns and set patterns
Changed with a keyswitch using Remote Octave.
1.1.Overview of the Performers
This section gives an overview of Performer's features such as basic and custom features, grids, overlays, and editing tools.
 (Vertical, horizontal, overlay from left to right)
(1) Grid mode: Select one of the three grid modes (vertical, horizontal, overlay).Each grid mode has options for defining how shapes are drawn to the grid using editing tools.
• Vertical line (X-axis): A rhythmic grid for drawing shapes on the grid by selecting the grid mode and drawing tools.
• Horizontal line (Y-axis): Select the quantized drawing and editing mode.Here you have the option to set the number of steps for the parameter value (quantization) of the performer (vertical grid / Y-axis).By default, the number of steps is set to 24 (bipolar-24 to +24, unipolar 0 to +24).
• Overlay: Click Overlay and Overlay On / Off (power button) to enter grid edit mode.The placement and width of the overlay can be adjusted using the three handles above the overlay.
The number of divisions is set in the tool section (6).Overlays also have stretch controls that you can use in the same way as controls in the edit section.The difference is that the grid itself can be stretched (not the modulation node of the selection).This makes it easy to use overlays as a guide for creating modulation sections that speed up or down.You can also use overlays to create grid values that are wider than quarter or odd splits at irregular times.
• Overlay On / Off: Shows or hides the overlay grid.
(2) Basic / Custom grid: Switch between basic grid mode and custom grid mode.
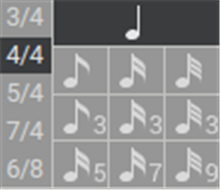
• The basic grid is the default option for drawing curves on the run grid using the drawing tool (6).Use basic mode to define the time signature and rhythm resolution of the grid from quarter note to thirty-second note.
• Custom grids are used to create complex rhythmic grids / time signatures with up to eight different departments.Use a custom grid to process one or more signatures.When using custom mode, set the number bar, beat length, and subdivision.
(3) Loop marker: Drag the loop marker handle to define the start and end points of the section of the modulation pattern you want to play.The marked sections will play according to how the mode is set in the Performer Grid Overview.The following options are available in Performer Grid Overview.
• Loops, sections within loop markers are repeated.
• OneShot, the section inside the loop marker is played only once.
For more information on Remote Octave and Performer Grid Overview, see Remote Octave Overview.
(5) Editor: Create a modulation using the drawing tool (6) and the editing tool (9).
• The tools below stretch the node inward or outward.
2. USING THE PERFORMERS
To change the parameters over time, add shapes to the grid and manipulate the modulation points at different points on the timeline to change the values of the assigned parameters.To adjust a modulation point, move the modulation point up or down to a new value, or move it left or right to fit a new point in the grid.Not only can you change the timbre of the sound, but you can also use modulation to raise or lower the pitch of the oscillator (and other pitch-related parameters) to create a melodic sequence.You can also use the Remove Octave keyswitch to play when creating melodic sequences or timbre changes.
The grid is the area where each Performer is modulated.The drawing tools allow you to add dynamic modulation shapes and then edit a single point or select multiple points.
2.1.Drawing Tools
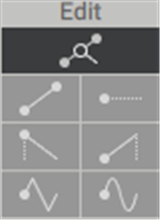
The drawing tools allow you to draw different modulation shapes on a rhythmic grid.The outline of the drawing tool is as follows.
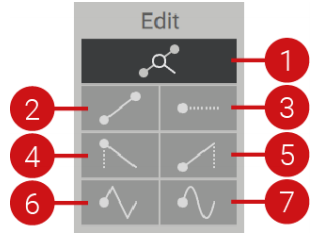
(1) String: This tool can draw points longer than one rhythm value.Click to set a modulation point on the grid to create a segment from that insertion point to the next modulation point.
If there are no other points, until the end of Performer.
(2) Linear: Creates a static value from the insertion point to the next modulation point.
(3) Static Unit: Sets a static unconnected modulation node based on the current note and rhythm value.
(4) Ramp A: When drawing in unipolar mode or above the equator in bipolar mode, this tool creates a descending ramp.Drawing below the equator in bipolar mode creates a rising ramp.
(5) Ramp B: When drawing in unipolar mode or on the equator in bipolar mode, this tool creates a rising ramp. Drawing below the equator with Bipolar creates a descending ramp.
(6) Triangle: Make a triangular lamp.Triangle waves produce non-sinusoidal waves.This wave tilts upwards and then plunges.
(7) Sine: Make a sign shape.Sine waves create a smooth sine wave curve.
2.2.Drawing Modulation
You can use the drawing tools to add modulation to the grid.When you draw a shape, it snaps to the selected time signature division and note value.For more information on choosing time signatures and note values, see Performer Overview.To draw a modulation on the grid:
1. Select the time signature and grid note value.
2. Select a drawing tool.
3. Click and drag the mouse on the grid to draw the modulation.
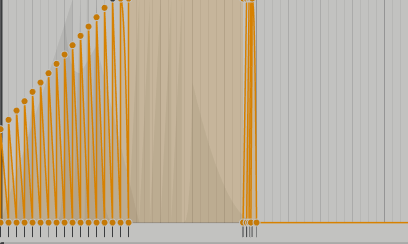
4. Move the mouse up and down while drawing to change the amplitude.
5. Assign Performer to the parameter
2.3. Assigning the Performers
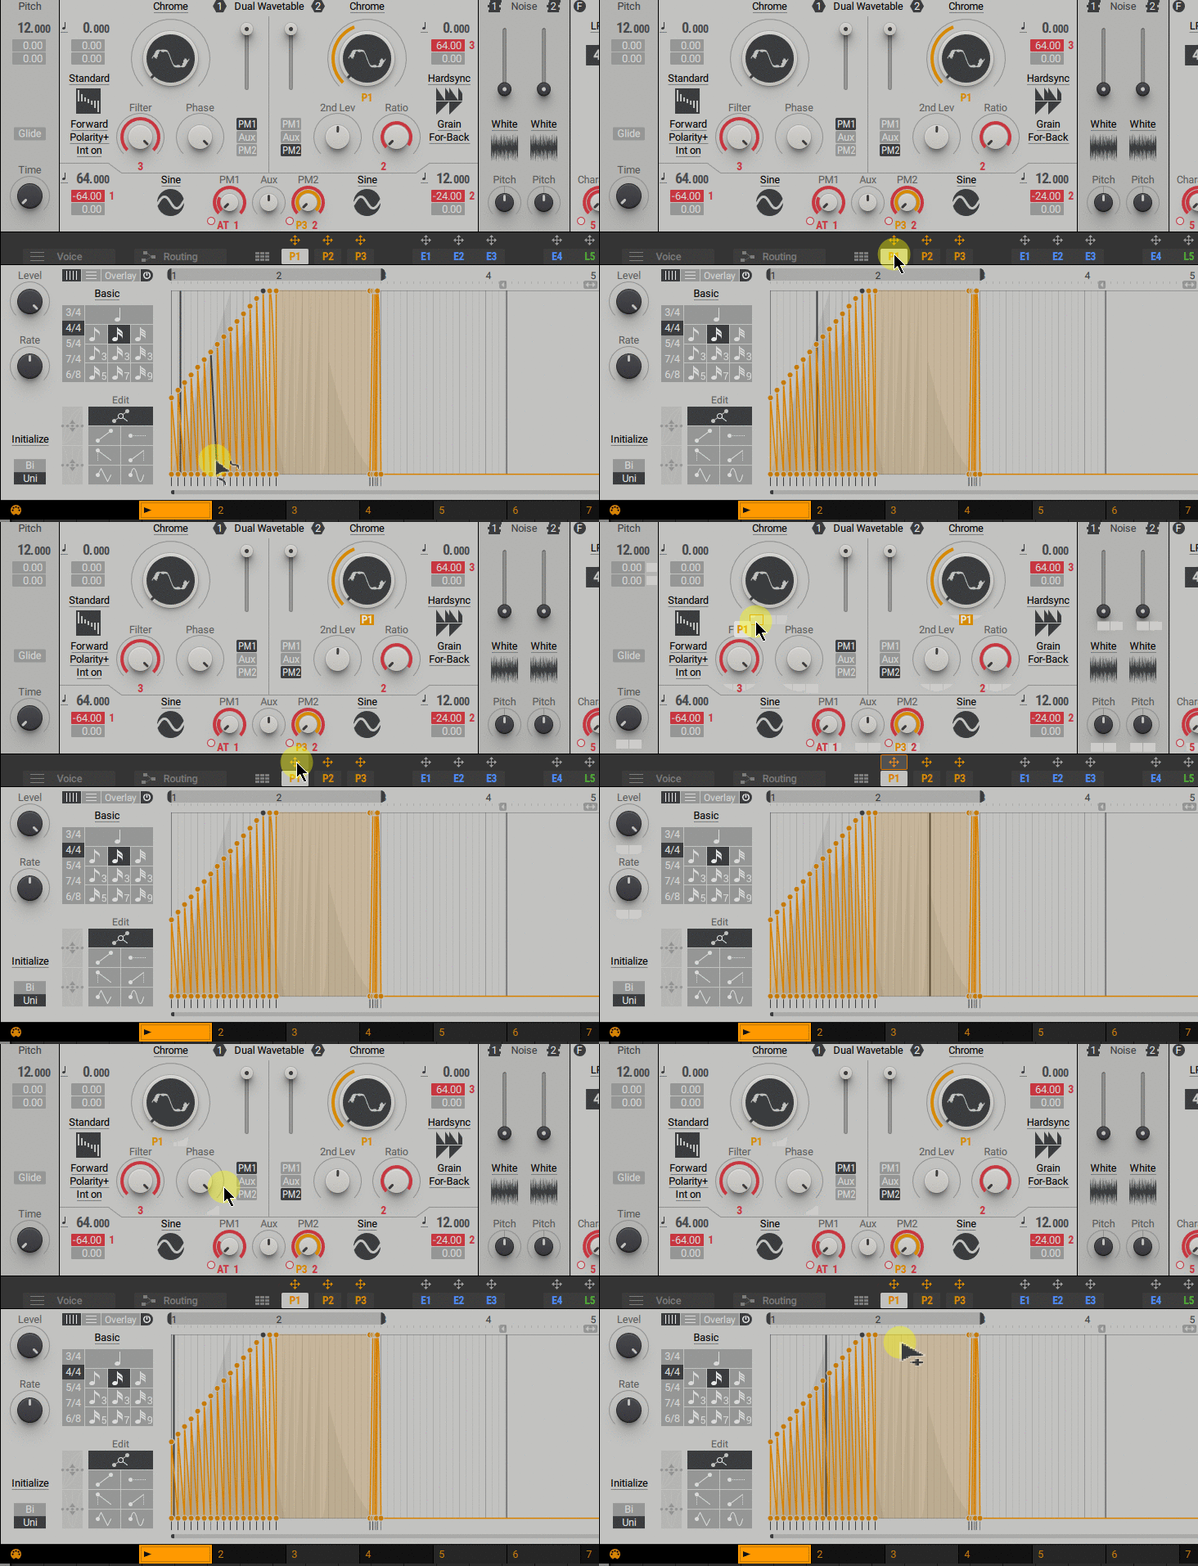
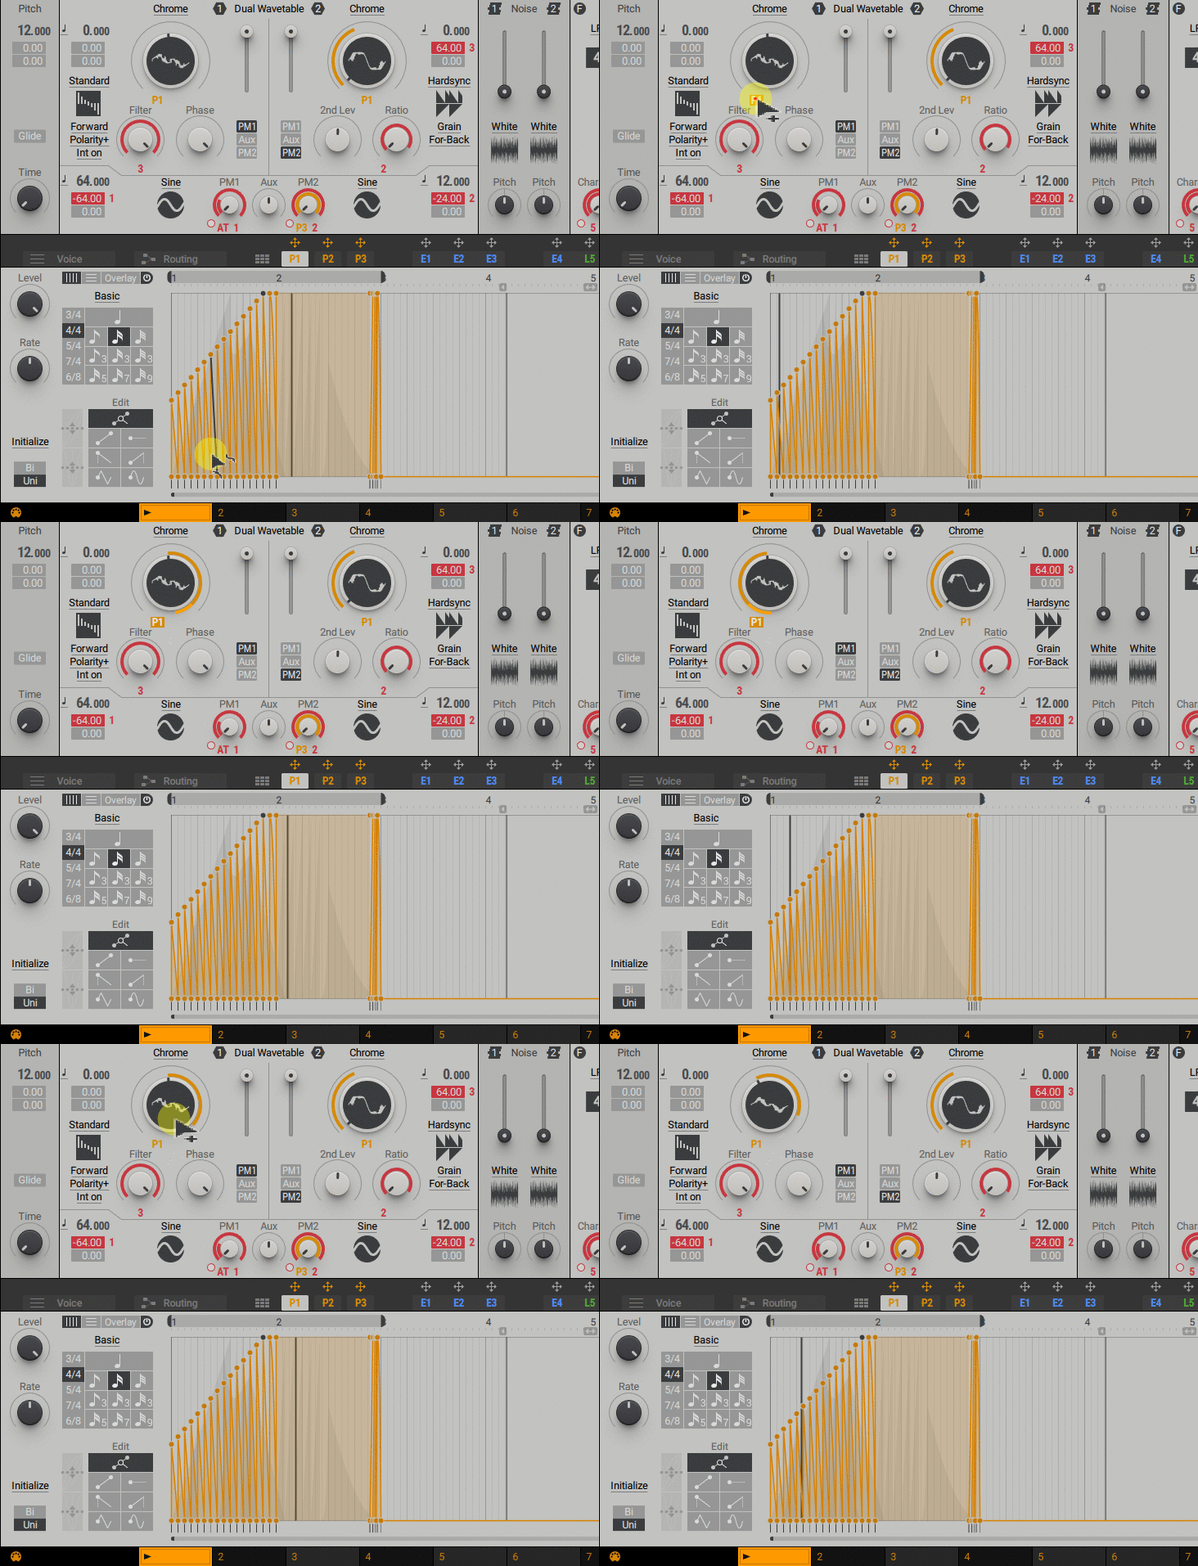
Before the effect of Performer's modulation pattern can be heard, it must first be assigned to a parameter.
The process of assigning each Performer is the same, and Performers can be assigned to multiple parameters at once.
To assign an performer to a parameter:
1. Drag the Performers 1 (P1) arrow icon, for example, to the first modulation slot in the wavetable position.Release the mouse button when the contour of the destination is highlighted.
2.4. Editing Modulation
This section outlines the features available for editing modulations in the Performer grid.
Select a modulation
To select a modulation point:
In the selection, drag the selected modulation point to highlight it.You can delete, move, or bend selected points.
Remove modulation
You can delete individual modulation points or multiple modulation points.
To remove a single modulation point:
• Double-click the modulation point.
To remove multiple modulation points:
• Select a modulation point and drag left or right.All existing points from there to the target location will be deleted.
To remove all modulations in Performer:
• Click the Initialize button and select Bipolar or Unipolar to reset the grid.
To remove all three modulation patterns for all three Performers:
• Double-click the bottom grid area of the Remote Octave overview. For more information on Remote Octave, see Performers Overview.
Move modulation
You can move a single modulation point or multiple modulation points.
To move the modulation point:
• Select the points you want to move in the selection, then drag them horizontally or vertically in the segment range.
All existing points at the desired location will be deleted.
Bend the modulation
• Hover your mouse over an existing modulation curve on the grid, click and drag up or down.
3. REMOVE OCTAVE
The remote octave provides a special key zone that gives access to 1 optional variations of Performer P2, P3, and P12.These alternative sets can be switched remotely by using MIDI notes as keyswitches or by using the mouse in the footer of MASSIVE X to select one of the 12 sets.
You can think of Remote Octave as a remote control for your keyboard controller to select different Performer modulation patterns.This can be used to change the modulation of performance.
For precise control when programming remote sequences on the fly or with your favorite host sequencer.
3.1. Overview of Remote Octave
This section gives an overview of the Remote Octave feature.
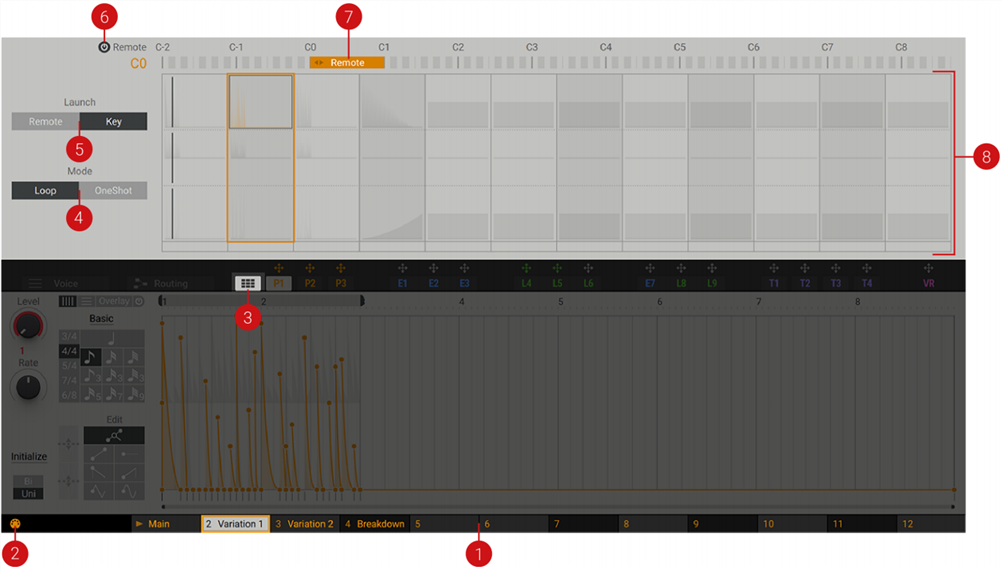
(1) Remote octave keys: There are 12 keys for the remote octave at the bottom.This area displays information about the state of the activity and is used to manually change the active pattern of all Performers using the mouse.
The following is an overview of the state of the remote octave keys.
• The Play icon next to the pattern name indicates the Performer pattern you are currently playing.
![]()
The orange outline shows which pattern will play when the next "start" signal is received.
This signal can be triggered by a remote octave change (for example, switching with a mouse in the footer or a MIDI note in the remote octave zone) or a MIDI note.The launch option selector is in the Performer Grid view (3). If the Key Launch option (5) is used, the Remote Octave switch will not immediately start playing the newly selected pattern.
![]()
The gray fill indicates the pattern you are currently editing.You can play another pattern while editing another pattern.To do this, right-click on a pattern other than the one you are playing.
![]()
The orange fill indicates the pattern that is currently open and playing in the editor.Right-click and select a key to open the associated pattern while the other pattern is playing.
![]()
(2) Remote MIDI Control: This button mutes incoming MIDI notes to the remote octave key zone.
(Defined in Performer Grid view (8).) This feature can be used, for example, to disable remote switching from the host sequencer while editing a Performer modulation effect.
pattern.
(3) Performer Grid View: The grid options button is displayed when the Performer Editor is selected and displayed at the bottom of MASSIVE X.A grid view opens with a summary of Performer playback options and all Performer patterns.
(4) Trigger mode: Switch between loop mode and one-shot mode.
• Loops, sections within loop markers are repeated.
• OneShot, the section inside the loop marker is played only once.
The Performer option applies globally to all three Performers.
(5) Performer Launch option: This selector toggles the Performer Launch option as described in the Demote Octave Keys section (1).When the pattern changes, Remote launches the pattern set directly.The keyswitch sets the focus on a new pattern that starts when the next MIDI note is played. The Key option is most useful for keyboard players who want to resume the modulation pattern on every note played. If you want your DAW to sequence the Performer pattern changes, you can use the Remote Launch option.
(6) Remote Power button: This button enables / disables the control of the remote octave key switch by MIDI.This disables key zone filtering and allows you to play notes using the full range of your keyboard.
(7) Remote Key Zone: You can shift the key zone for MIDI note control of Remote Octave up or down in octave by dragging the Remote handle of the Remote Performer Grid view.
(8) Outline of performer grid In the outline grid, there are P1 in the upper row, P2 in the lower row, and P3 in the lower row.The column holding the currently playing pattern is highlighted with an orange outline.The pattern currently displayed in the editor has a black outline. There is a play cursor as you can see in the Performer editor. Twelve pattern variations are placed next to each other on the same row.The grid provides an overview of all modulation patterns, allowing convenient copying and exchange of pattern sets and individual patterns.
• To copy a pattern, drag and drop the pattern into another slot.
• To swap patterns, right-click between the two slots and drag and drop.
Summary
There are some parts I didn't know about, and I think the editor function is very good.
However, there is a fatal problem and there is no Undo Redo function.
(If there is, please tell me secretly !!)
If you make a slight mistake, you will have to start over from the beginning and go crazy.
I also want the ability to save and load Performer.
Even if I try my best to make it, I can't help but cry.
I felt that I would like you to install the functions in that area in the next version.

Comment