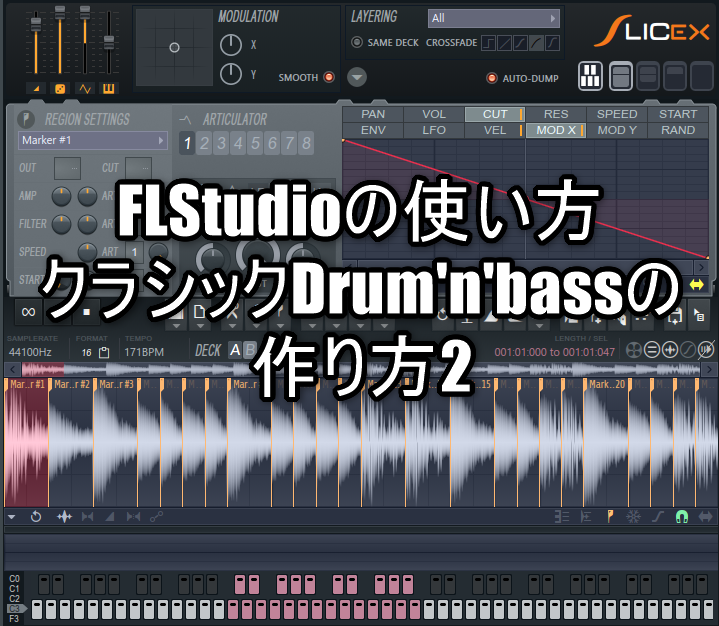
How to use FL Studio How to make a classic Drum'n'bass XNUMX
I'm yosi, the caretaker of Chillout with Beats.
The first time I had unexpectedly received a response, so I will do my best to write it.
(No, I'm always doing my best, yes)
For the time being, I will explain Loopcloud and sidechain so that even beginners can reproduce the contents of the previous demo.
I haven't really done much, so I think it's easy if I understand it.
How to use Loopcloud
LoopCloud starts from the installed state.
Please refer to the following articles for installing Loopcloud.
First, load Loop Cloud into FL Studio.
Apart from that, LoopCloud itself will also start.
LoopCloud is a separate app rather than VSTi and feels like a bridge.
However, I don't feel any inconvenience in this form because I'm looking for a loop and dragging and dropping it into my DAW.
(If you know the file name, you can search for it later.)
First, find the sample used this time.
It is a file called "RES_172_B_AtmosPad_10".
If you do a search, you will see the following.

"RES_172_B_AtmosPad_10" itself is included in the Welcom Pack and is a sample that is included free of charge from the beginning. (For the cloud mark)

Select this file and drag and drop "PROCESSED" into your DAW.

BPM will automatically synchronize if the Loop Cloud plug-in is loaded on the DAW side.

Change the start of the drum from bar 9.

Then look for the base in Loop Cloud.
Search for "DAA_174_C # _Illusive_Bass_2" in Loop Cloud.
This sample is also included in the Welcom Pack, but one thing to note.
This base has a different key than the previous pad.
![]()
Match the keys there.
Set the Pitch part to "B" and click "AUTO".

It was easy even with a video.
Place the base so that it starts at bar 9.
Now you are ready.The only thing left is the side chain.
When I listen to it in this state, it feels a little flat and not sharp.
How to hang the side chain
As I wrote before, I will rewrite a part for this article.
(I also have experience, but when I was told to read this article, the content was a little different and I could not reproduce it as it is)
Click here for the article I wrote before. If you are interested, please read it.
(I also wrote a method applied to delay)
First of all, for the side chain, we have prepared an easy-to-understand video.
There is no side chain in the first half, and there is a side chain in the second half.
I will briefly explain only the point of what a side chain is.
The point is that the trigger is used to apply compression, so other sounds can be reduced only when the trigger is ringing.
In the example of the video, the sound of the Pad becomes quiet at the moment when the kick sounds, and after a certain period of time, the Pad returns to the original volume.
"Constant time" is determined by Release Time.
Also, the amount of sound reduction is determined by the balance between Ratio and Threshold.
When hanging a side chain in FL Studio
There are two patterns for applying side chains in FL Studio.
One is to use a mixer to apply the side chain in the usual way.
The other is to use Patcher and hang a sidechain inside Patcher.
The merit of using Patcher is easy to understand visually, and even in a drum loop, you can extract only the kick with EQ and apply a side chain.
Set the side chain
I will explain how to use Patcher.
First, decide the routing of each track.
Mixer5: Pad and Bass

Sidechain routing settings
Set the sidechain routing settings.
Select Mixer1 and right-click on Mixer5 ▲ and click "Sidechain to this track".

I have prepared a video because it is difficult for people who have never done this setting to understand.
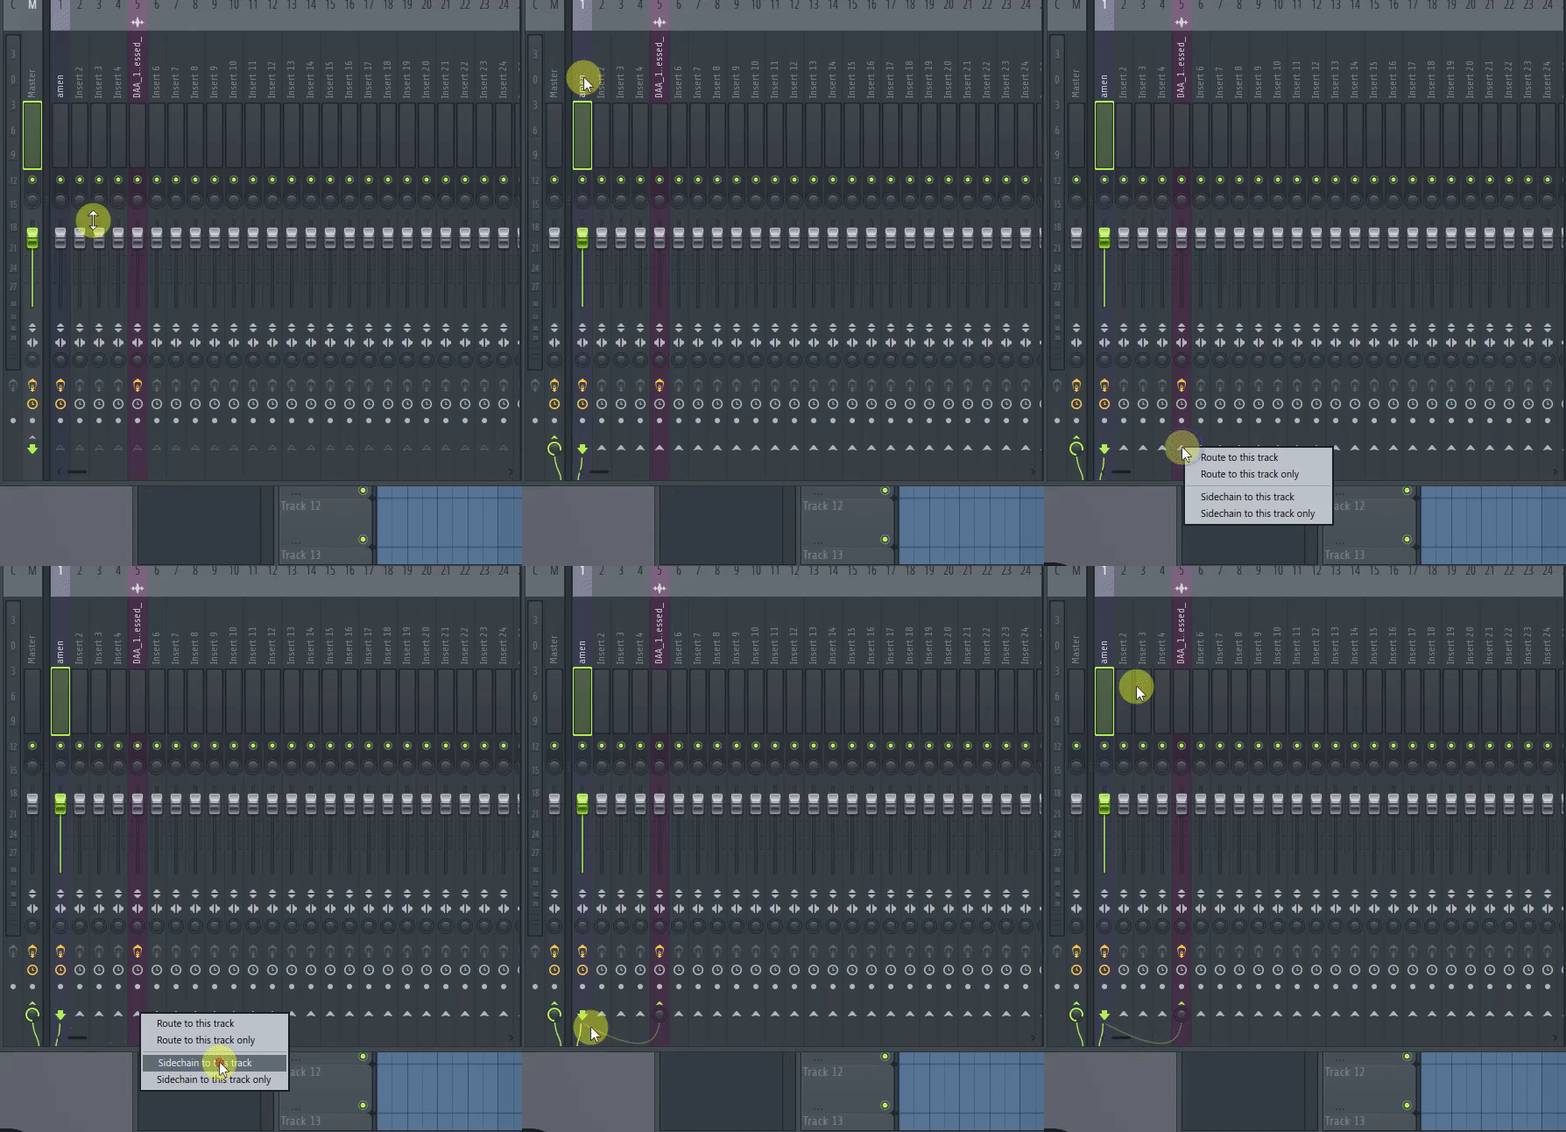
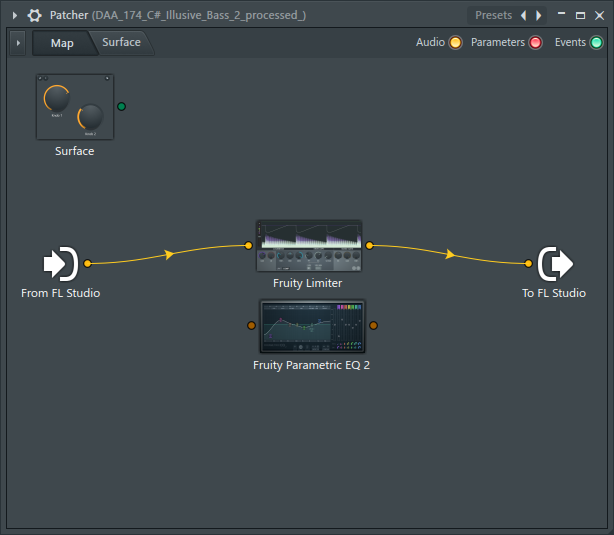
Load Patcher into Mixer5.
Patcher settings
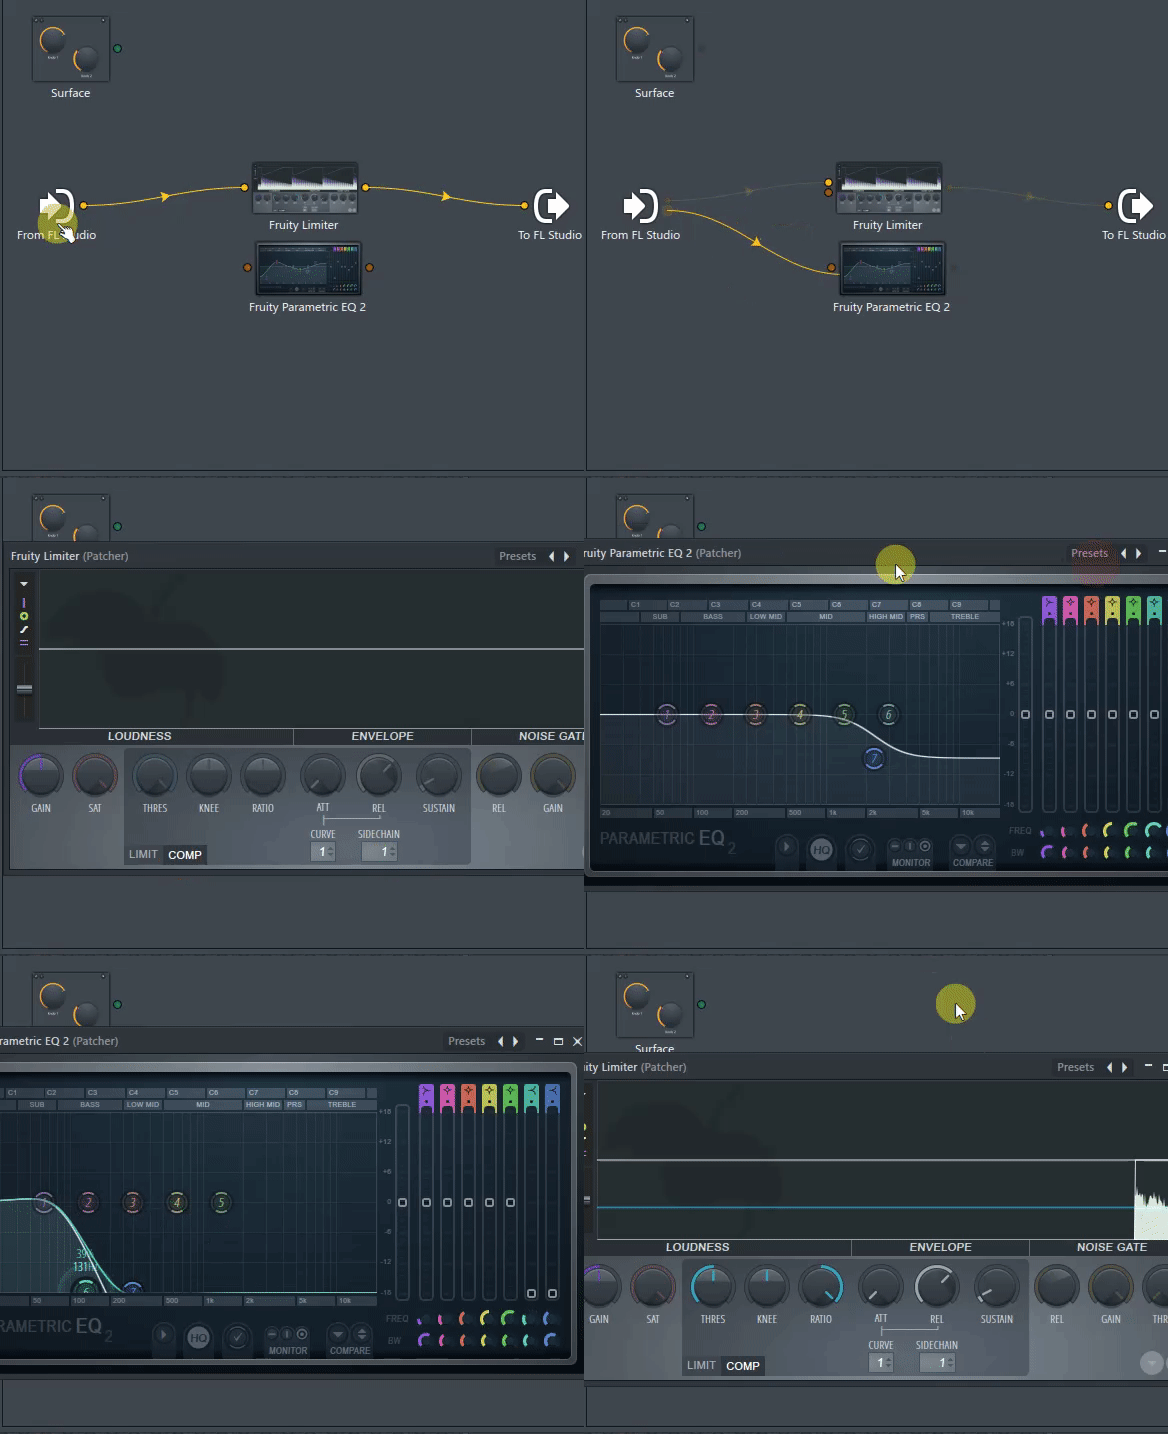
Open Patcher and right-click to load "Fruty Limiter" and "fruity equalizer 2".
Creating sidechain inputs
Create a sidechain Input in the Patcher.
Right-click From FL Studio and click Output-> Audio-> amen.
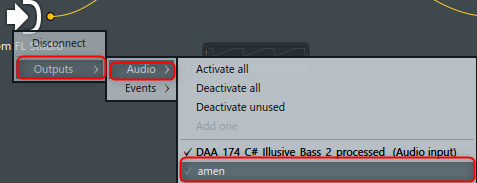
This will route the sidechain from Mixer 1 that you just enabled to this Input.
This time, prepare a sidechain Input in "Fruty Limiter".
Right-click on "Fruty Limiter" and click "Input"-> "Audio"-> "Add one".
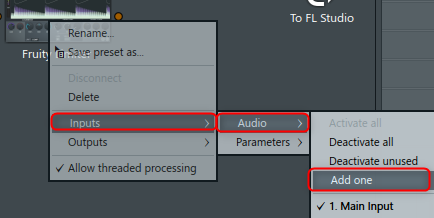
It was easy even with a video. (The video also includes the following steps)
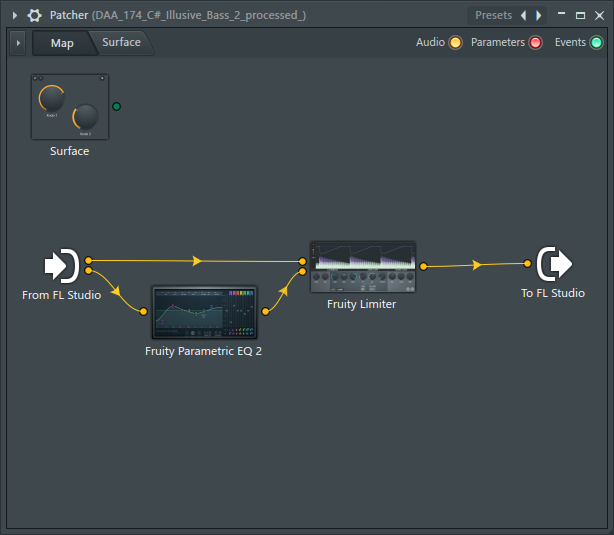
wiring
Wire as follows.
Effect settings
Please use the effect as a guide.
fruity equalizer 2
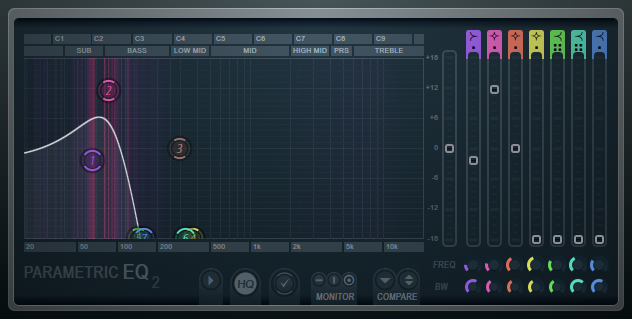
Configuration
Band2: 11.5dB 86Hz
Band3: default
Band4: -18dB 369Hz
Band5: -18dB 144Hz
Band6: -18dB 325Hz
Band7: -18dB 158Hz
Fruty Limiter
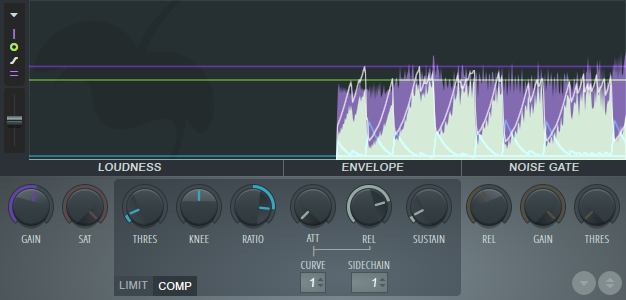
RATIO: 10.6: 1
REL: 271ms
bonus
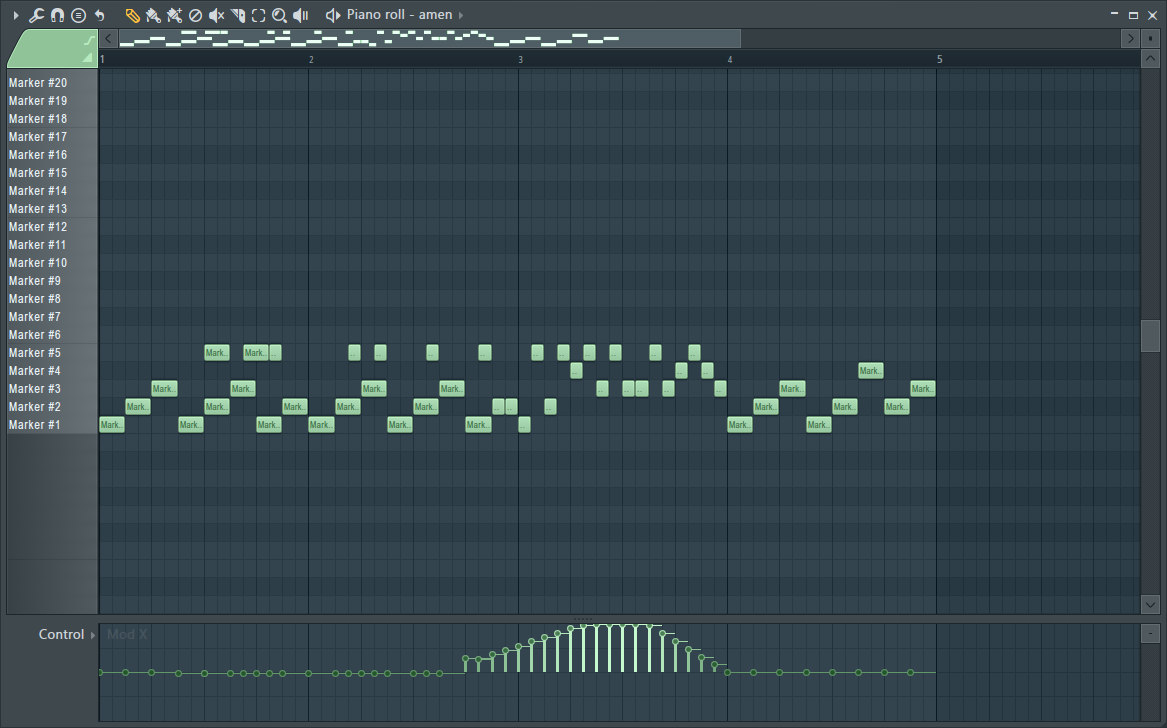
The last drum pattern is as follows.
The cutoff is changed with Control.
How to use FL Studio How to make classic Drum'n'bass XNUMX Summary
How is it?
Anyone can reproduce it, so I think that even beginners could get a feel for making drum'n'bass with FL Studio.
I think it would be fun to be able to do this.
If the fun of DTM spreads and the population of people who do DTM increases in this way, it would be good for the entire industry to flourish.
That's why I will write more, so please keep in touch.
![[Free] The New Propanium is now available for free on 8Dio 32 2019 12 17 22x14 34](https://chilloutwithbeats.com/wp-content/uploads/2019/12/2019-12-17_22h14_34.png)
Comment
I'm not sure if the side tain is hanging, but I was able to experience various things.
It is very useful because there are not many articles on how to use it practically and how to make songs ^ ^
Please refer to other articles from now on!
Thank you very much! !
thank you for your comment.
I also wrote about the sidechain effect using automation.
It may be easier to understand the change in sound here.
Please read it if you like.
https://chilloutwithbeats.com/flstudio-sidechain-automation/