How to use Voltage Modular Nucleus Initial setting
This is yosi from Chillout with Beats.
Voltage Modular Nucleus has been distributed for free, so I will explore what I can do by touching it.
Please refer to the following article for download.
I want to know how to make it because the setting is good!If you are interested in this article, please read this article.
Overview of Voltage Modular
Voltage ModularVCV Rack,Softube OfStructureIt is a virtual modular that reproduces the same hardware modularity as software.
FreeVCV RackI have written quite a few articles about this, so please refer to this as well if you like.
I will post the official video.
System requirements
AU, VST, VST3, AAX, standalone
Mac OS: CS X 10.9 or later, 64-bit only. 8GB or more RAM, quad-core CPU recommended
Windows: Windows 7 and above, 64-bit only. 8GB or more RAM, quad-core CPU recommended
Voltage Modular initial settings
Installation is the same as ordinary software, so I will omit it.
You will be asked for an email and password at startup, so enter them and click "Login".
(Same authentication method as Reason)
Recently, there are many software that use the audio settings of the OS as they are, so there are many cases where the sound is produced without doing anything.
However, it may not be single thread setting or ASIO, so it is recommended to check the setting for the time being.
Click the gear icon at the top of the screen to open the settings screen.
I will post the Google Translate of the manual.
![]()
General

Undo, user log file settings, etc.
![]()
Add Undo Changes to Module Controls with Mouse-Enable this to undo the adjustments to the module's knobs / sliders / buttons.If you need the ability to undo all aspects of patch editing and programming, it's a good idea to leave this on.
Load last preset at startup (standalone only)
![]()
Voltage Modular Automatically loads the last preset used when launching the standalone version.
![]()
Creating a log file for use-This will create a text document of all Voltage Modular internals and routines in use.It is primarily intended for users who develop custom modulars using the Module Designer app. Click View Log Folder to open the folder that contains the Voltage Modular log file document.Pictures of wooden logs are not displayed.

Preset Folder-Shows the current location of Voltage Modular sound presets.This can be changed by clicking on the field and entering it.
Browse…-Shows the current location of the file manager's preset folders.
Set Default-Sets the currently displayed preset folder path as the default location
Clear Cache File-Deletes all log files, temporary sound, and image cache.
Delete Module File-Deletes all modules.This is in case the module gets damaged. Voltage Modular "knows" that a module has been removed and automatically re-downloads all purchased modules so you won't lose anything forever.However, it may take some time, so don't delete the module files 5 minutes before you go on stage.
CPU

These settings define how Voltage Modular leverages your computer's processor hardware.

Use Multiple Threads for Mixing-On high-speed computers with multiple cores, this feature can significantly improve mixing performance, but it also increases CPU usage.On slow computers, this feature can slow down mixing and slow performance.The number of mixed threads used can be set in the dialog.This option is off by default, so be sure to enable it if you are using a fast multiprocessor computer.
![]()
Use OpenGL Hardware Acceleration-This will improve graphics performance if supported by your graphics card.If you're not sure, it's a good idea to do some research with your graphics card (or try both methods to see what improves performance).
INTERFACE

Here you can customize the Voltage Modular user interface settings.
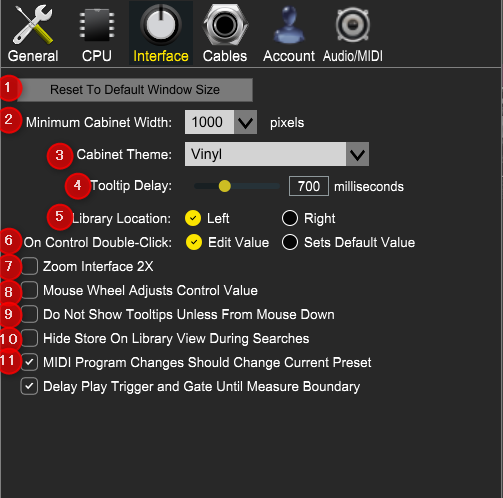
(1) Reset To Default Window Size-Resets the voltage modular workspace to 1280 x 720 pixels. If the Voltage Modular workspace grows relative to the display for some reason and cannot be resized, use it to reset the window size.
(2) Minimum Cabinet Width-This sets the narrowest width that you can adjust the size of the Voltage Modular when you resize it by dragging the edge of the window.
(3) Cabinet Theme-These are the various "skins" on the outside and inside of the Voltage Modular cabinet.Try this with hardware modular!
(3) Tooltip Delay-If you don't notice, a tooltip is a handy little text that pops up when you hover over a control or jack (try it first, wait ...). The Tooltip Delay setting defines how long the cursor should be on the control before the tooltip pops up.
(5) Library Location-This determines whether the library, including modules, cabinets, MIDI, and store tabs, appears on the left (default) or right side of the workspace.
(6) On Control Double-Click-Defines what happens when the mouse is double-clicked on the control. If you select Edit Value, you can enter a number and press Enter or Return to enter the exact number. If Set Default Value is selected, double-clicking the control will reset it to the default value.
(7) Zoom Interface 2X-Choose this if you have a monitor with a high pixel density-usually this is a PC with a 4K + display. Macs with Retina displays fall into this category, but wiley OS X automatically adjusts for this, so you don't need to change this.
(8) Mouse Wheel Adjusts Control Value-When enabled, you can move the mouse wheel (or slide your finger if you're using an Apple Magic Mouse) to adjust knob, slider, and switch values.
(9) Do Not Show Tooltips Unless From Mouse Down-Select this check box to hide the tooltip when you hover over the control.Displayed only when the mouse button is pressed.This usually happens when you move the rotary knob or slider control.
(10) Hide Store On Library View During Searches-If you uncheck this box, Voltage Modular will display modules that you do not own in a special store category.Clicking this option disables the display of store categories and only shows the modules you own.
(11) MIDI Program Changes Should Change Current Preset-You can change the voltage modular patch with a MIDI program change message.
CABLES
Now set the behavior of the Voltage Modular virtual patch cable.
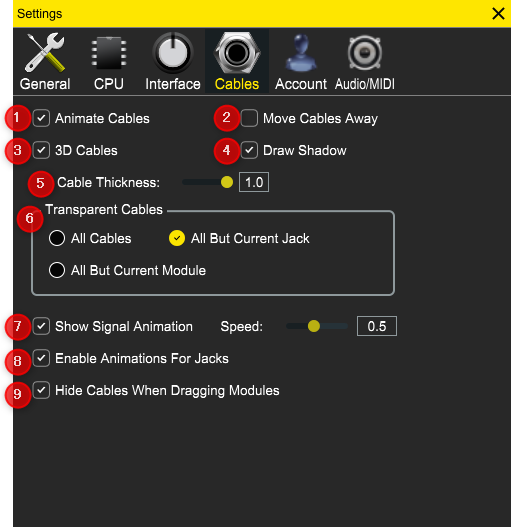
(1) Animate Cables-If checked, the voltage modular cable will bend or hang like a real cable.This makes everything sound better (not really, but it looks cool).
(2) Move Cables Away-If checked, hovering the mouse over the cable (or multiple cable spaghetti) will temporarily move the cable out of the way, making the module below easier to see.
(3) 3D Cables-Check this shade to make the cable look more three-dimensional.Best of all, you don't need these stupid red and green glasses.
(4) Draw Shadow-The cable casts a shadow on the module.
(5) Cable Thickness-Adjust the thickness of all cables.
(6) Transparent Cables-This works in conjunction with the Cable Transparency button described earlier. If you select All Cables, the Cable Transparency slider affects all cables. With All except the current module selected, hovering the mouse over the module will make the cable opaque. Transparent Cables have no effect when the Cable Transparency control is set to the maximum setting.
(7) Show Signal Animation-When enabled, a stream of "ant marches" will be superimposed on the cable that displays the flow and direction of the signal. (The wider the cable, the easier it will be to see.) The Speed slider adjusts the display speed, but it does not affect the signal.
(8) Enable Animations For Jacks-Select this to see a nice little animation when you click on the jack to use the built-in 6-way multi.For ultra-quick Type A personalities (like the guy typing this), unchecking this box disables the animation and the 6-way multi pops up immediately.
(9) Hide Cables When Dragging Modules-This is self-explanatory.If the cable disappears when you move the module, it will be easier to place the module.
ACCOUNT
Personal login information and account settings.
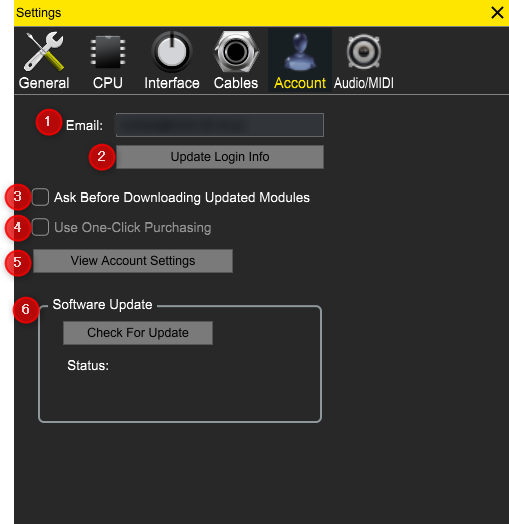
(1) Email-The email address of your current login is displayed.
(2) Update Login Info-No, there is no news or tour dates for yacht rock superstar Kenny Loggins.Clicking this will open the login screen with the same email and password that you see when you first launch Voltage Modular.
(3) Ask Before Downloading Updated Modules-Often we fix bugs and improve modules.By default, Voltage Modular automatically downloads new versions of modules when available.Select this check box to disable automatic updates and ask if you want to update the module.It does not modify existing modules that could potentially "break" existing patches, but has been updated if you are using Voltage Modular for live performance or other "mission-critical" situations. We recommend that you enable verification before downloading the module.
(4) Use One-Click Purchasing-When enabled, all login / credit card nonsense will be skipped and module purchases will be faster.Do not turn this on if you have an irresponsible kid who is crazy about modular synthesis (or if you are an irresponsible kid who is crazy about modular synthesis).
(5) View Account Settings-This will open a personal account page on the Cherry Audio Store website with information about purchased modules and more.
(6) Check For Update-Check for updates.
AUDIO / MIDI
Audio and MIDI hardware input / output settings.This tab only appears in the standalone version of Voltage Modular.
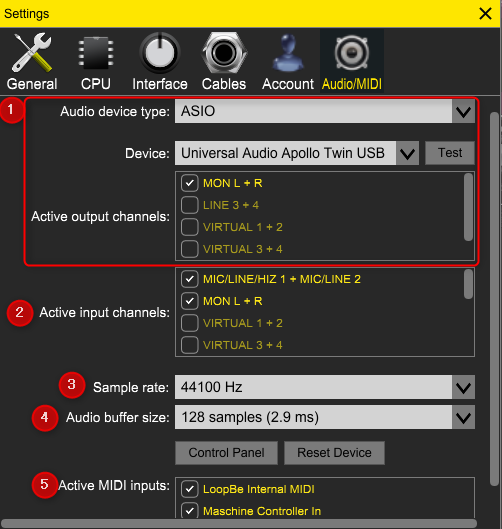
Output-Use this drop-down menu to select a physical audio output source.This defaults to built-in inline output, or computer onboard system audio, but an external professional audio interface improves fidelity.The maximum audible difference is usually the reduction of background noise or hum, but external audio hardware is also flexible in terms of the number of inputs and outputs and the presence of the built-in microphone or low-level instrument (ie, electric guitar). It will be higher.These are especially useful when processing sounds using the Voltage Modular's external inputs. Click the Test button to generate a sine wave.This is useful for troubleshooting.Another name, "Why doesn't this make noise !?"
Input-Click the drop-down menu to select the physical input that will supply the audio input from the host jack on the I / O panel.When the selected input is receiving an audio signal, the small horizontal input meter on the right will light up.
Sample Rate-This sets the voltage modular's global sample rate.To optimize overall performance, it is usually recommended to use the default rate of 48 kHz, but if your processor has the processing power, try 96 kHz mode.
Audio Buffer Size-Like other digital audio apps, it defines performance and note latency and is highly dependent on your computer's CPU speed.Professional external audio interfaces often perform better than "embedded" system audio.Lower settings reduce latency (faster response to played notes), but increase the likelihood of audio gaps and noise.
Active MIDI Inputs-Shows all available MIDI input sources: keyboards, pad controls, MIDI knob / fader control surfaces, and more.Check the box to enable it.
How to play the preset
It's nothing to end with just a lecture, so let's play the preset for the time being.
Click Select Preset in the menu.
![]()
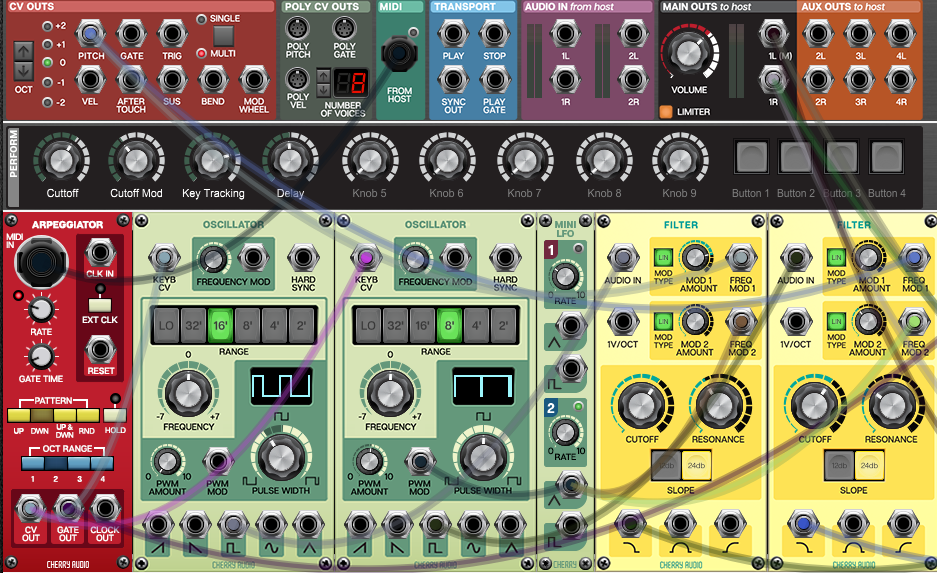
The following will be displayed. Select "Basic Arp 1" here.
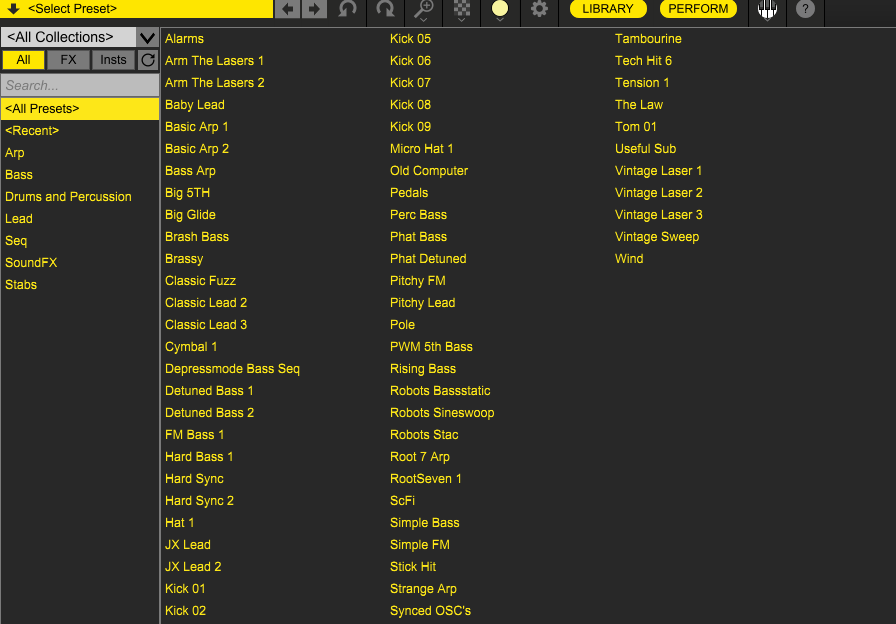
I changed the layout a little, but I think that the same modules as below are lined up side by side in terms of configuration.
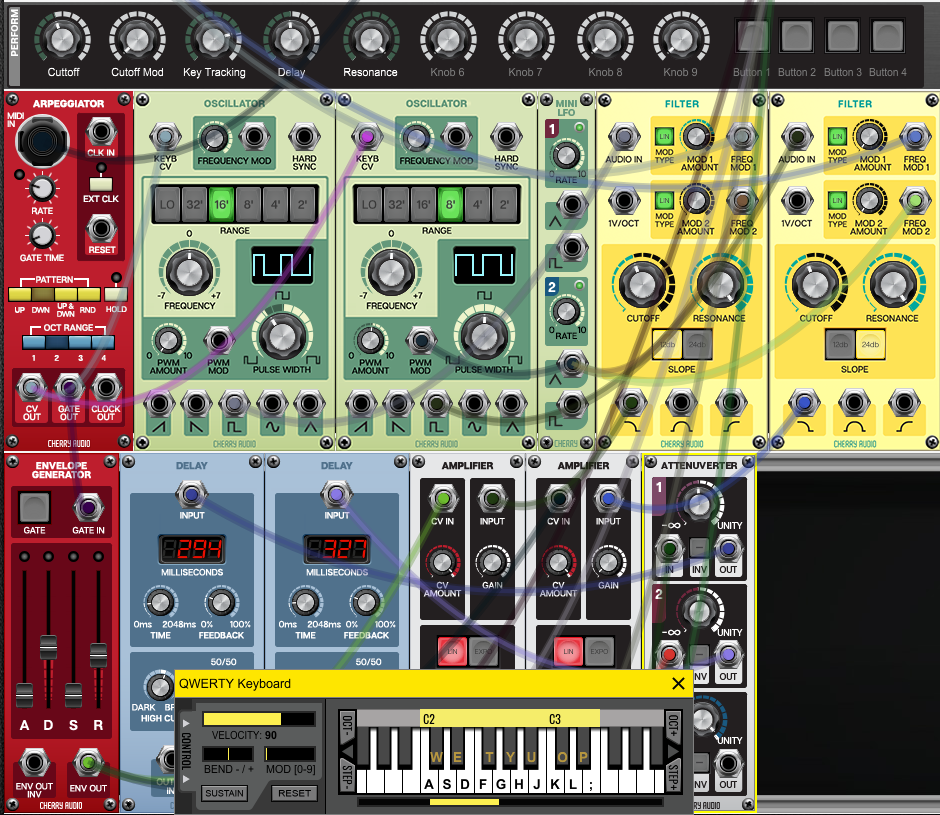
First, if "QWERTY Keyboard" is not displayed, click the keyboard icon at the top of the screen.

![]()
From the keyboard of the PCA S D F If you press equal, you will hear the synth sound.
If it does not sound, review the Audio settings.
How to use QWERTY Keyboard
It wasn't mentioned in the manual, but I'd like to mention what I felt when I used it.

(1) VELOCITY:You can set the velocity value to be output when you press the PC keyboard.
(2) BEND-/ +:It is the same operation as pitch bend. "BEND-/ +", "MOD [0-9]" and "SUSTAIN" are linked with "CV OUT".It's just modular, so you can use it freely.Is there a shortcut? - ; .
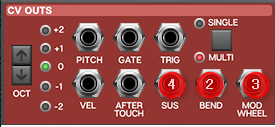
(3) MOD [0-9]:It works the same as the modulation wheel.If you move it with the mouse, the value will be kept at that location while dragging, but if you drag it, it will return to 0.Shortcuts are numbersXNUMX~Nine.
(4) SUSTAIN:It works the same as the sustain pedal.The shortcut is Tab ON only while pressing with Shift + Tab To switch between ON and OFF.
(5) RESET:Reset all QWERTY Keyboard settings.
(6) OCT- +:Moves the PC keyboard assignment up or down an octave.Shortcuts are one octave down Z Above X is. (Shortcuts are capitalized for clarity)
(7) STEP-+:Moves the PC keyboard assignment up or down a semitone.The shortcut is a semitone down C Above V .
How to use Voltage Modular Nucleus Initial setting summary
I'm surprised at the amount of initial settings that I intend to finish lightly.
And personally, I don't really like useless coloring, useless animations, and specifications around cables.
Given thatVCV RackI really like it because it's simple and lean.
Next time, I will actually make a sound and make a simple synth.


Comment