How to use FL Studio How to set the optimal buffer size
I will explain how to use FLStudio20.
This time is how to set the buffer size.
It differs on a case-by-case basis, but since it was mentioned on the ImageLine homepage, I will explain based on that.
What is latency?
Before the buffer size, I will briefly write about the latency that is closely related.
I will quote the explanation from the Wiki.
Generally, when a computer outputs a sound signal, the sound data is recorded in a buffer of a certain length and then sequentially output to the hardware.Therefore, latency (seconds) is generated by the number of buffer samples divided by the sampling frequency (hertz).The smaller the buffer capacity, the smaller the latency, but the overhead over time increases, and if the system performance is low, processing omissions may occur and noise may occur.
Latency is also generated by the effector's digital signal processing algorithm.For example, in an algorithm using a fast Fourier transform (FFT), latency is generated according to a window width or the like, and in a limiter / compressor having a look-ahead function, latency is generated according to a look-ahead time.Further, in multi-track reproduction, if an effector having latency is used only for a specific track, the synchronization will be out of sync.Therefore, some systems have a latency correction function that unifies and synchronizes the latencies of all tracks.
In short, the smaller the buffer size, the lower the latency (delay), and the larger the buffer size, the higher the latency (delay).
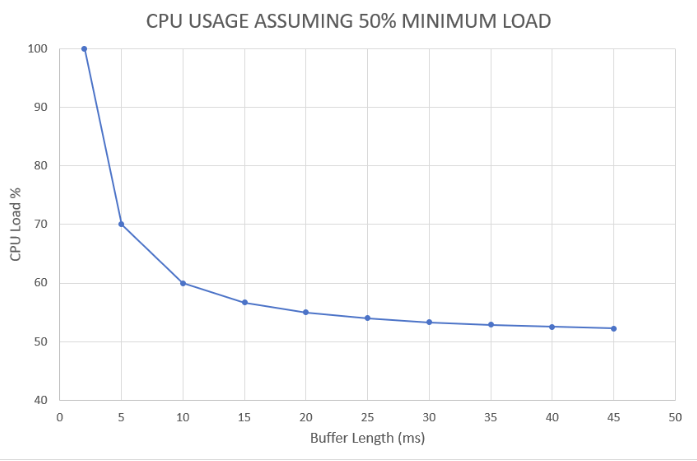
Then why not minimize the buffer size?Some people may think that, so to explain, if you make the buffer smaller, the CPU load will increase accordingly.
Then, if you maximize the buffer size, you can use the CPU most efficiently.
The CPU load becomes constant when the buffer size exceeds a certain level.
I borrowed it from ImageLine.As you can see from the figure belowI think that a buffer length of about 10ms to 25ms is appropriate.
When using as a DTM12ms (512smp) or 24ms (1024smp)It will be two choices.By all means in recording and live performancesIf you want to reduce latency3ms (128smp) and 6ms (256smp)I think there is a choice, but it is better to avoid 2ms (64smp). Accidents and noise caused by CPU overload are more dangerous.

FL Studio settings
Let's take a look at the FL Studio settings.
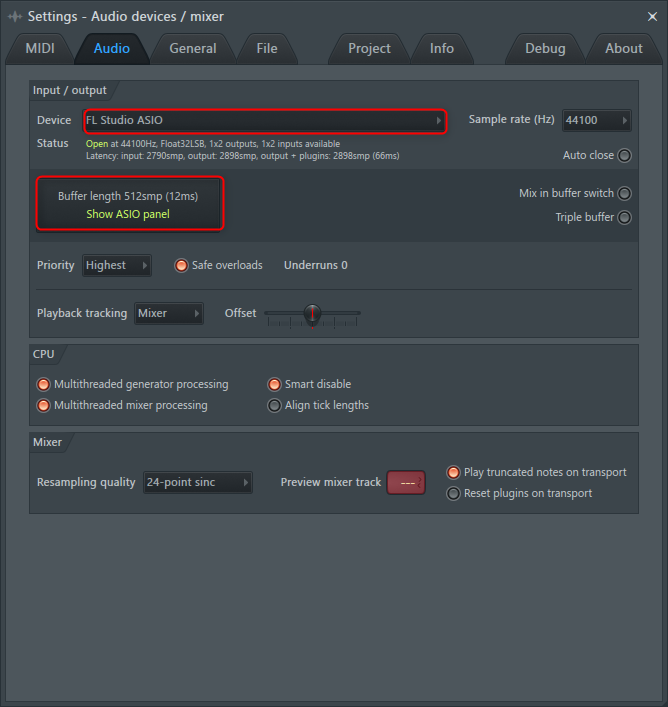
For Device, select the ASIO driver for the audio interface you are using, if any.If not, select FL Studio ASIO.
Turn off the "Triple Buffer" on the right side unless there is noise.As the buffer increases, so does the latency.
The Buffer length is 512smp, which is about 12ms, so I think 512smp is appropriate.
Click Show ASIO panel to change the Buffer length.

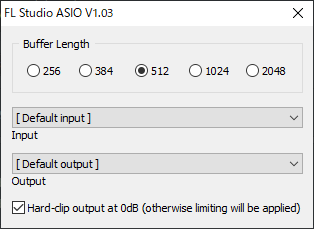
In the case of "FL Studio ASIO", the following screen will be displayed. Set any "Buffer Length" and close it with the x button.

Summary
It needs to be changed depending on the application,
BufferLength is normally used as DTM
12ms (512smp) or 24ms (1024smp)
For live or real-time recording
3ms (128smp) or 6ms (256smp)
I think that is the best.
Articles about FL Studio are summarized below.
There are quite a lot of them, so please take a look if you like.


Comment