Explanation of Voltage Modular SAMPLER I
This is yosi from Chillout with Beats.
Let's go a little further before the LFO.
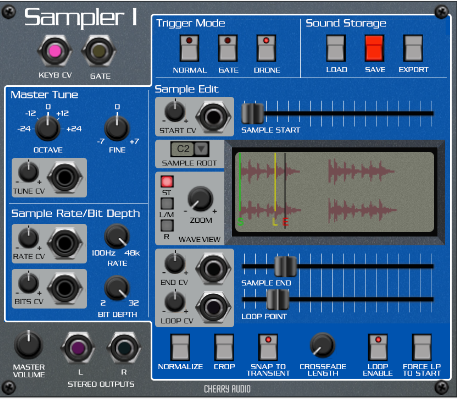
Voltage Modular SAMPLER I Google Translate + α
Cherry Audio Sampler I is a unique retro-inspired digital sampler module designed with creativity in the foreground.Useful for music tones, drum loops, drone effects, and more, allowing users to instantly sample, import, and save sounds.
We usually try to explain the panel controls from top to bottom or from left to right, but here we'll use the most meaningful way to learn how to use Sampler I.
Concept
The Sampler I is similar to the classic 80's sampling keyboard, but with a slightly different behavior.You can hold one sample at a time and play one note at a time.Also, because there are no onboard amplifiers or envelope generators, it's best to think of it as a sophisticated digital oscillator (rather than a built-in sampling device).Since the samples are not always played continuously like a standard oscillator, they include several different trigger modes to accommodate the different methods used.
Audio and CV Inputs and Outputs
Keyb CV– Standard 1V / octave CV input for pitch control.
Gate– Standard 5V gate input to start playing the sample.This depends slightly on the currently selected trigger mode.
MasterVolume– This is an output volume control.The center position is unified, and turning it will increase the additional gain by 12db.This is useful if the sample is really quiet.
Left/Right Stereo Outputs– These are audio outputs.
File Section File Section

Here you can load existing audio samples and save and export the currently loaded samples.Samplers You can load and play samples in AIF, WAV, MP3, and OGG formats.The user sample is in WAV format with a 32-bit / 48kHz resolution.
Load– Opens a standard dialog for loading raw samples or .voltagesample files.This file contains a sample and the following settings:
- Trigger mode
- Sample start, end, and loop point settings and CV modulation attenuator settings
- Transient snap, crossfade length, button settings to enable loops
- Tuning section octave, fine, and CV modulation attenuator settings
- Sample rate / bit depth section rate, bit depth, CV modulation attenuator settings
Save– Save the .voltagesample file described above.
Export– Export the entire current sample in WAV format.The exported sample is not affected by the Start Sample, End Sample, or Enable Loop control settings (or any other Sampler I settings).The exception is that if the sample is cropped or normalized, it will be exported that way.
trigger mode

This affects how the sample is regenerated when the gate voltage is received.It is important to understand how trigger mode works to get the most out of Sampler I.Therefore, this time, turn off Celebrity Big Brother and perform hangering.
As mentioned earlier, the Sampler I doesn't have its own envelope generator or amplifier, so it's best to think of it as a kind of large sampling oscillator (rather than a built-in instrument).Although it can be used alone, it creates a standard subtraction synth patch in which the output of Sampler I is patched to the filter and amp module, which is controlled by the envelope generator as follows:
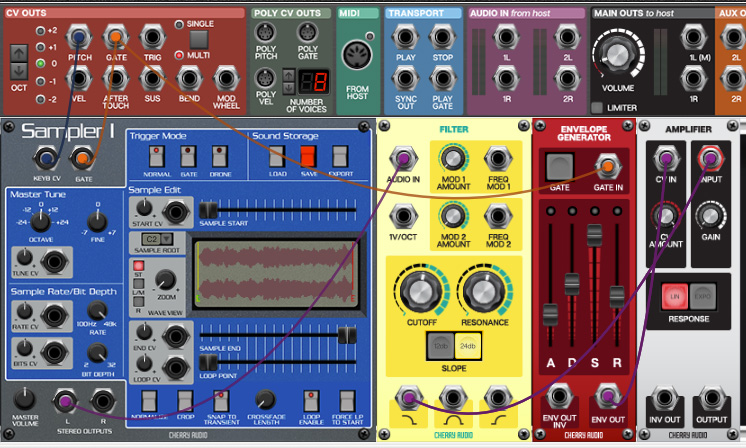
The trigger mode feature may seem counter-intuitive at first, but with Sampler I we promise to make more sense.
Normal– In Normal mode with Loop Enabled off, the sample will play from start to finish when 5V is input to the Gate input.The sample is played to the end point regardless of the voltage at the gate input.This is often referred to as "one-shot" playback. When "Loop Enable" is on, if 5V is present at the "Gate" input, the sample will play from start to finish, jump to the loop point and continue loop play (from the loop above Sampler> Filter> Env). > In combination with the Amp patch, Normal mode is especially useful for playing standard pitch sounds with loops enabled. The idea is that the sampler I outputs the sound continuously and the envelope generator / amplifier Concatenating the amplitude curves of each note. Each time a key is played, the pitch changes to the input pitch CV, and the new gate voltage retriggers the envelope generator and resumes playback from the sample start.
Gate– Gate mode works much like "normal" mode, but instead of playing continuously when a voltage is applied to the gate input, the sample voltage only occurs when the gate voltage is present. increase. When Loop Enabled is turned off, the sample will play from the sample start to the end as long as the gate voltage is present. When Loop Enabled is on, playback jumps to the loop point and the sample plays continuously from the loop point to the end as long as the gate voltage is present.
Gate The mode is useful when using Sampler I alone, as the on / off nature of the gate effectively acts as a basic on / off organ-style envelope.It's also useful for drum loops that don't require complex volume envelopes.
Drone– The sample will play continuously and the Gate CV jack will be effectively disabled.This is useful for sound effect beds, background noise, etc. "Loop enable" is automatically enabled and cannot be disabled in "drone" mode.
Tune Section
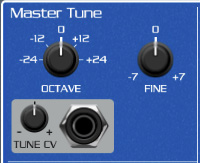
Octave– Sample playback can be transposed up to 2 octaves up and down.
Finish– You can make fine adjustments only at 5 degree intervals (up and down).
Tune CV jack and attenuator– Up to 5 octaves up and down pitch bipolar CV control is possible.This is pretty crazy.
Sample Rate / Bit Depth Section
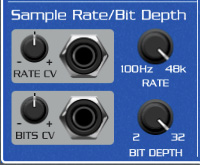
Rate– The sample rate can be adjusted from 48 kHz to 100 Hz.This is a replay parameter, so the sample data will not change permanently (although it will temporarily cause real confusion).Antialiasing filtering is not applied.At lower sample rate settings, you'll hear delicious digital aliasing noise above the playback rate frequency, much like a vintage sampler. The Rate setting can be modulated with a Rate CV mod jack and a bipolar attenuator.
Bit Depth– Set the sample playback bit rate from 32 bits to filthy 2 bits. Like Rate, Bit Depth is a playback parameter that does not change the stored sample data.Its settings can be modulated with a "Bits CV" mod jack and a bipolar attenuator.
Sample Edit Section
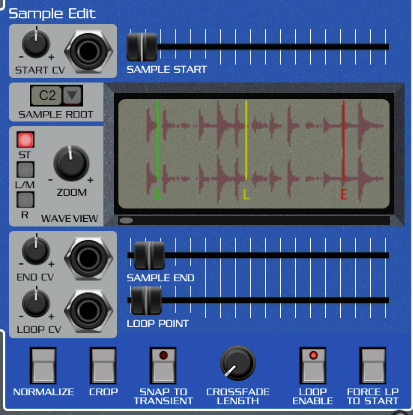
This is where the action takes place.It sets the start, end, loop point, and other parameters that affect sample playback.I'll skip this section a bit and explain how it works best.
Sample root– As the name implies, this sets the root position of the current sample.Click the down arrow button and select a note value. C2 supports the CV input of a 2V keyboard and plays samples at native pitch on MIDI note C2.
Sample Start– Set the playback start point of the sample.Move the slider to see the sample number in a tooltip. As with any Voltage control, hold down the OS X Command or Windows Option keys to move more finely. Sample Start can also be adjusted by grabbing the red start marker on the Wave View display.The sample start position can be modulated in real time using the "Start CV" mod jack and bipolar attenuator.
Sample End– Set the sample playback endpoint.You can also adjust the sample end by grabbing the red end marker on the Waveform Display display.The end position of the sample can be modulated in real time using the "End CV" mod jack and bipolar attenuator.
Loop Point– Select the “Enable Loop” button to set the point at which the sample playback loops.The loop always plays from looppoint to endpoint, regardless of whether the looppoint is set before or after the endpoint.This can be transformed into any kind of forward / reverse playback scene-see the "Pushin'Forward Back" section below.Loop points can be modulated in real time using a "loop CV" mod jack and a bipolar attenuator.
Setting Sample Start, End, and Loop points: Note that the moving resolution of the Start Sample slider is constant regardless of the Waveform Display Zoom setting, but the resolution of the Waveform Display Start marker increases with increasing Zoom size.Therefore, use the Sample Start, End, and Loop Point sliders for large adjustments, and move the Waveform Display, Start, End, and Loop markers directly for fine adjustments. recommend to.
Wave View display and controls– Sampler I's Wave View screen makes it easy to view and edit samples.The view selection button does not affect the sound, only the current display.
- ST– Show both left and right channels
- L / M– Shows the entire wave if the left channel or monosample is loaded
- R– Shows the right channel of the stereo wave
- Zoom– R Rotate clockwise to enlarge the view of the waves.To edit the sample accurately, use the Zoom knob with the scrollbar knob at the bottom of the wave display.
normalize– This means “increase the total volume of the sample so that the maximum volume is 0 db”.If the sample isn't too loud, it's usually a good idea to press the Normalize button.Note that, unlike compression and limitation, normalization does not change the dynamics of the sample, it increases the overall gain proportionally and does not affect the noise floor.Normalization does not permanently edit the sample loaded from the hard drive, but the exported or saved version retains the normalization.
Crop Top– Delete the sample data before the start point and after the end point.This is especially useful for extracting areas of audio (such as drum loops) from very large sound files, making editing much easier.Like normalization, cutting does not permanently change the sample loaded from your hard drive, but the exported or saved version retains the cutting.
Snap To Transient– Snap-on to toggle transients snaps the start, end, and loop markers to the detected transient "hits" in the waveform.This is very useful when editing a drum loop, as the marker snaps instantly to the drum hit.It is also useful for setting a starting point if there is silence at the start of the sample.I like it so much that I set it to "on" by default.
Crossfade Length– If loops are enabled, add an equal power crossfade of up to 300ms from endpoint to loop point.Very useful for creating smooth loop transition points with a lasting sound.
Loop Enable– Turn the loop on and off.When disabled, the yellow loop marker disappears from the Waveview screen.
Force LP To Start– Click this button to instantly set the loop point to the same location as the start point if you want the sample to play repeatedly from start to finish.
Pushin'Forward Back: The inspiration for the Sampler I's horizontal Start, End, and Loop sliders came from the crude hardware sampler of the 80's.The trick is not only to make real-time sample editing much easier with sliders, but also to be able to quickly play the sample in the opposite direction by swapping the start and end points.You can do the same with Sampler I.If the end point is set before the start point, the sample will play in the opposite direction.As mentioned earlier, when loop enable is on, the loop always plays from loop point to endpoint.If the position of the loop point is modulated using CV in, the loop point can be moved beyond the end point.Not only does this change from a forward loop to a backward loop, but it also produces a very nice noise as it passes through the endpoint.To try this, patch the Mod Wheel in the I / O panel to the Loop CV mod input (you may need to try setting the amount of positive or negative mods, depending on the location of the loop point).
Voltage Modular SAMPLER I points
As mentioned in the manual, it's a good idea to have a filter, envelope, and amp just like a regular synth.
In the example belowSynthTec WaveEditI read one of the WaveTable waveforms exported in step 1 with Sampler 1 and played it.
SynthTec WaveEditI wrote an article about WaveTable here, so if you are interested in WaveTable, please read it.
The problem with playing samples this way is that they don't match the pitch.
(Although it is not always necessary to match)
Thankfully, you can load VST using Plugin Host, so free tuner software (GTuneIs light and recommended)Brainworx bx_tunerSomething is recommended.
Brainworx bx_tunerCan be obtained for free with a coupon if the timing is right.

I made another one for fun.
A normal sample is loaded and sounded.This has an interesting effect.
After that, I experimented with "TRIGGER TO GATE CONVERTER" to add a little random element to the drums. If you put the LFO in "TRIGGER TO GATE CONVERTER" and the length of the Gate is too long, you cannot trigger it, so the trigger will randomly drop out of the actual drum pattern.
Summary of explanation of Voltage Modular SAMPLER I
Many of the parameters of SAMPLER I can be controlled by CV, and I really like the feeling that it is modular.
To be honest, drum-related items are quite disappointing because there is almost no CV input.
(Free VCV Rack is better around here)
However, the PSP module, which I'm still worried about purchasing, has a solid CV input, so expectations are rising and it's on the verge of popping up.
The problem isPSP moduleEven if I write this article, there is too little demand ...
(If anyone says you bought it, please contact me on Twitter or in the comments)

Comment