Overview
This is yosi from Chillout with Beats.
VCV RackThis is the XNUMXth article.
last time?Click here for the article
this time too, Mutable Instruments Was the baseAudible Instruments.
This is the last boss.
VCV Rack Module Segment Generator (Stages)
The person who follows me on Twitter wrote the Stages information in a timely manner, and I used it as a reference.
I can't catch up with my understanding at all.
First, the official explanation
A stage is a set of configurations for building a modulated signal.
Can generate complex multi-stage envelopes
A sequence of LFOs or some channels. Start with a 6-segment envelope and break it down into smaller, independent pieces.
The envelope is up to its smallest modulated atom
The D envelope.
Yes, I don't know.What is a multi-stage envelope?
For the time being, it seems that it can be used as an LFO, sequence, or envelope with 6 stages.
I will quote CLOCK FACE MODULAR STORE. (Thank you for the very easy-to-understand explanation.)
Stages is a modulator that combines six stages to create multiple envelopes, LFOs, and sequencers.A complex 6-stage envelope, one AD envelope and one 6-step sequencer are also possible.How to combine which stages is automatically determined by how you patch the gate jack.Also, if you use more than 1 stages, you can chain up to 4 Stages.
Each stage operates in one of the following modes and combines them to create a modulation source.
I don't understand this explanation well.
It seems that you can connect up to 36 in the real thing.
Segment Generator points
When using as an envelope
You can divide the segment at the position patched to GATE.
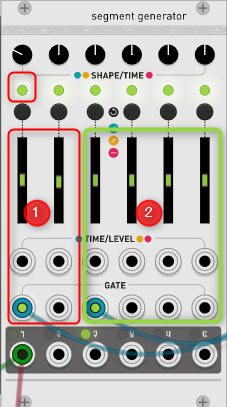
In the figure below, it is patched to Gate3, so the segment is divided into ① and ②.
First the LED It is the operation at the time of.
When the LED is green, you can move to the next stage smoothly.The time to move to the next stageCIt is determined by the position of the slider of.
If Gate inputs 1 and 2 are patched, Out of 1 will be decay.
(I'm not sure, but it's a decay, not an attack)
In the case of the figure below, segment ① is AD (attack and decay), and segment ② is ADSR (attack, decay, sustain, release).
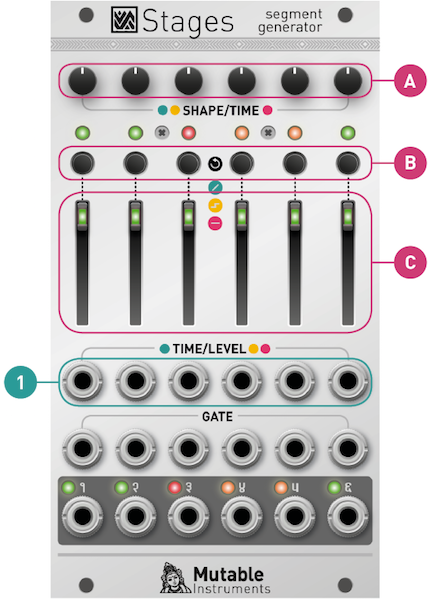
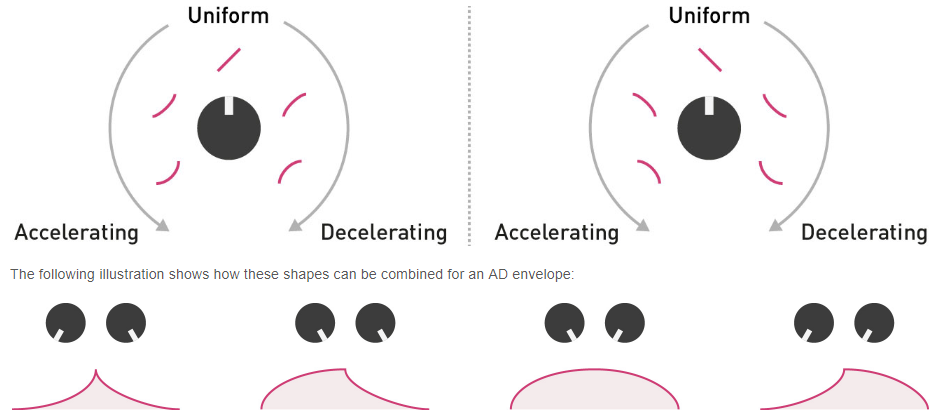
Above the LEDAThe knob can change the curve of the envelope.
Below is the difference between the leftmost and rightmost envelopes.
LED It is the operation at the time of.
When the LED is yellow, move to the slider position (0V to 8V) and keep it until the next stage.
The travel time to the slider positionAYou can change it with the knob.
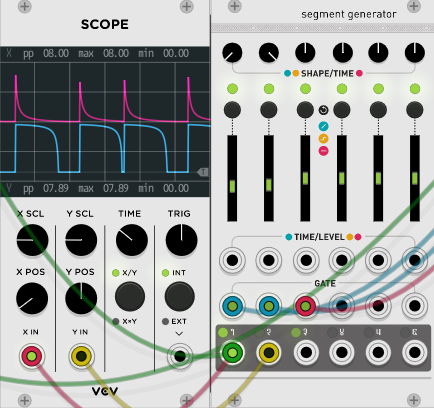
The knob position is output as it is as shown below.Therefore, you can create an envelope, or you can do something like a sequencer.
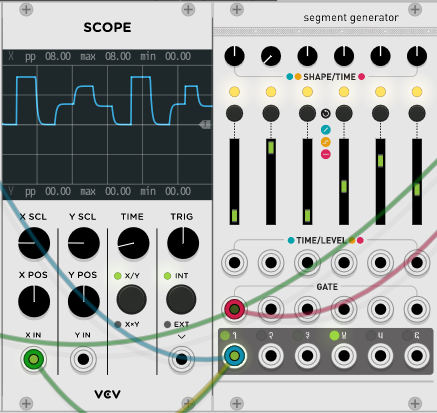
LED It is the operation at the time of.
When the LED is red, move to and maintain the slide position.
The length isAYou can change it with the knob.
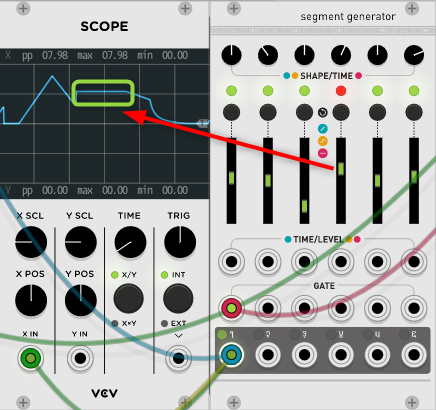
It doesn't come out even if I right-click, but there is something like a hidden command.
![]() Press and hold the button below the LED to blink.
Press and hold the button below the LED to blink.
When the LED is blinking, it is in loop mode.
It's a loop, but it can be mixed with the envelope, so you can make a pretty tricky sound.
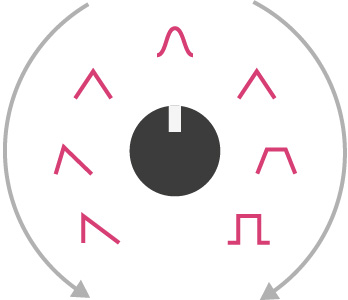
Loop speed with slider,AYou can change the curve with the knob as follows.
When using the Segment Generator as an LFO
The envelope is already close to the LFO, so you can use it as is.
However, it's not fun to make an LFO that can be produced elsewhere, so I'll show you how to create a slightly different LFO.
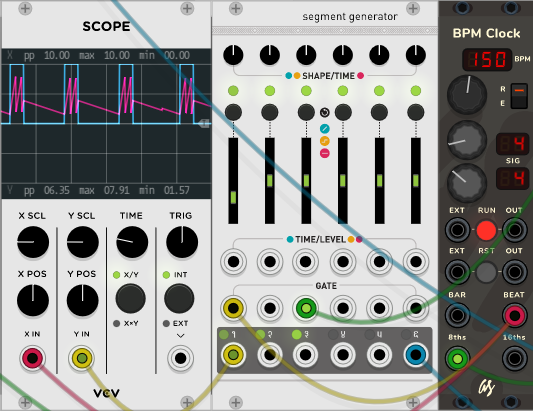
When combined with Loop, you can create the following LFO (I don't know if you can call it ...).
(You can create a tempo-synced LFO by putting the Clock in the GATE.)
Use Segment Generator as portamento (bonus)
I learned from the video on Twitter. (I was allowed to see it without permission ...)
I'll leave the name down for the time being, but I think that it will come out soon if you search on Twitter with this module name.You will study with a very detailed person.
LED And set the slider to the bottom.
Connect 1 to an appropriate oscillator and enter information such as the sequencer in Time / Level to complete.
You can make a nice sound with portamento.
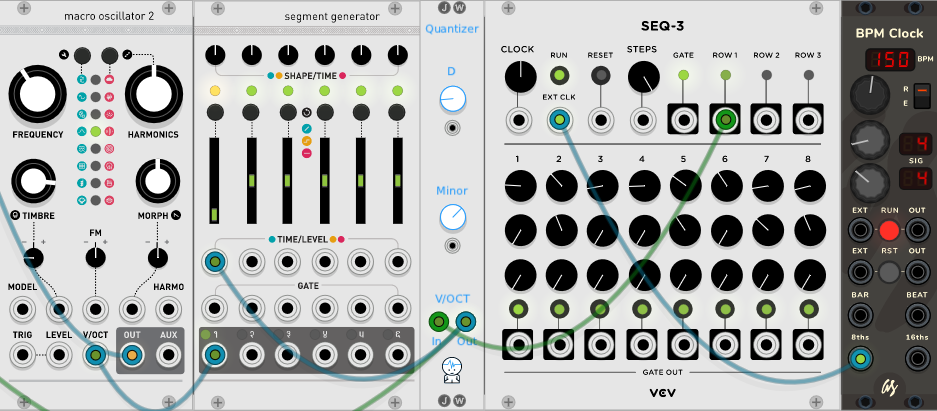
Below is a translation by Dr. Goolge. (Some corrections have been added)
Segment Generator Grouping segments
Whether Stages behave like six independent decay envelopes, one six-segment envelope generator, or somewhere in between, depends on which GATE input you patched.
Inserting a jack into the GATE input will result in a group of segments.All unpatched segments on the right will be part of this group.Generates the first output envelope signal of the group itself.Generates the following output segment activity signal – from 8V to 0V whenever the corresponding segment is active.
- If not patched to the GATE input, segments 1-6 are all independent free running segments.
- Two-segment envelope if GATE inputs 1, 3, and 5 are patched
- One 1-segment envelope and two single-segment envelopes if GATE inputs 5, 6, and 1 are patched.
- Six independent single-segment envelopes if all GATE inputs are patched.
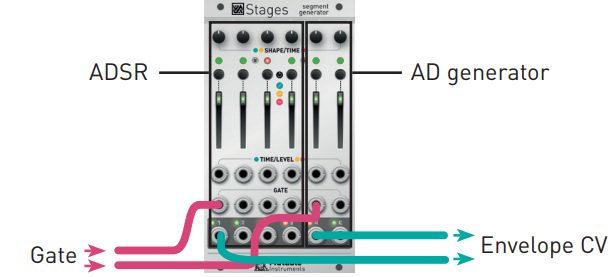
In the example below, it is patched to GATEs 1 and 5, so the left side is ADSR and the right side is AD.
A 1-segment envelope generator consisting of segments 4 to 1 and generating an envelope signal at output 4.
Segment activity signals at outputs 2, 3, and 4.
Independent 5-segment envelope generator consisting of segments 6 and 2 to generate the envelope
Output 5 has a signal and an attack end signal is turned on.
Output XNUMX.
Segment Generator CONFIGURING SEGMENTS
To change the behavior, press the button [B].
 RAMP: If the output is from one voltage to another, the next segment will be active.The ramping time is controlled by the slider [C] and CV input [1].The shape of the curve is controlled by the potentiometer [A].From logarithmic to linear to exponential.
 STEP: The output slides to the target voltage,
This voltage is applied until a trigger is received, after which the next segment becomes active.Like a sequence step!Voltage
(From 0V to 8V) Control with slider [C] and CV
Please enter [1].The amount of glide is set by the potentiometer [A].
 HOLD: The output remains the same voltage.
Adjustable length, and the next segment is active.
The voltage (0V to 8V) is controlled by the slider [C] and the duration of the CV input [1] segment is potentiometer [A].
![]() To loop the segment on its own, press and hold the B button.
To loop the segment on its own, press and hold the B button.
The LED flashes to indicate a loop.
Create a loop that spans multiple segments within the same segment
Group, press the first button [B] at the same time
The last segment of the loop The corresponding LED flashes
With a "ping pong" pattern.
To disable the loop, press and hold the Start or B button.
End of loop segment
Segment rules
1.The first RAMP segment ramps up to 8V.
No matter what level the output is currently at.
2.The last RAMP segment ramps down to 0V.
3. The level of the HOLD or STEP segment defines the start
The (end) level of the subsequent (preceding) RAMP segment.
For example, in the previous figure, the start levels for segment 3 and segment 5 are both set as follows:
Level 4 of the HOLD segment
4. If the end level of the RAMP segment cannot be determined
In Rule 1, 2, or 3, this level is explicitly set by the potentiometer [A].For example, in the previous figure, the levels of segments 2 and 5 are set by their potentiometers.
5. If LOOP is defined, the loop will play during GATE.
The signal is high. When the GATE goes low, the envelope advances to the segment that follows the end of the loop.If the end of the loop is the last segment.
And the loop goes on forever.
6.If the envelope contains STEP segments, until you are trapped in the first STEP
segment.Stay in this segment until the next trigger occurs.
received.When this trigger is received, it will proceed from it
To the next segment ... Until the last segment
You have reached the STEP segment.
If there is a STEP segment inside the envelope loop,
There is no way around this loop.
Segment Generator envelope example
Many envelope shapes can be programmed on stage. ![]() Represents the loop area.
Represents the loop area.
Classic ADSR envelope![]()
Classic ADSR envelope with adjustable pre-delay and initial levels.
AHDSR Envelope – Hold level and time are controlled by the second segment.
AD1D2SR envelope with a breakpoint between the vertex and the sustain. The second segment potentiometer [A] controls the voltage at this breakpoint.![]()
A more complex AD1D2SR1R2 envelope.There are breakpoints at both the decay and release stages.![]()
AD envelope![]()
The AR envelope sustain level is set by the HOLD segment.
A trapezoidal LFO with minimum and maximum levels set in segments 2 and 4, and a plateau period.Lamp time and curve set in segments 1 and 3.![]()
A three-note sequence with linear glide that can be adjusted between each step.![]()
Summary of VCV Rack Module Segment Generator
The last boss is too strong. (There is still something strange about the behavior when blinking red or blinking yellow, isn't it?)
And when I check other modules, there are still hidden command-like elements and it is a rewrite decision.
That said, this is the last article on VCV Rack.
(V1.0 will be released soon, so I will do it again at that timing)
Next, I will investigate what Reaktor's modularity is and what it can do, and write an article.
Comment